How To Repurpose Old Garden Tools To DIY A Creative Trellis

Replacing old garden tools is something that all gardeners have to do eventually, but before you chuck out the old ones, why not turn them into a charming DIY feature that will turn your backyard into a secret garden oasis? With a few pieces of wood and nails, you can create a garden trellis that is as practical as it is delightful. Allowing your garden tools to spend their retirement supporting the plants they used to help tend seems fitting, don't you think?
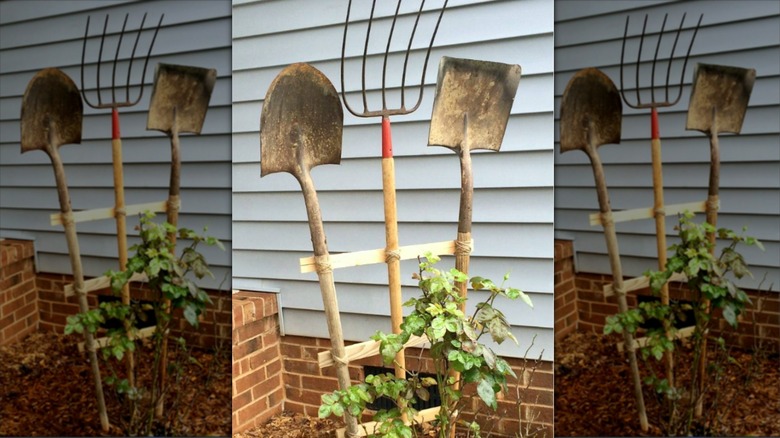
The first step to making a garden tool trellis is to sharpen the ends of the tool handles. Rakes and shovels work well for this project. Most of them have rounded handle ends for safe use, but sharpening them makes them easier to hammer the tools into the ground. Carve the ends to a sharper point using a knife or a small hand axe. Prevent injuries by cutting away from yourself. Once you've sharpened the end, arrange your tools so the longest one is in the center to anchor the trellis and keep it stable. The shorter tools should go on either side, slightly angled away from the center tool.
Use scrap strips of wood as the cross-bracing, longer for the top and shorter for the lower sections. For a rustic feel, use strong tree branches instead. The braces run horizontally across all three tools. Nail the center of the longest strip to the tallest tool, then attach it to the two side tools. Angle the tools in a fan shape, and nail another bracing strip further down. Use jute string in a tight cross-tie at each join to prevent the sticks from moving. Once the structure is secure, it's ready to go into the garden for your climbers.
Creative garden tool trellis ideas to suit your space
Using the tools in their current state gives you a relaxed trellis that's perfectly suited to a cottage garden. However, if you're looking for a more elegant rendition of the concept, a paint job is the easiest way to make your trellis suit the vibe in your garden. Old metal tools often sport their fair share of rust, so follow these simple tips for painting over rust to get the best result. Whether you go understated black, a fresh metallic shade, or good old gardener's green, your DIY trellis is a coat of paint away from being perfect.
Another quaint idea is to use the flat area of a shovel to quote your favorite garden saying. Go with humor, such as, "I live in the Garden, I just sleep in the house," to give visitors something to smile at. Aim for cute whimsy with a sweet saying like "Everybirdy Welcome," or hang a metaphorical welcome mat with, "Come into my garden, my flowers want to meet you."
Hide an ugly corner by creating a curved trellis. For a smooth curve, use 5 tools and don't throw out that old garden hose — turn it into a genius DIY trellis instead by replacing the wooden crossbars with short lengths of hose. The trellis should stand securely when the ends are in the ground, but if it still feels a little unstable, insert curved lengths of wire into each piece of hose for shaping.