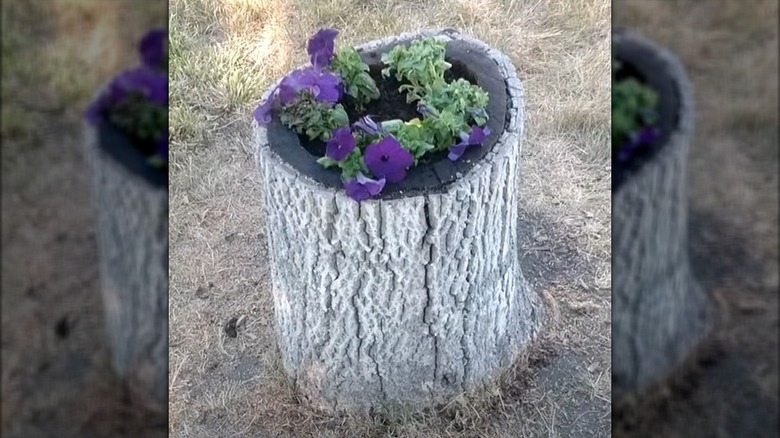
This Brilliant HGTV DIY Repurposed An Old Tree Stump Into An Adorable Planter
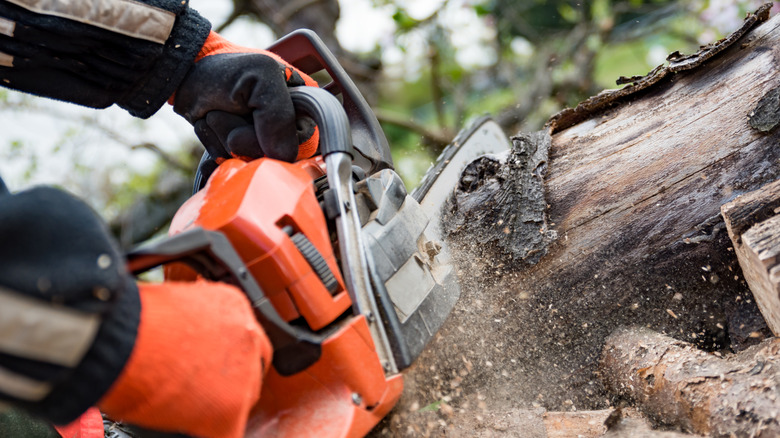
Timber! You've finally cut down that tree in your yard that's been dead for a while, and it's time to cut it up into manageable bits. Not all of it needs to be stacked on the wood pile, though. Is there a section that has a unique feature, like a burl or interestingly-shaped branch stubs? Or is one chunk so quintessentially "stumpy" that it pains you to split it into firewood? You can save a section to make a planter like the creatives at HGTV did; they removed the bark, hollowed out the center of the log, attached legs, and stained it. This project is doable without needing a lot of advanced skills. No matter which approach you take, no two stump planters will look the same. If you don't have an entire tree handy, you could always check online to see if anyone nearby is getting rid of downed tree wood.
Make your own planter à la HGTV with a chunk of tree trunk that's similar in width and height. The HGTV version shows off a lovely contrast of stained, nubby wood and sleek hairpin legs. However, any type of legs — or none at all — will contribute to a unique look. This is also a great opportunity to repurpose old furniture legs. As for tools, set aside a chisel, a hammer, a power sander or sanding block, and a drill. Other supplies depend on the size of your particular wood cut. You'll also need a paintbrush and a can of oil stain or varnish to keep the fruit of your hard work in beautiful condition.
How to hollow the trunk
Creating a cavity in a very heavy, dense log is easy to tackle with a chainsaw, but only if the stump stays secure while you cut. If it moves even a little, it's too dangerous to continue. For smaller pieces or stumps unsuitable to cut with a chainsaw, try a combination of a reciprocating saw, a tool worth investing in, or a drill with a Forstner bit, and a hammer and chisel.
Before revving up a power tool, don't forget to don gloves, eye and ear protection, and a dust mask. If you're able to use a chainsaw safely, you can go about the task a few different ways. If you are confident with the saw, make freehand cuts in a circular form, cutting out center chunks as you go. For a safer option, make five or six cuts that intersect at the center like a starburst. Continue making cuts in each section, and use the hammer and chisel to remove the pieces.
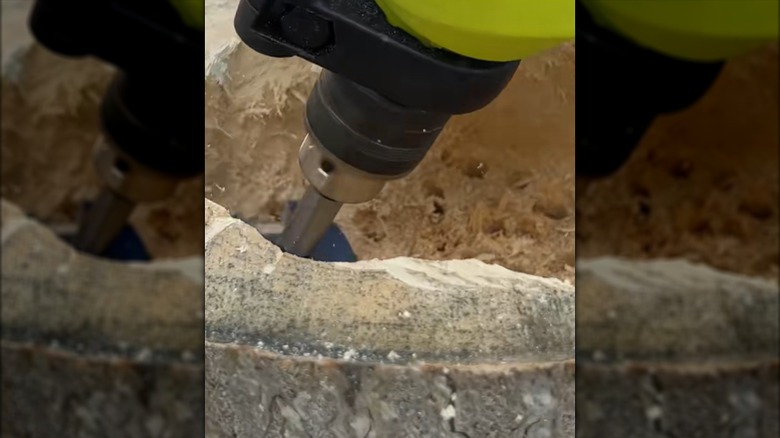
Without a saw, hollow the log by drilling multiple holes using the largest bit you have. Make the holes as close together as you can. Then, use the forstner bit or chisel and hammer to cut away the remaining wood. You may also want to use a U-gouge chisel to smooth away any unevenness.
Make your stump plant-ready
If a barkless planter is more your style, now's the time to chip off the bark. Using a chisel and hammer, carefully work the bark off in pieces. No matter the size of your wood piece, it'll need some drainage holes. If there's a lot of space between the hollow and the exterior of the log, you may need a drill bit extension to reach the hollow from the side. Drill two or three evenly spaced holes (more if the log is large) around the base. Angling the holes downward will aid drainage and may make them less conspicuous. Sand all of the surfaces if you removed the bark; if not, just sand the barkless areas.
Attach the legs if you're using them. Using three legs can help prevent the wobble caused by an uneven base. However, it may also make the planter easier to tip over. If you'd like the extra reassurance of four legs, you can use wood shims between the planter base and the legs to compensate for any unevenness; just make sure that the screws you use are long enough to reach through the shim(s) and anchor themselves deeply enough into the trunk for a secure hold.
Apply two coats of varnish over the exposed wood. You can treat planters with bark, as well. If there are any loose bits, remove them. Use a soft brush to sweep away dirt or dust, and cover the surfaces with a light coat of oil-based stain or varnish. Finally, fill the hollowed-out area with soil and plants that make you smile.