The Simple DIY That Makes Dollar Tree Styrofoam Pumpkins Look Way More High-End
We may receive a commission on purchases made from links.
When it comes to fall decor, a lot of options that you might find in stores look the same. Bright foam pumpkins, for example, are one of the staples of these seasonal decorations. While festive, these can sometimes feel a bit cheap and gimmicky. So if you'd like to make basic Dollar Tree styrofoam pumpkins into something a bit more high-end, which you can proudly display throughout the fall instead of just for Halloween, this DIY is for you. With a bit of yarn and a hot glue gun, you can turn these basic seasonal decorations into something that looks straight out of a magazine or fancy boutique without breaking the bank.
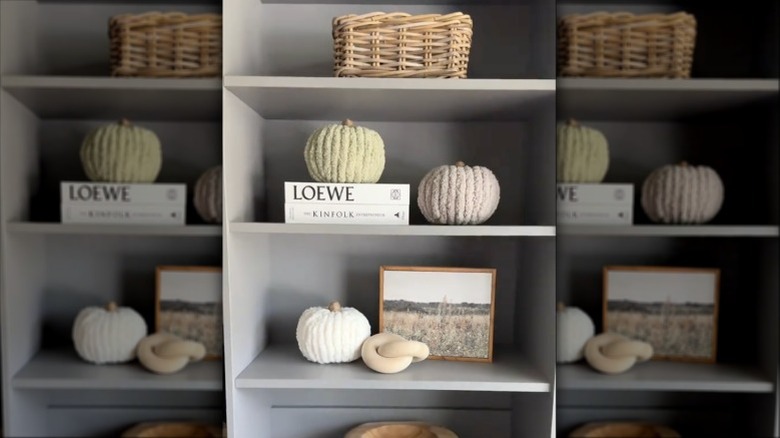
The idea for this DIY is to cover a bright orange styrofoam pumpkin with some fuzzy yarn and twine using hot glue, giving it a cozy, wholesome, and more neutral look that can blend perfectly with your decor. If you're looking for Halloween decor ideas that aren't just black and orange, this is the high-end DIY for you. And because it's not bright orange, it's a subtle way to transition into fall decor as early as September.
To do this hack, grab a Carvable Foam Pumpkin and a roll of Premier Just Chenille White yarn from Dollar Tree. Chenille is best because it's fuzzy and can therefore cover the styrofoam more effectively while giving it that fluffy look. Of course, you can also try to get your yarn collection under control by using some old rolls lying around. Whites, creams, and pale colors work well for this DIY, but you can experiment with darker ones as well, like black, brown, or burgundy. Finally, get yourself a roll of Crafter's Square Natural Jute Cord. All of those supplies will only cost you about $4 from Dollar Tree.
How to DIY a yarn-covered foam pumpkin
To do this hack, grab your pumpkin and pull on the stem to remove it. It should come off easily because it's simply attached with a small wood piece the size of a toothpick. With your hot glue gun, attach a piece of jute cord to the bottom of the styrofoam stem piece and gently wrap it around it to cover it completely. Cut off the jute cord when you're done, and set the stem piece aside.
Then, grab the stemless pumpkin. Create a vertical line with hot glue that goes from the bottom of the pumpkin to the top. Then, press some yarn onto the glue. Repeat this step, going up and down the pumpkin, until you've covered the entire thing. This technique, rather than going around in horizontal lines, will help maintain the texture of the pumpkin even when it's covered with yarn. When the pumpkin is fully covered, cut off the very end of the yarn and let the glue dry for five minutes or so.
To finish up, grab a long and pointy object, like a pair of scissors or a screwdriver, to add the finishing touches. With the pointy tool, poke the yarn into the styrofoam wherever it sticks out, especially at both ends where you cut the yarn. You can do the same thing with the stem part, stabbing the end of the jute cord into the styrofoam to make it look seamless. And finally, just add the stem back at the top of the pumpkin with the wood piece it came with, and you're done. Do this DIY with as many pumpkins as you'd like, alternating yarn colors, or try experimenting with larger and smaller ones, like DomeStar's White Foam Pumpkins, to create a collection.