Dupe Hobby Lobby's Pricey Fall Planter Box With A Budget-Friendly DIY

Regular Hobby Lobby shoppers know that it's a great place to shop when looking for outdoor fall porch decor — decorative flower boxes that shout out a warm welcome are a popular option. Unfortunately, at nearly $80 a piece, the front door decor pieces may land outside of your financial comfort zones. But crafty Hobby Lobby shopper aren't deterred by this. Instead, they use the Hobby Lobby's fall planter box as inspiration for a piece they'll DIY for themselves.
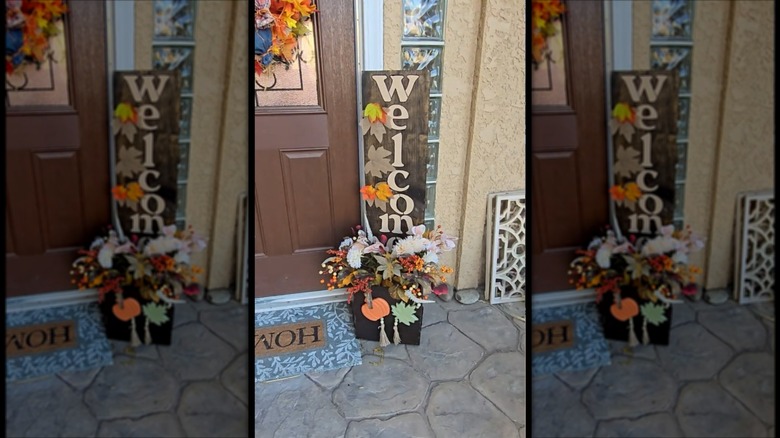
The planter box has four sides that are of equal length, around 12-inch by 12-inch. However, you can adjust the dimensions to fit your preferences. The back side is significantly taller, around 12-inch by 4-foot. This is the sign portion. Home Depot sells pre-cut boards in those sizes. You'll find the 12-inch by 12-inch board for less than $6 a piece. The 12-inch by 4-foot board will set you back $13 and some change. The taller board is thicker – 1-inch versus ¼-inch. This isn't a bad thing, however. The extra girth gives the board a base to stand on.
Hot glue, a hot glue gun, and E6000 3.7 industrial strength adhesive for crafting are the tools you'll need to paste the boards together. You'll also need some stencils, paint brushes, and paint for the greeting that goes down the front of the taller board and some green floral foam and faux flora in fall colors. If you'd like to add more decorative elements, head over to your favorite DIY craft store or to the Dollar Tree. You'll find items like hang-able fall-themed beverage decor and fall icons with tassels. Finally, grab some wood stain to turn the decorative piece a nice chocolate brown.
Assembling the dupe Hobby Lobby fall planter box
It's easiest to start this DIY with the staining. Do this before you assemble the box. Next, you'll glue the four smaller sides of the planter box together with the glue gun or craft glue. One of the squares serves as the bottom of the box, and the other three create the front and sides. You'll need about 15 minutes for the glue to set, though it can take up to 24 hours for the glue to truly set. You'll press the boards together until the glue dries well enough for you to let go. For this task, you may appreciate some WETOLS corner clamps for woodworking. At just over $12, these clamps are a budget-friendly tool that makes it easier to assemble the DIY. You can also screw the pieces together if you want a sturdier box.
At this point, you'll have a three-sided box with an open back. Wait to add the taller board to the back of the project until after you've stenciled your greeting onto it. Words like "Welcome," your family name, or even your house number are appropriate here. If you want the words to be big enough to read from the street in front of your home, then they'll need to be at least 4 inches tall. That's the minimum size of most house numbers. You'll also only want to stencil the top 3 feet of the board since the bottom 12 inches will be hidden in the depths of the planter box.
After the greeting is stenciled onto the box, glue the taller board to the rest of the piece. Once it's dry, you'll place some green floral foam in the bottom of the box and add a flower arrangement made of faux silk flowers inside. Finally, glue the little extras from the Dollar Tree onto the planter box to create the autumn vibe.
Ways to uplevel the DIY planter box
If you'd like to use this planter box for more than just your fall decor, you'll need to make some adjustments to your construction methods. Instead of gluing the decorative Dollar Tree pieces directly onto the box, use some Melsan hook and loop tape to fasten the decorations onto the Hobby Lobby dupe planter box. You'll attach one side of the tape to the box and the other side of the tape to the decoration you'll hang on the box. If you do this, you'll be able to pull the holiday-themed decorative elements off the box and replace them with items that reflect the upcoming holiday. For example, once the season changes, you'd swap out your elegant fall pumpkin decor for some creative Christmas decorations, like bulbs and snowmen. This keeps the project both budget-friendly and seasonally relevant.
Finally, it'd be fun to use this planter box like you would a sandwich board if you're having a party. To make the switch, take some of the decorative pieces off the planter box and replace them with party, recipe, or menu signs. The simplest way to do this would be to fasten some Tool Bench removable hooks from the Dollar Tree to the taller back board and hang rustic fall recipe signs, also from Dollar Tree, on the hooks to give your guests a look at the goodies to come.