12 Beautiful DIYs To Refresh Outdated Wood Cabinets (Without Paint)
We may receive a commission on purchases made from links.
Real wood is one of the most popular cabinet materials; its versatility and sturdiness make it ideal for refinishing and doing DIY updates. Many people upgrade outdated wood cabinets by painting them, but it's not always possible. Whether you're renting or simply don't want to deal with the hassle of painting, rest assured that there are other ways to refresh cabinets.
We've rounded up some of the DIY-friendly alternatives that will make a big visual impact on your space, sans paint can and brush. These simple projects, which can be as simple as adding LED strip lighting or as involved as replacing the doors entirely, allow you to choose your own adventure and personalize your cabinets based on your needs and design preferences.
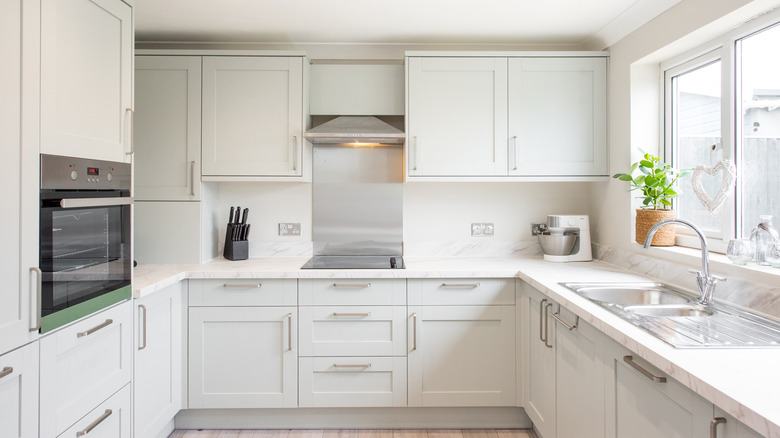
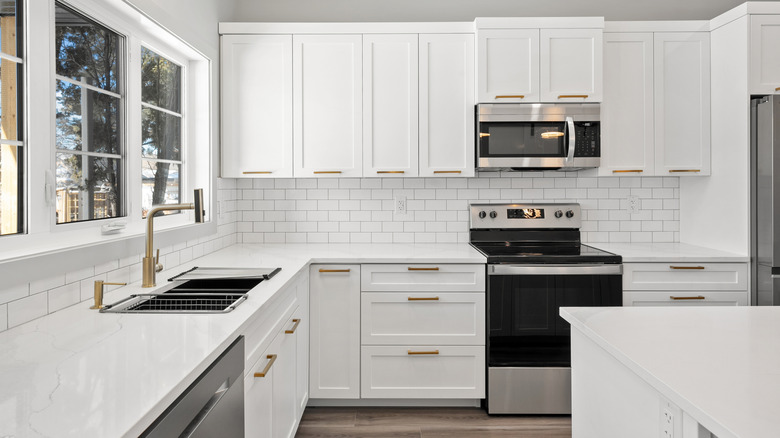
Install new cabinet hardware
Updating your cabinet hardware is a well-known upgrade hack for good reason — it's a small project, but it can make a big difference. Hardware is like jewelry for your cabinets: It's a seemingly minor detail that can affect the overall style. This project is appealing because it can be a very affordable and easy DIY. For a small kitchen, it's possible to complete this project with a budget as low as $20 and an afternoon of work. If you match the old hardware type, meaning you don't need to drill any new holes, the project can be renter-friendly too.
There's a dizzying array of cabinet hardware available, and you'll find an option for any home decor style. To modernize old wood cabinets, consider sleek contemporary hardware, like the minimalist Amazon Basics Euro Bar Cabinet Handle or Amerdeco Cabinet Knobs. If you want to make bland wood cabinets more charming and whimsical, lean into a vintage-inspired style, like the Seimneire Ivory Pumpkin Knobs. Higher-end cabinet hardware can come in distinctive styles, like the elegant Rejuvenation Oval Cabinet Knob with Rectangle Backplate pictured. Also keep in mind that you can mix and match knobs, pulls, and rings for a highly customized effect. For even more hardware inspiration, consider these trendy cabinet hardware upgrades that make your kitchen look more expensive.
Remove cabinet doors to create open storage
There are a few reasons to consider open shelving in your kitchen. While not as open as traditional wall-mounted shelves, you can create a similar effect by taking the doors off your cabinets. If your cabinet doors are very worn out or feel completely at odds with your style, removing them might be the best option. This project is a good idea if you're trying to make your kitchen look more modern and minimalist, since clunky or more traditional wood doors can take away from the look. Open spaces also make the kitchen feel larger and more airy, especially if you take the doors off the upper cabinets. Lastly, this idea lets you put decorative dishware and other decor on display, allowing you to redecorate and update the look of your space — without having to install anything new.
This project idea is very cheap: If you have a suitable screwdriver, it might not cost you anything at all. Even better, if you don't like it or change your mind in the future, you can re-install the doors. It's a low-risk idea, so a good one to try if you're unsure of what you want to do. If you end up loving the door-less look and find no need to keep them, here are some crafty ways to repurpose old cabinet doors around the house.
Replace cabinet doors with curtains
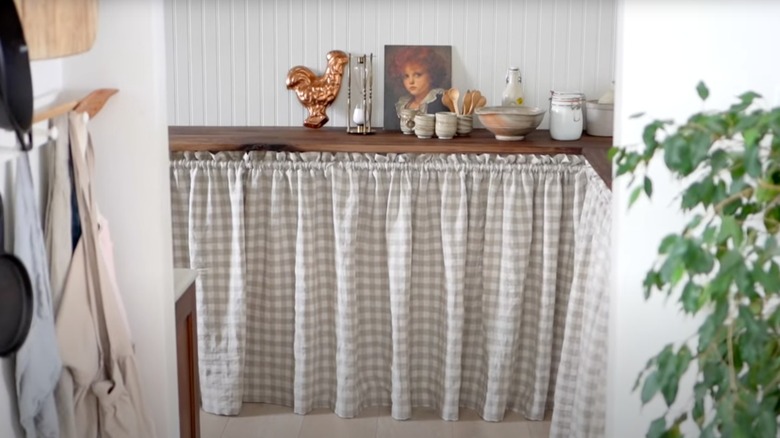
Replacing cabinet doors with curtains isn't just a budget-friendly and easy DIY project — it also looks incredibly charming. This project involves removing your current cabinet doors and installing small curtains that cover the area like a door. It still hides clutter, but looks a whole lot more endearing. The difference in overall look can be as dramatic as refinishing your cabinet doors (even more so if you choose patterned curtains), but for a fraction of the cost.
It's possible to use this idea on both upper and lower cabinets. Lower cabinets are the more common placement, especially for a rustic farmhouse look. There's also a variety of ways to install curtains. For one, you can buy and trim them, or find a sink skirt that might already be the right size. You can DIY your own, potentially by using one of these household items you should be repurposing into stylish curtains. DIY crafting and trimming options don't always require a sewing machine either, and you can use products like Aleene's Fabric Fusion Glue or HeatnBond Iron-On Hemming Tape for no-sew hemming. Rod options are also plentiful, and you can choose mounted rods that span over single or several cabinets, or tuck tension rods into individual cabinets (the latter option is renter-friendly).
Swap out old cabinet doors for new ones
Replacing cabinet doors is a simple swap to upgrade wood cabinets without using paint. Realistically, this project is about as big as painting cabinet doors. It requires quite a bit of work and is pricier than other options on this list. However, if your main concern is avoiding the mess of paint or its often-imperfect finish, replacement might be a good idea — especially because it makes such a big visual difference. Though swapping out the doors takes more money and work, the outcome often justifies the cost, since you can choose a completely new style — something that a layer of paint can't achieve.
Replacing your cabinet doors can make the kitchen look like it's gone through a renovation without having to rip out any existing structures. Often, it just involves using an electric screwdriver to remove old doors and mount the new ones. Just keep in mind that this project is best suited to frameless cabinet doors that have little to no frame visible. Otherwise, you might need to paint or stain the frame to match the new doors.
Add ambient lighting
Sometimes, the easiest way to upgrade the cabinet space is to upgrade the surrounding appearance — meaning you don't need to touch the cabinets themselves. This idea might particularly appeal if you're a renter. It's also a good one to try in combination with other projects. Adding ambient lighting can distract from and soften the look of outdated cabinets. After all, your dinged-up old oak doors will often look better in warm ambient lighting, rather than cold, clinical overhead lights.
Best of all, this is a budget-friendly and easy DIY. LED strip lights are a popular product for this project. Strips from brands like Govee are affordable and include adhesive. This product's colors can be controlled via your phone – even better for setting an aesthetic. There are a few spots where you can stick one of these light strips. A common option is under cabinets, whether that's under upper cabinets to illuminate counters, or under lower cabinets as toe-kick lighting. If there's a gap on top of your cabinets, you can try adding LED strip lighting there as well.
Install peel-and-stick wallpaper
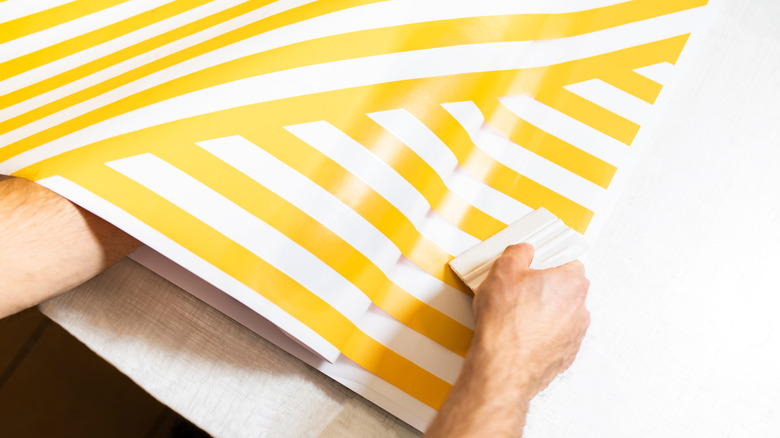
Peel-and-stick products are a mess-free alternative to paint that can be used on kitchen cabinets as well as walls. Peel-and-stick products are ideal if you want to change the color, pattern, or texture of cabinet doors. These wallpapers can mean a new hue, without the prep, mess, and texture of painting. They also offer a lot more pattern options that can't be replicated with paint. This renter-friendly alternative can conceal the grain pattern of outdated wooden cupboards with ease.
Peel-and-stick products are popular and plentiful. You can use any peel-and-stick contact paper or wallpaper that is suitable on treated wood. To modernize old wood cabinets, consider the Latitude Run Solid Color Matte Wallpaper; it's a good choice to cover wood grain and create a minimalist look. On the other side of the spectrum, peel-and-stick application is a great way to incorporate fun and eye-catching patterns. Rebel Walls' Happy Stripes Wallpaper and Chasing Paper's Flora Plaid are two examples of patterns that can dress up old cabinets.
Decoupage cabinet panels
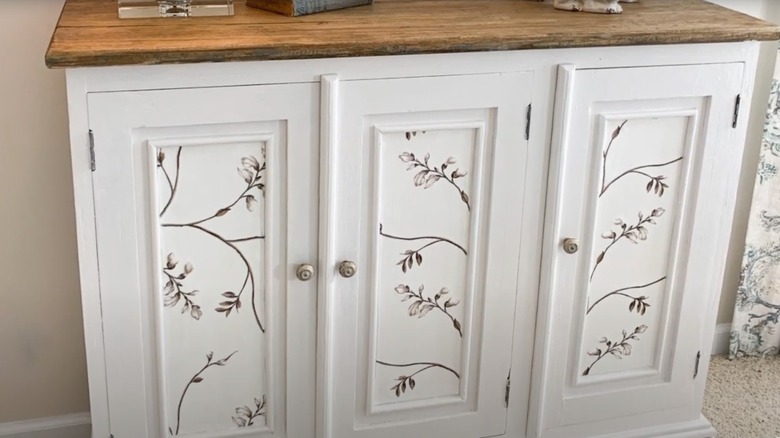
It's simple to turn your furniture into a DIY piece of art with decoupage. You can apply decoupage to many surfaces, including kitchen cabinets. It's even possible to decorate countertops with decoupage if you want them to match. Decoupage opens up the door to so much creativity since you can use pretty much any paper or fabric. This flexibility gives kitchen cabinets a totally custom look with little effort. A thicker fabric is especially good at hiding dings and chips in the wood. The process feels like an art project, and the potential for artistic interpretation is great for creative types.
Decoupaging cabinets is a budget-friendly project too, since you'll just need enough of your chosen material and Mod Podge to seal it. This is a wonderful way to add a pattern to a middle panel of traditional wood cabinets. Of course, you can also choose to cover the whole door. For a more durable and long-lasting finish, cover the completed doors with something like General Finishes High Performance Water-Based Topcoat.
Add decorative trim
Decorative trim can transform the way plain wood cabinet doors look. Installing traditional face trim requires quite a bit of work, as it often involves painting the cabinets after they're mounted for the most seamless look. Luckily, there are some lower-effort alternatives, like staining or painting just the trim to match the cabinets. Yes, it involves paint, but it's much easier than painting the whole cabinet. Lastly, if you don't want to install trim on the front of cabinet doors, you can try trendy scalloped trim. It's great if your cabinets have a bottom lip to mount it to. Scalloped wood trim may come unfinished, so you'll likely need to add a stain or paint, or a peel-and-stick covering.
If you have common wood tones or white cabinets, you can find pre-painted or pre-stained trim to match them. This will get you the traditional molding look, sans paintbrush. If you're renting, you can consider a peel-and-stick product like the Jsiwoth Peel-and-Stick Wall Molding (using an adhesive product is also a lower-effort option for homeowners). Another creative idea is to add some metallic peel-and-stick trim for a bit of glam, like the Abyssaly Gold Contact Paper.
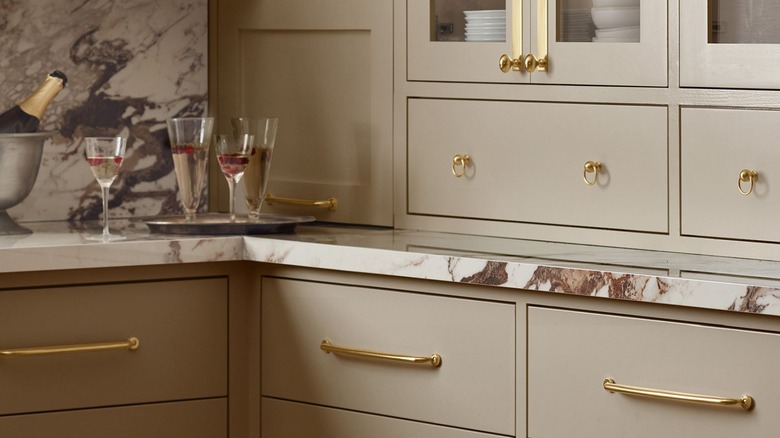
Install decorative cabinet hinges
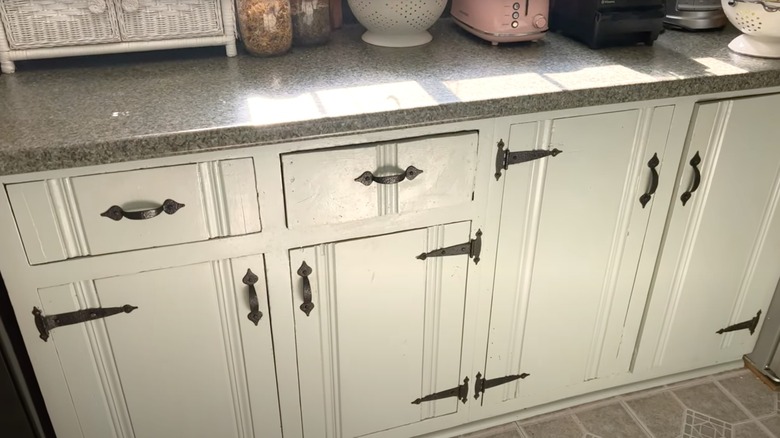
Replacing cabinet hardware is a popular way to update your cabinets' style, but this often focuses on knobs and pulls. You can also change your cabinet aesthetic with decorative cabinet hinges. This idea is best for kitchens with a rustic or old-fashioned style, as decorative cabinet hinges tend to lean vintage. Modern kitchens often have hidden cabinet hinges to achieve a minimalist look.
Some have subtle designs, only noticeable when you look closer, while others are larger and more eye-catching. Some almost look medieval in style with an ornate wrought-iron design, like these Black Wrought-Iron Door Hinges. A subtler example is the Amerock Antique-Style Cabinet Hinge, which doesn't attach to the front of the door like previous options but has a decorative piece that sticks out when the door is closed.
Update the toe kick
The toe kick is the recessed area below lower kitchen cabinets. It's easily overlooked, but it can have an effect on the look of your kitchen — if you want it to. Combine this idea with another on this list for more visual impact. At minimum, repairing a scuffed and damaged toe kick will make your cabinet area look more polished — and distract from outdated cabinet doors. For a more pronounced transformation, consider updating the toe kick in a new contrasting color or pattern. While it doesn't alter the cabinets themselves, this can give the area a visual boost.
If you want to skip the paint, you can refinish the toe kick with contact paper. Using colorful or patterned contact paper is an option if you want to update the look. Alternatively, if your current toe-kick cover is pretty damaged, you can replace it entirely with a pre-painted product, like the plywood Hampton Bay Avondale/Leyton Toe Kick, which comes in a few bold color options. Yet another avenue is to cover the area with adhesive baseboard moulding, which you can easily stick right on, like the Fonuno Vinyl Baseboard Molding Trim for a matte finish or the Sanbege Stainless Steel Toe Kick Cover for a metallic touch.
One more update you can make to this area is to install a decorative toe kick molding. It's another one that doesn't change the cabinet itself, but adds some adornment to distract from outdated finishes. If you have the tools, you can quite easily cut your own. If not, look for options like the Hardware Resources Pedestal Foot, which is pre-finished and ready-to-install on furniture projects.
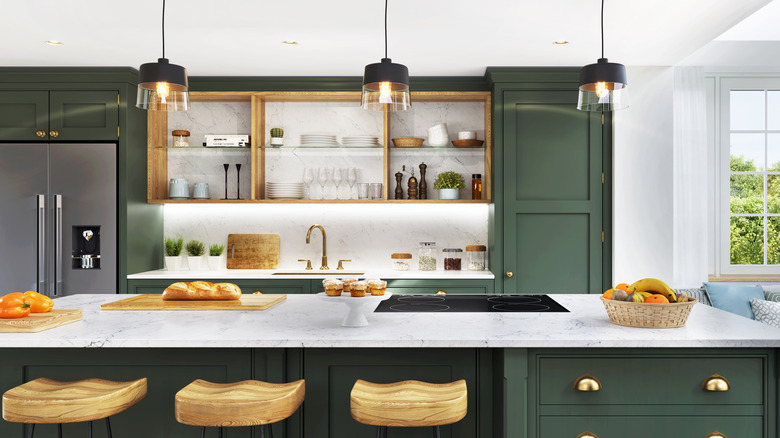
Add some corner shelves to create a contemporary look
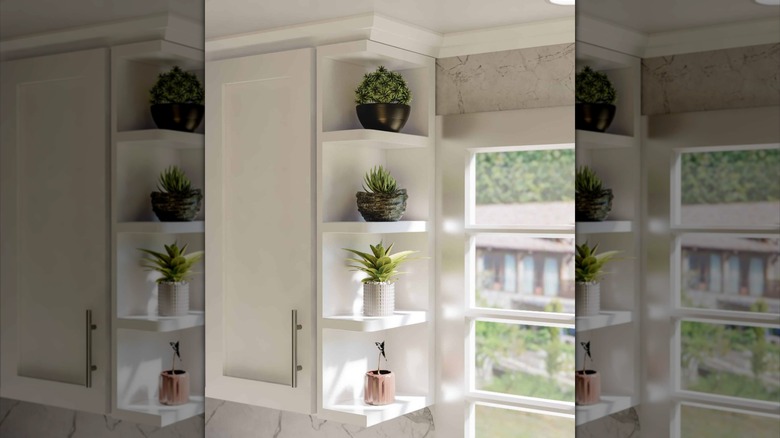
If you're hesitant to alter your existing cabinet doors, this is another idea that focuses on improving the area around them, in hopes of drawing attention away from outdated wood cabinets and refreshing the overall ambiance. Decorate open surfaces around cabinets to give the space a new look. To give yourself more surface area and a contemporary vibe, mount a corner shelf to the side of a cabinet.
Pictured is the Nelson Cabinetry White Shaker Open-End Shelf. You can also create your own layout with individual shelves, like the AmazingNextDoor Corner Floating Shelf. Either option is simple to DIY and install on the side of wood cabinets. Cover the shelves with plants, cookbooks, and decorative dishware, and guests will notice the decorations before your outdated cabinet doors.
Remove some of your dated wood uppers
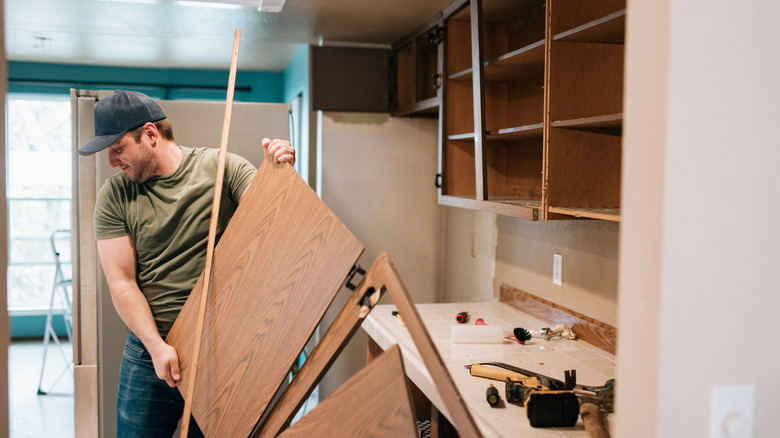
Sometimes removing cabinet doors isn't enough. The cabinet base can still make a kitchen feel boxed in and crowded. To really open up the space, remove some (or even all!) of your upper cabinets. If you're trying to modernize your home, this can help achieve the more open and airy layout popular for contemporary kitchens. Reducing the number of bulky, old wood cabinets will also lessen their dating effect. After all, you're taking out some of the elements that make your kitchen feel stale and tired.
@studio_chiodo Painting cabinets, refinishing cabinets, adding cabinetry... all things that take time, money & energy. After designing our own kitchen and having worked with many clients, it's obvious how much pressure there is to do a complete overhaul during a kitchen remodel! My favorite thing is to give permission to clients (and even encourage them!) to make other updates first, and then decide if they still want to makeover their cabinets. Because often times you can make a big change by updating other elements besides the cabinets themselves (hardware, lighting, paint, tile, counters, etc.). And save a lot of time and money doing so! In our kitchen we actually removed cabinets 😏 and tiled above the upper cabinets to add visual interest and dimension ✨ Of course, if your goal is to paint or refinish your cabinets, I'm all for that!! It's all about designing your kitchen to fit your unique needs 🥰 And if you need help doing so, I'm your girl! 💃🏼😉 The full blog post on our kitchen makeover is now on my website! Link in bio. #interiordesign #oakkitchen #oakcabinets #kitchendesign #kitchen #kitcheninspo #kitchen #kitchenrenovation #homedesign
Even if you're not going for a modern or minimalist look, removing some upper cabinets can have a positive effect. It takes them out of your sight line and makes them less of a focus. It also lets light bounce around the room more readily, a welcome change in kitchens that feel out of fashion. The open space left behind is useful and you can use it for open shelving, artwork, or a tall backsplash. Just be aware that you will lose storage space, so this idea is best suited for kitchens that already have an ample amount of conceal storage in the lower cabinets, or a roomy pantry that can handle some overflow.