How To Upcycle Old Books Into Charming Fall Decor On A Dime

We may receive a commission on purchases made from links.
Around here, decorating for fall is an event. With a pumpkin spice latte in hand, "Gilmore Girls" on in the background, and your favorite apple cinnamon candle, transitioning your space from summer cool to autumnal cozy is something to look forward to every year. But new decor doesn't always fit the budget. Instead of shelling out cash for the latest fall decor, repurpose those old books that you probably aren't reading anymore into a charming book pumpkin sculpture that brings warmth and charm into your home.
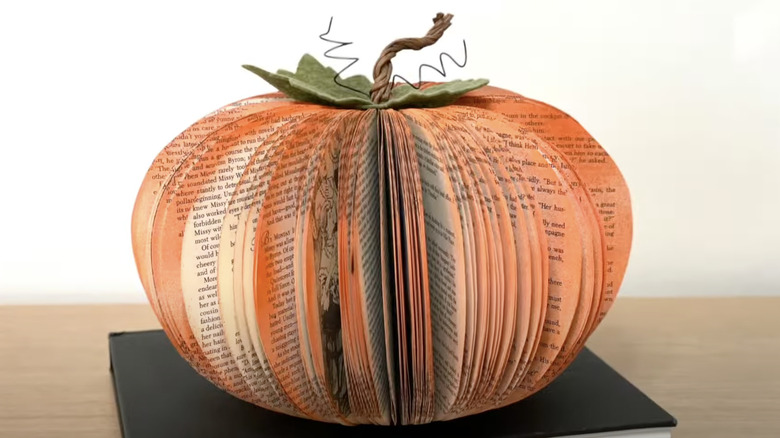
At its core, this DIY is fairly simple: remove the cover of an old, worn-out book, cut the pages into pumpkin shape, then glue the outer pages together, fanning the others out to create the sculpture. The real fun comes when it's time to decorate. A touch of paint, a cute felt flower, a velvet ribbon, or even some dried fall flowers can add a sense of your personal style while breathing new life into old or unused books. The best part? You can do this DIY for about the cost of the book and any crafting supplies you need (you probably already have most of them), like your trusty hot glue gun and scissors or craft utility knife. You'll also need cardstock for the template and your old book, of course.
Turn that old book into delightful pumpkin decor
Finding the right book to make your pumpkin is crucial. There are two elements to consider: the cover type and book size. Paperback book covers are easier to remove, coming off with a simple tear, while hardcovers need to be cut out. On the other hand, hardcovers have a stronger spine, which may help stabilize your sculpture. Both are great options. The deciding factor may be what you have on hand. Next, decide on the sculpture size. Larger books are perfect for centerpiece-sized decor while pocket-sized books create smaller sculptures, ideal for the mantel or place settings.
Once you've got your book, check the page size to gauge how big your template can be; the last thing you want is your template to hang off the side. Then, pick your shape. For a Cinderella pumpkin-inspired sculpture, draw a long, low half circle, almost like a cheese wheel. Draw a tall half circle for a more traditional pumpkin style. Maybe add a slight curve to the top of the template to mimic a pumpkin's ridges. Before you start cutting your template, check that the bottom of your template its bottom is straight and flat to ensure your sculpture has a solid base.
Now it's time to cut. Some DIYers use scissors while others reach for craft utility knives. The best tool for you is the one you feel can make the smoothest cuts. While it's tempting to cut large sections, work on around 10 pages at a time to get even edges and a smooth pumpkin shape, and use the template for each section. Once the pages are cut, glue the outer pages together to create your sculpture.
Budget-friendly options to personalize your book pumpkin
No book pumpkin is complete without a little decoration. If you love incorporating books as art in your home, you may want to leave the pages unpainted. For a little extra glimmer, use a glitter spray paint, like Krylon Glitter Blast spray paint, to just dust the edges. Want a little more color? Grab an acrylic spray paint, such as Krylon Short Cuts spray paint, and spray the edges with color. We love a black, orange, dark green, or even a vibrant blue to bring the fall tones into your space. You could also use a sponge brush to add acrylic craft paint to the edges. Group the pages in chunks and paint together to make it go a little faster.
Now for the stem. Some crafters use floral wire, like Decora 24 gauge green floral wire, but don't worry if you don't have it handy. Paint a cork or even a small stick a gorgeous fall color, and attach it to the top. For a little texture and a stunning scent, tie a few cinnamon sticks around the base, slide them into the gap, and hot glue them into place.
There are a lot of options to add final touches to your book pumpkin with items already in your craft cart. Cut leaves from fall-toned felt and adhere near the base of the stem. Use that spool of velvet ribbon to add a stylish bow on top, or swap it out for twine for a rustic look. Glue a sprig or two of dried pampas grass or bearded wheat for a look that lasts all autumn long.