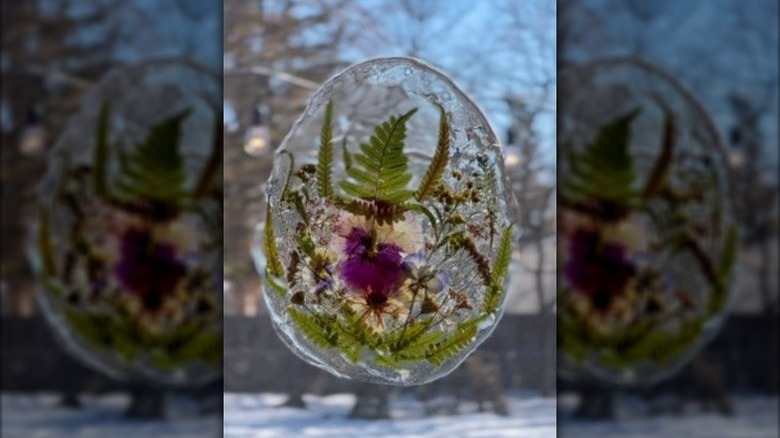
The Stunning Suncatcher You Can DIY Using Kitchen Ingredients And Dried Florals

For some people, the idea of DIYing home décor can be daunting. It's decidedly easier, however, when you can make something that curates a collection of pieces you may already have on hand. You might also find more inspiration for crafting if the DIY in question shows off your personal style and decorating preferences, isn't difficult to pull off, and doesn't come with a hefty price tag. All of these traits are embodied in crafty Instagramer northwoodsfolk's easy three-ingredient DIY sun-catcher, which is a whimsical recreation of the festive window clings commonly seen on store shelves or online during the holidays.
If you want to try out this beginner-friendly DIY at home, all you need is a gelatin or agar-agar powder, boiling water, and your choice of dried flowers and greenery. Get some food coloring in your choice of hue if you prefer a colored background. To remove excess moisture and help preserve your piece for longer, an oven or dehydrator will also come in handy. If you choose not to dry your sun-catcher, it probably won't last more than a few days before the materials start to deteriorate. For a personal touch, you could dry your favorite flowers to style in this stunning statement piece. Why toss the dead or wilting flowers in your vase when there are ways to repurpose them?
How to make a DIY sun-catcher using gelatin and dried florals
Before you dive into this project, there's one thing to keep in mind: be prepared to work fast. While it can take time for the sun-catcher to set firm, the thin layers you'll be working with initially set quickly. Start by boiling some water and preparing your gelatin or agar-agar. Follow the package instructions for this step, as the exact amount of water you need varies based on how much gelling product you use. After mixing your gelatin or agar-agar with your boiling water, add the food coloring, if you're using it.
Next, pour a thin layer of the mixture onto a smooth surface, being careful to avoid burning your skin. A clean heat-resistant mat or board is the best option. If you want your sun-catcher to have a dynamic ripple effect, pour the mixture onto parchment paper. If you prefer a smooth texture, avoid using this paper. While the mixture is still soft, work quickly to add your dried greenery and flowers. Then, pour on another layer of the mixture to seal it all in.
Drying your DIY sun-catcher and alternative ways to style it
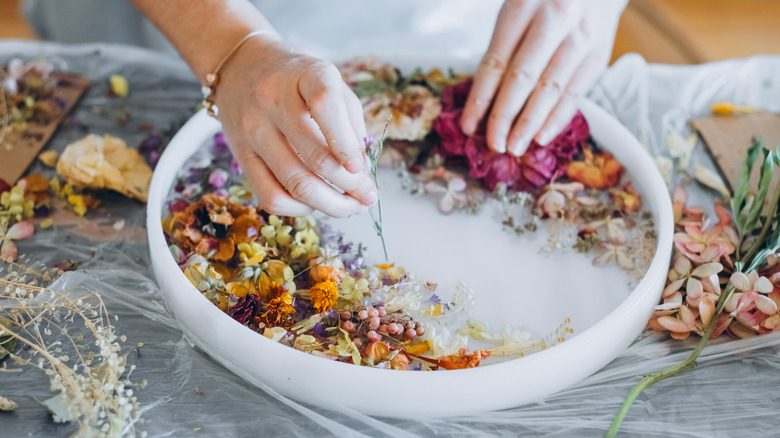
Before your sun-catcher sets, create a hole to hang it from or use cookie cutters to create a unique shape. Timing this is important. If you cut the gelatin or agar-agar too soon, it won't be stable enough to hold its shape. Alternatively, place the cookie cutter onto your pouring surface and pour the mixture into it. This will give your sun-catcher sharp, clean edges. Add the dried flowers and foliage directly into the mixture as usual. If you're worried about the gelatin sticking to a cookie cutter you use for baking, you could also use a silicone mold or upcycled plastic container lids.
If you're varying the shape of your sun-catcher, why not play around with what's inside it, too? Take inspiration from other budget-friendly DIY sun-catchers that anyone can make. Add beads, glitter, glass stones, or swirls of food coloring for a stunning project that's unique to you. Allow the sun-catcher to dry thoroughly in the sun, or pop it into a dehydrator or oven at the lowest setting until moisture-free. Keep a careful eye on your project so it doesn't burn. Your sun-catcher may lose some of its stickiness after dehydration, so you'll need to hang it from a string or use a washable adhesive to secure it to your window.