DIY Spooky & Stylish Front Door Decor Using Dollar Tree Supplies

Seasoned crafters know that displaying homemade holiday decor is almost as fun as the celebrations themselves. Here's an adorable project that's simple as pie — dare we say — pumpkin pie? With Dollar Tree wares and a short chunk of time, you can assemble three low-skill spooky season's greetings signs that spell out a command to trick or treat. Stenciled letters on Dollar Tree foam pumpkin halves, affixed vertically to wooden hanging signs, create enviable front porch signs: Flank your home's entrance with "trick" and "treat", and hang "or" directly on the door.
In our inspo video, the crafter behind the YouTube channel Glue Guns and Roses was lucky to find 24-inch-long wood hanging signs that each accommodate up to five halved pumpkins perfectly. But, if your local Dollar Tree doesn't stock these, you can still make a sign with a small tweak. Grab that green basket and load it with three 24-inch wooden signs (if you can find them); Mod Podge; glitter; orange, yellow or brown, and black paint and a brush; stencils; faux fall leaves; puffy paint in a few colors that will pop against an orange background; and six or seven Seasonal Collection Carvable Foam Pumpkins — the extra one is in case of crafting casualties.
Can't find 2-foot-long signs at your local Dollar Tree? Pivot with three Crafter's Square Wood Plank Hanging Decor pieces instead. Grab six pumpkin Halloween-Themed Foam Glitter Picks that fit better on a shorter sign. The remaining supplies are the same as the larger version. Also, set aside a serrated knife, a cutting board, a black permanent marker, a glue gun, and craft glue to help make this Halloween door sign come to life.
Prep your pumpkin signs
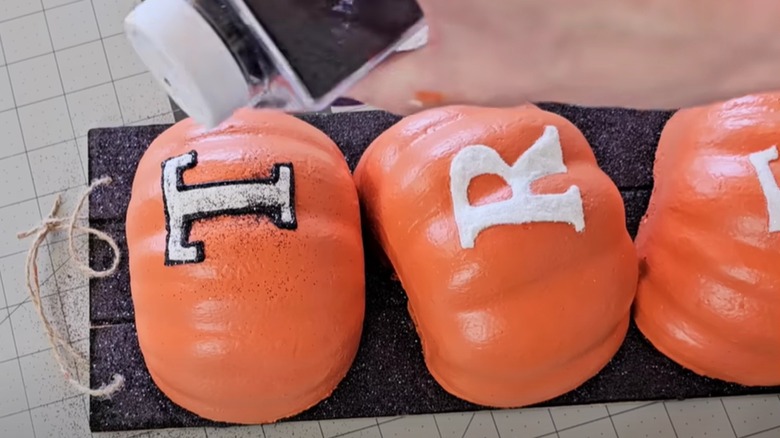
Before starting, if you have the smaller glitter-coated pumpkins, give them a quick coat or two of Mod Podge to hold the glitter in place. You can always add more glitter to the pumpkins at this point, as well, since it will stick onto the Mod Podge. Once the coating has dried, the remaining steps for both sizes of signs are essentially the same. Carefully pull out or cut off their plastic stems, and saw them in half with your serrated knife.
Again, in case of errors, it's smart to paint and/or stencil the pumpkins before gluing them to the signs. For solid orange pumpkins, you can use them as-is or give them a coat of paint, mixing some of the brown, orange, and yellow paints to add some dimension in the vertical grooves. Once dry, either free-hand thick lettering, or trace one letter stencil each in marker per pumpkin half, spelling "trick or treat." Fill in the block letters or add details to hand-written letters with black or white paint. If you ended up with the black-and-white small glitter pumpkins, choose another color that will stand out brilliantly against the neutral background; why not orange, purple, or neon green? Top the paint with a sprinkling of glitter while it's wet.
Mock up the pumpkins' spacing on each sign before uncapping the glue. Trace the shapes in pencil — not marker, as it might bleed onto the pumpkin — on the wood sign. Glue the halves in their outlined spots. If no crafting casualties befall you, give the leftover Dollar Tree foam pumpkin a major upgrade with a simple DIY.
Troubleshooting and finishing your signs
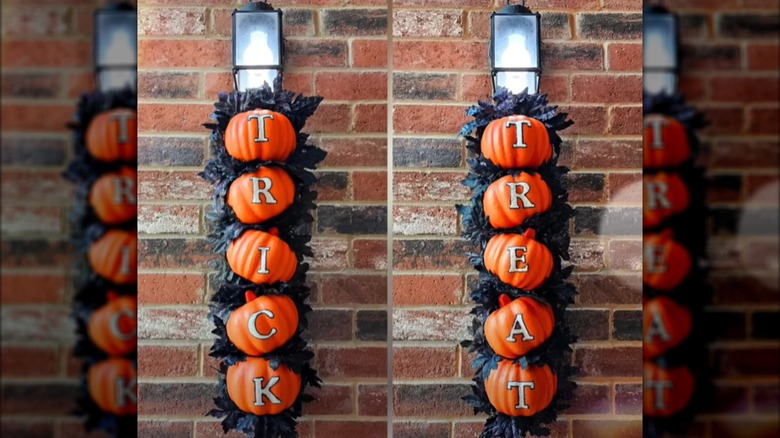
The "or" sign might perplex you, since the two letters leave lots of blank space on the sign. You can saw off part of the sign to give the two pumpkin halves similar margins on the sign as your other two signs. Or, you can center the two halves — one above the other — on it, and fill the remaining background with faux leaves or other embellishments.
While the craft glue firms up a bit, you have an opportunity to zhuzh up your faux leaves for an extra macabre effect if you so choose. Dab black paint onto each side of the leaves, and treat them to a dose of glitter. Sparkles are fun, but if you don't want to keep seeing them around your house for what seems like an eternity, set the freshly painted leaves inside a large bowl lined with foil or plastic wrap. After you've glitterized each leaf, fold the lining in on itself and toss it with little mess (hopefully). Once the paint has dried, a coating of Mod Podge on the leaves can also help hold the glitter in place.
After all glue, paint, and Mod Podge are dry, plug in your glue gun; you'll be attaching the leaves onto the sign, filling any gaps between the pumpkins along with exposed wood at the margins. You can consider yourself done at this point, but if you still feel the signs are lacking something, swap the twine hanger for a more "spirited" Halloween ribbon, usually available at Dollar Tree this time of year. Hang your creation where all can enjoy your perfect fall porch decor.