Say Goodbye To Mail Clutter With A Cute And Affordable Dollar Tree DIY Organizer

We may receive a commission on purchases made from links.
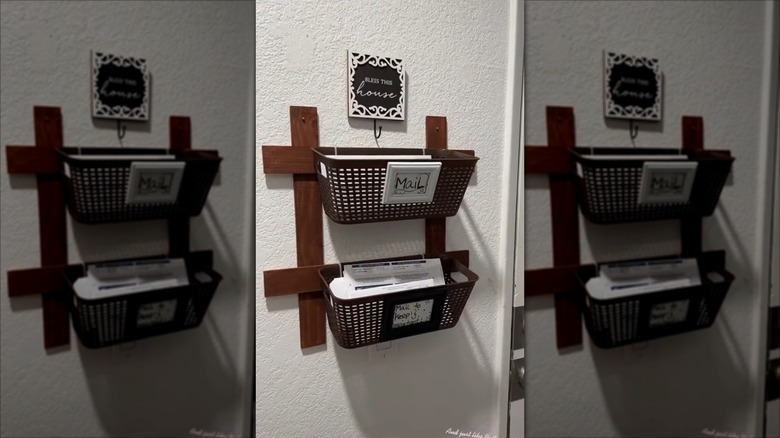
Of all the things that's likely to get cluttered in your house, your snail mail ranks right at the top of the list, second only to maybe single matchless socks in the laundry and dishes in the sink. Often, mail clutter stacks up because we literally don't know what to do with it, as we have no system in place. However, if you're a Dollar Tree crafter, you can make a mail organizer that not only gets rid of the clutter but is also cute and oh-so affordable.
Clutter can have a real impact on our mental health, with some people admitting to more bouts of the blues when their piles of stuff have grown beyond control. Thankfully, this project reins in your snail mail. It all starts with a couple of Essentials Plastic Woven-Designed Storage Baskets from Dollar Tree in the color of your choice. You'll build a frame for them out of four pieces of Crafters Square Craft Wood Planks. Since they're plain, the craft-loving side of you will likely want to spiffy them up a bit. Put aside some acrylic paint and brushes for this purpose. Two Special Moments Memories Collection Mini Gold Photo Frames, a black Sharpie, some cardstock, and a glue gun are also part of this project's facelift.
Finally, the project also calls for some practical items. Zip ties bind everything together into one cohesive piece, while a ruler keeps your measurements straight. Either a drill and some screws or a hammer and nails will help with hanging up your finished mail organizer once your crafting is done. You'll need a pair of scissors, too.
Fabricating your mail organization system
Begin the project by painting the craft boards. It'll be easier to work with them later if they're already painted rather than trying to work around their construction. If you'd like the baskets painted to match, switch from brush-on paint to spray paint. This creates a more even look and allows you to use fun colors in your decor, like Rust-Oleum Painter's Touch Gloss Apple Red. If you do spray paint, paint all the pieces before assembling the DIY.
Once the paint on the boards is dry, lay two of the craft boards parallel to each other. Try to get them as even as possible, using the ruler if you need to. This'll ensure that both ends of the boards run parallel to each other. Next, glue the two boards on top of the ones under in a cross pattern, forming a sort of 'hashtag' shape. Let the glue dry. Next, use zip ties to fasten the baskets to the top and bottom horizontal boards. Snip off the ends of the zip ties to make the piece look neater. Next, cut some cardstock so that it fits inside the frames. Once it's cut, write "Incoming Mail" on one card and "Outgoing Mail" on the other with the Sharpie. Slide those into the frames. Pull the stand off the back of the photo frames and glue them onto the front of the baskets with the glue gun. Finally, use a drill and screws or a hammer and nails to secure the organizer on a wall. Now you can keep your mail organized with this brilliant Dollar Tree hack.
Upping the cuteness factor of the mail organizer
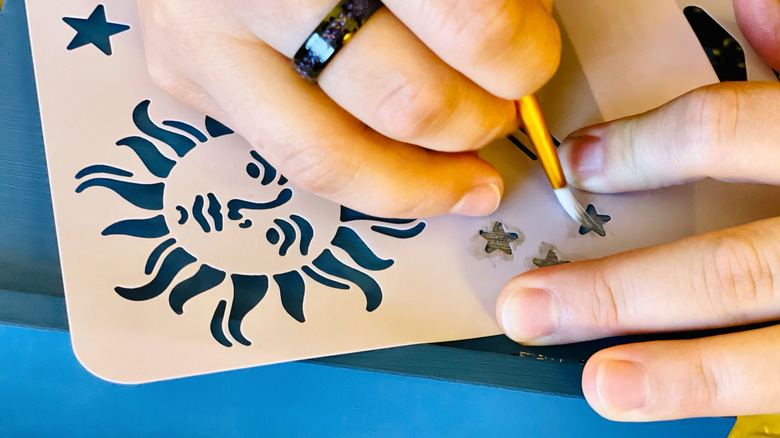
As it stands, this organizer has four pieces of wood that cross each other. If you move the two horizontal boards down a bit, you should have room to glue a third board at the very top of the organizer. Once that's set up, the top-most board becomes a great place for embellishment, using a stencil like the CrafTreat Reusable Postal Stencils for Painting on Wood on the wood. This labels the DIY mail organizer with mail-related decorative elements, adds more personality to the piece, and gives you a chance to introduce more of the colors from your decorating scheme into the project.
Another way to add a fun touch to this small-item storage idea would be to hang some Creaides Wood Arrow Signs on the baskets instead of the picture frames. If you're hanging the organizer by the front door, point one arrow at the door and label it with "Outgoing Mail." Point the other arrow in the opposite direction and write "Incoming Mail" on it. Again, stencils would make the imagery of the piece all the more lovely. As for fastening the arrows onto the baskets, zip ties could work here, or the ropes that the arrows come with.
Finally, consider tying a click-pen to a piece of twine or a Stylish Wooden-Beaded ID Lanyard and hooking the twine or the lanyard onto the wood frame or one of the baskets. This allows you to keep a pen handy when you get a piece of return-to-sender mail. Use the attached pen to label the piece with a return-to-sender or not-at-this-address label before it goes back into the mailbox.