Always Keep Your Kitchen Scraps, Here Are The Plants You Can Regrow
Before you slide those food scraps from the cutting board to the trash bin or compost, stop for a minute and consider that you could be throwing away free plants. Many fruits, veggies, and herbs have the ability to regenerate from the very parts we tend to discard, like roots, stems, bulbs, and even leafy tops. Instead of sending them to the trash, get them in the garden ASAP, as you could be looking at a whole new round of harvests that save you both money and a trip to the grocery store.
Regrowing plants from kitchen scraps isn't just a cool science experiment for kids, it's also a sustainable way to reduce food waste and free up some breathing room in your budget. The trick is knowing which kitchen scraps you can reuse and how to set them up for success. So, let's break down some of our favorite plants to regrow from scraps. We'll show you what makes them able to regenerate and even give a few tips for how to do it. Soon, you'll have a garden full of tasty foods that only cost you the price of the original plant.
Green onions are one of the easiest veggies to regrow
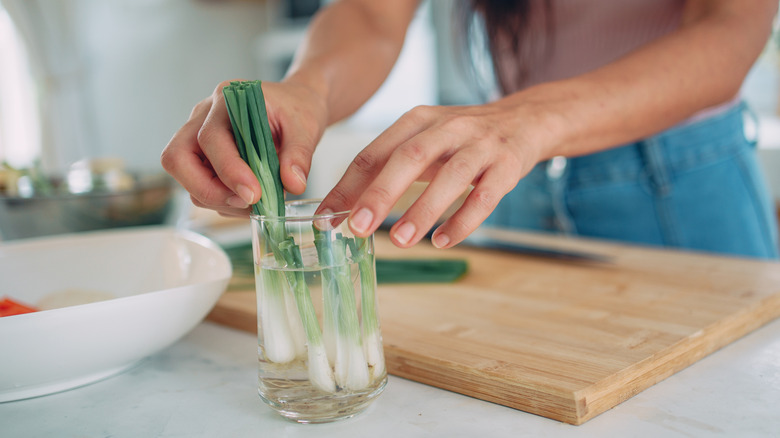
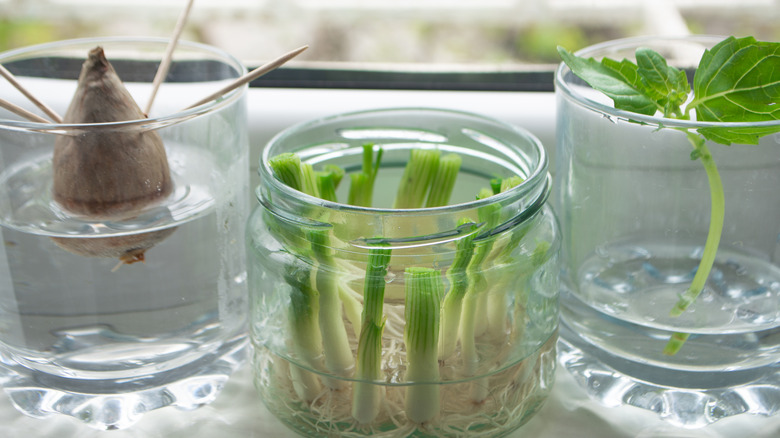
Green onions (Allium cepa) are one of the easiest kitchen scraps to regrow, making them a perfect go-to starter project. The grocery store onion's ability to regrow relies on their root system; as long as you keep the white bulb end with its tiny roots intact, the plant has everything it needs to regenerate. Snip off the green tops for cooking, then place the root end in a glass of water. Within a few days you should see new shoots begin to emerge. Since the roots are able to keep pulling in nutrients and water, they can keep producing for weeks, giving you a steady supply of fresh garnish.
For the best results, be sure to change the water every couple of days. This helps replenish the water's oxygen level and prevents algae from growing, especially if you have your propagations on a bright windowsill. Once the shoots reach a few inches in length, you can either harvest as needed or transfer the onions into soil for a stronger regrowth and longer lifespan. Keep trimming even if you don't need them right away, because it will encourage the plant to keep sending up new growth.
As long at the bottom is in tact, you can regrow celery
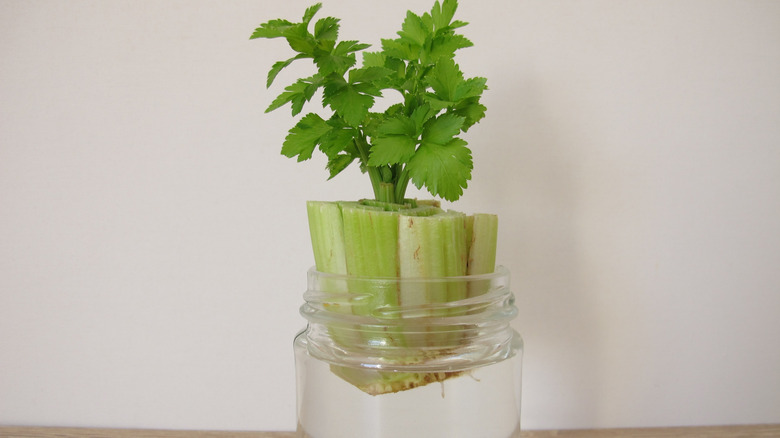
Celery (Apium graveolens) is another kitchen scrap superstar, and you don't need much more than the butt end of a store-bought bunch to get started. The plant's ability to regenerate from just scraps comes from the tiny growing point in the center of the base, so, as long as that core is intact, it has the potential to push out new stalks and leaves. Set the bottom in a shallow dish of water and within a few days you'll notice pale green shoots emerging from the middle.
Like green onions, the best results will come from a plant that has fresh water every few days and lives on a bright windowsill where it can soak up sunlight. Once new leaves and roots form, you can transfer it into soil for stronger growth and sturdier stalks. Celery stalks grown in glass jars may not reach the full size of supermarket bunches, but it's great for harvesting flavorful leaves and smaller stalks for soups, salads, or garnishes.
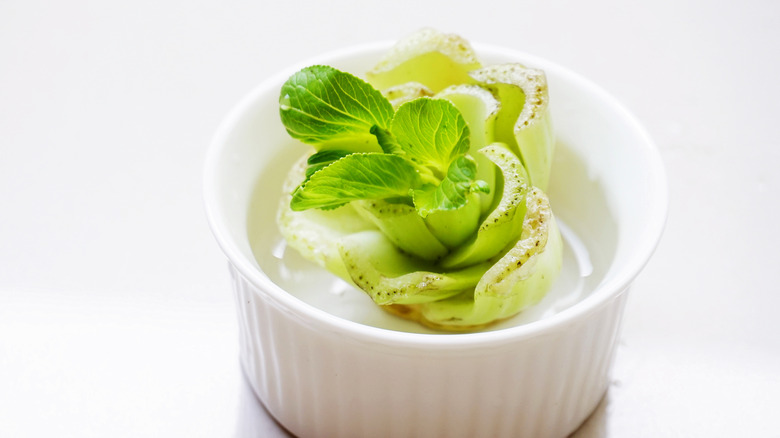
Leafy greens like lettuce, kale, and cabbages can regenerate from their core
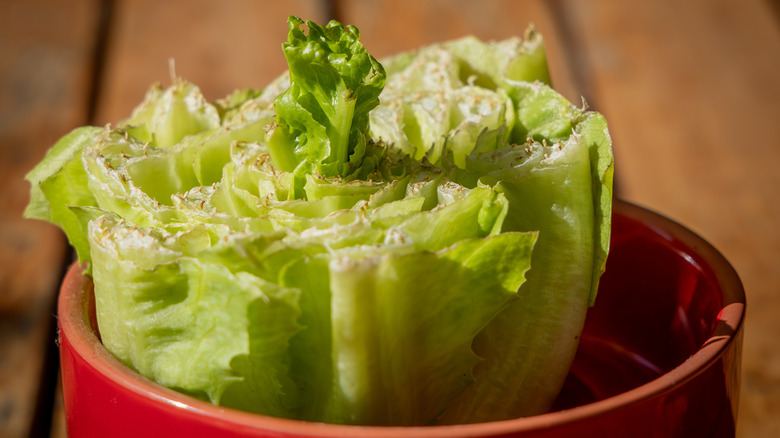
Leafy greens such as lettuce (Lactuca sativa), kale (Brassica oleracea), and cabbage (Brassica oleracea) can regenerate from their base, thanks to the dormant growth points tucked inside the stem core. When you trim off the edible leaves and keep a couple of inches of the stem intact, new foliage will sprout from the center. This is the plant's natural survival mechanism; even when its main leaves are harvested, it has the ability to regenerate enough foliage to keep photosynthesizing and stay alive.
However, think of these regrowths as "bonus greens," rather than full replacements. The leaves that emerge are often smaller and more tender, so harvest them young for the best flavor and texture. If you want to extend the life of your regrown greens, transplant the base into soil once new roots appear. Outdoors, they'll hold up better against wilting and may give you a second or even third round of usable leaves.
Germinate avocado pits by suspending them in water with the toothpick method
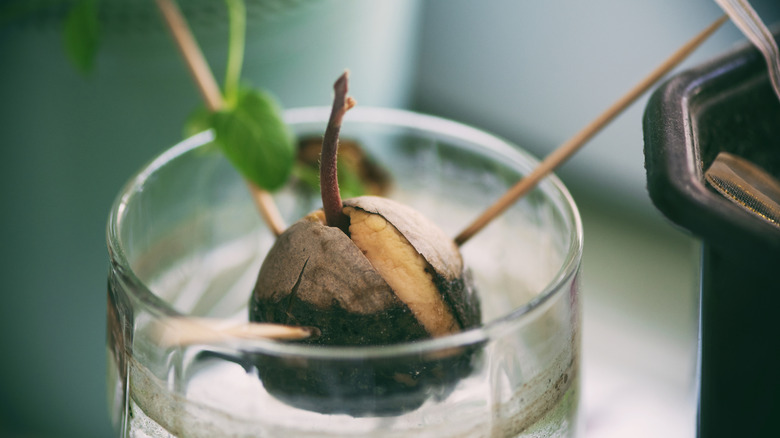
Avocados (Persea americana) are one of the most popular kitchen scraps to regrow, mostly because the process feels like a fun little science experiment. Inside every fruit is a large pit that holds the embryo of a new tree, and with a little help, it can sprout roots and shoots. The classic method is to suspend the pit over a jar of water with toothpicks, so just the bottom stays submerged. Within a few weeks, you'll see roots stretching downward and a stem pushing up, eventually giving you a young avocado tree you grew yourself.
One thing to keep in mind is that avocados are tropical trees, so you'll need to protect it from drafts or cold air. That said, there's an important caveat: Avocado trees grown from seed don't usually produce fruit identical to the parent. Many store-bought avocados are grafted varieties, so your regrown tree may produce something different, or nothing at all. If you're mainly interested in harvests, buy a grafted tree from a nursery instead.
The leafy crown, and the right environmental conditions, are the key to growing pineapple
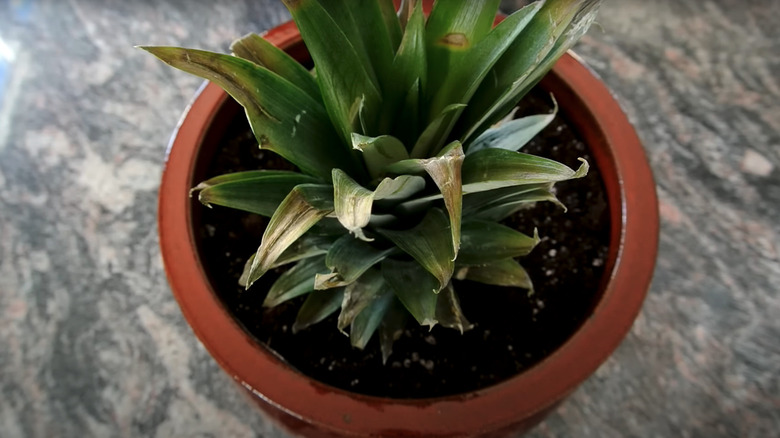
Pineapples (Ananas comosus) are another tropical plant you can regrow right from the scraps of your kitchen because the leafy crown at the top of the fruit contains a growing point that can grow into a new pineapple plant. All you need to do is twist or cut the top off a ripe pineapple, strip away the lower leaves to expose the base, and let it callous over for a day or two. Once it's dried out, plant it in well-draining soil and within a few weeks, and with the right growing conditions, roots will form and the crown will start to put out new growth.
Like avocados, pineapples are tropical, so they'll need protection from chilly air. They need consistent warmth above 55 degrees Fahrenheit, plenty of sunlight, and sometimes even controlled lighting indoors to trigger flowering. And while getting the top to root is easy, getting it to produce fruit is much trickier. Unless you have a greenhouse or live in a warm climate, it's best to treat your pineapple as a neat curiosity in your plant collection, rather than a guaranteed fruit source.
Potatoes can be regrown through the eyes they sprout
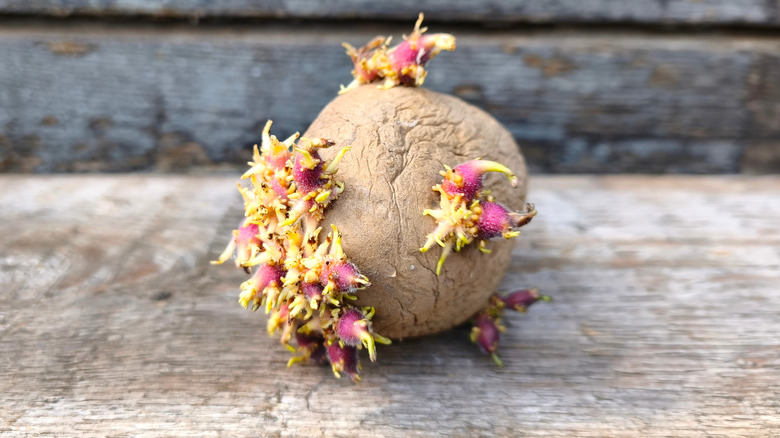
Potatoes (Solanum tuberosum) are classic candidates for regrowing from scraps, because each eye on a potato is a dormant bud capable of sprouting into a new stem. When planted in soil, these buds grow into leafy plants that produce fresh tubers underground. It's essentially the plant's natural cloning process: As long as an eye is present, the potato can regenerate an entire new crop without seeds. That makes potatoes one of the most beginner-friendly scrap projects you can try.
There is a catch, though. Most of the potatoes you'll find at the grocery store are treated with sprout inhibitors to extend shelf life, which can delay or even prevent regrowth. If you're looking for guaranteed results, choose organic potatoes or those specifically sold as "seed potatoes," which are untreated. To plant, cut a potato into chunks with at least one or two eyes present on each, let the pieces dry for a day or two to prevent rotting, then bury them in loose, well-draining soil. With consistent watering and hilling soil up around the stems as they grow, you'll eventually get a fresh harvest of spuds.
You can regrow sweet potatoes through two different methods
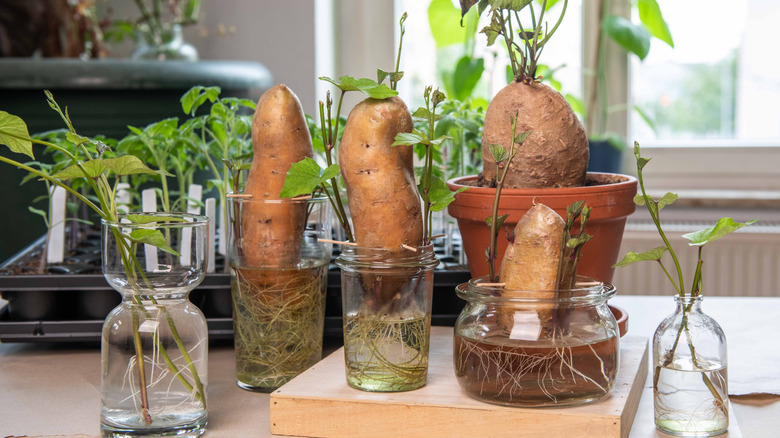
Sweet potatoes (Ipomoea batatas) regrow a little differently than their starchy cousins, but may also feel a bit easier to do if you have problems with rotting spuds. Instead of planting chunks with eyes, sweet potatoes produce sprouts called "slips" from the body of the tuber. Successfully starting new slips are the key to growing a new plant, and you can start them through either water and soil. For the water method, cut a sweet potato in half and suspend it in water with toothpicks so the bottom stays submerged, like you would with an avocado seed. Within days, roots and leafy shoots will start to appear from the top half. Or you can plant the entire sweet potato directly into soil.
If you're using the water method, once the slips reach about 4 inches, remove the and place them in their own glass of water until they grow roots about an inch long. At that point, you can plant them in soil. Like regular potatoes, store-bought sweet potatoes are sometimes treated with sprout inhibitors, which may delay the process, so organic tubers are a safer bet if you want reliable results.
Bok choy begins regrowing in no time
Bok choy (Brassica rapa chinensis) is one of the fastest-growing scraps you can revive. Like celery or lettuce, its ability to regenerate comes from the growing point at the base of the plant. If you save the root end with a couple of inches of stem attached, it can push out fresh leaves from the center in just a few days of sitting in shallow water.
To regrow successfully, set the base upright in a shallow dish with about half an inch of water, keeping it in a sunny windowsill. Refresh the water regularly, and once roots appear, transfer the bok choy into soil for stronger, more sustained growth. While you're not likely to get a full supermarket-sized bunch again, you'll harvest tender new leaves that are perfect for stir-fries, soups, or salads.
Place a piece of ginger in potting soil and watch it grow shoots

What makes ginger (Zingiber officinale) such a good regenerator is the that each "eye," or bud, on the surface of that knobby rhizome has the potential to sprout into a new shoot. Instead of cutting it up for recipes, save a chunk with a few healthy buds so that you can keep growing your own supply. Once planted, those buds will push up leafy stems while the rhizome multiplies beneath the soil.
To grow ginger from a piece of rhizome, you'll need to place it in a shallow container of rich, well-draining potting soil with the eyes facing upward. Keep it in a warm, bright spot and water lightly to avoid rot. Within a week or two you'll see shoots emerge, and as the plant grows, you can re-pot it into a larger container for more rhizome production. Ginger thrives indoors in cooler climates, so treat it as a long-term project and only harvest small sections as needed, so the rest can keep growing.
Grow onions by returning them back to the soil
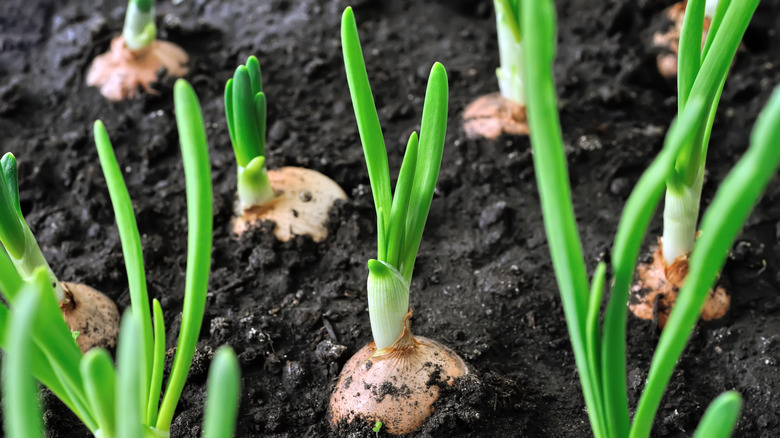
Onions (Allium) can regenerate from scraps too, though the process works a little differently than with green onions. Instead of sprouting directly from the roots, new growth comes from the basal plate — basically, the knobby, flat part of the bulb. If you save that section, the bulb will still have enough resources to push up new shoots and eventually form fresh bulbs. That makes onions a surprisingly resilient scrap to work with.
To regrow, cut off about a third of the bulb from the root end and let it dry for a few days until you notice the cut surface has begun to shrivel; this helps prevent rotting once it's in the soil. Plant it root-side down in a container or directly in the garden with about an inch of soil covering the top. You can harvest the green shoots as they appear or, if you're patient, separate the small buds that form at the base of those shoots and replant them individually to grow into full-sized bulbs.
Every clove of garlic has potential for new growth
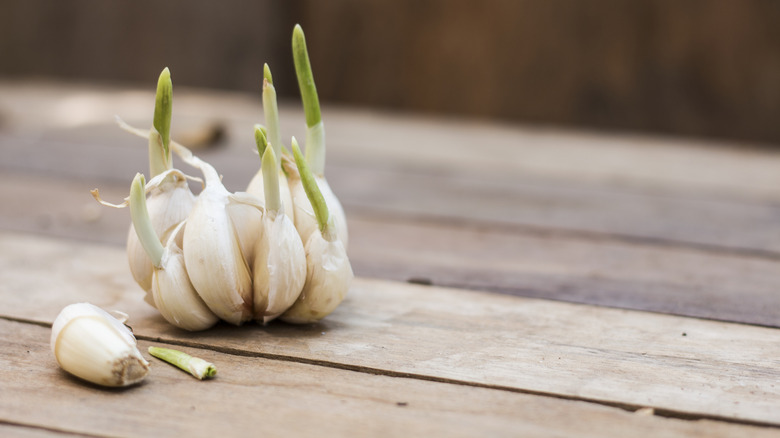
Garlic (Allium sativum) might be one of the most satisfying kitchen scraps to regrow because every single clove has the potential to become a whole new bulb. Each clove is essentially an untapped storage unit filled with the energy and genetic material the plant needs to regenerate. It's like getting one plant and finding out you got a few bonus baby plants for free.
To regrow, save a healthy clove and plant it root side down — pointy end up — about 2 inches deep in soil. If you're growing it outdoors, fall planting is best, since the cloves need a cold period to divide into full bulbs, which are ready to harvest the following summer once the tops yellow and flop over. If you're short on space, garlic can also be grown in pots indoors near a sunny window. The bulbs will be smaller, but you'll still have a steady supply, and you can always snip the green garlic shoots to use like scallions while the bulbs develop.
Strawberries are covered in tiny seeds you can plant to grow them

Strawberries (Fragaria × ananassa) work a little differently than the other plants on this list and they might seem like a trickier scrap to regrow, but we think it's still worth it. The secret to success lies in the tiny seeds dotting the fruit's skin, because each one has the potential to sprout into a new plant, given the right conditions. This is how strawberries naturally reproduce — spreading seeds that germinate once they've gone through cycles of moisture and drying, just like they would outdoors after falling to the ground.
To regrow from scraps, save the tops of strawberries (with a little flesh) and press them flat on a paper towel to squeeze out excess juice to prevent rot. Let them dry completely until the seeds fall away, then sprinkle the seeds over moist potting soil and cover lightly, keeping the tray in a warm, sunny spot. Another way to gather the seeds involves blending a few strawberries with some water for about 20 seconds or so. Then, let the mixture sit until seeds float to the top — scoop those out and discard them, as they are not viable. Run the remainder of the mixture through a fine sieve, collecting the seeds, then using them in the soil as discussed above.
Patience is key here because strawberry seeds can take a couple of weeks to germinate. Once they sprout, though, you'll have the beginnings of new plants. If you're more on the impatient side, you might want to skip this and opt for buying runners instead, but starting from scraps is still a fun way to turn leftovers into fresh food.
Root spare sprigs of mint, marjoram, thyme, and other woody-stemmed herbs
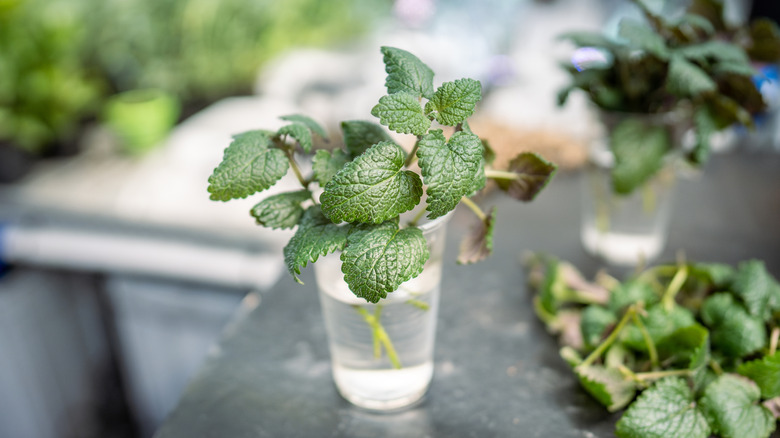
Fresh sprigs of herbs like mint (Mentha spicata or M. x piperita ), marjoram (Origanum majorana), and thyme (Thymus vulgaris) can regenerate into new plants, if you start with the right kind of cutting. Unlike leafy greens, these herbs grow from their nodes — those little bumps along the stem where leaves sprout. When a cutting is placed in water or soil, roots form from those nodes, allowing the plant to establish itself and keep growing. This is why some herbs, like basil and mint, propagate easily, while others like parsley or cilantro don't.
To regrow, take a 4 to 6 inch cutting from healthy stems and strip the leaves from the lower half — you don't want leaves sitting in the water or rot can set in. Place them in a glass of water in bright, indirect light, and within a week or two, you'll see roots begin to emerge from the nodes. Once they reach about an inch long, transfer them into soil for stronger growth. Keep the soil moist at first while the roots adjust, then harvest sparingly so the plant has enough energy to keep producing.