DIY The Cutest Raven Decor For Your Yard With Dollar Tree Supplies
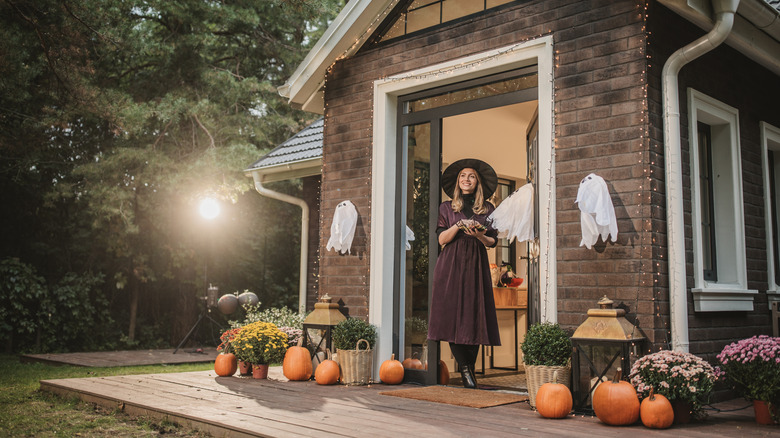
Fall, with its cooler temperatures and ever-changing scenery, is a thrilling time to decorate your home. The season offers endless inspiration, whether you prefer a harvest-inspired theme with natural elements like colorful leaves, pumpkins, and mums or you enjoy leaning into a classic Halloween look with playfully spooky accents, such as bats, black cats, ghosts, and goblins. Of course, you could splurge on the latest and greatest autumn decor. But if you're not careful, you may end up buried under the bills that come with it. Don't let yourself grow Instead, explore your creative side by trying a budget-friendly Dollar Tree project that turns wood pallets into cute fall decor, in this case a decorative DIY wooden raven that's perfect for the season.
Outside of the inexpensive Dollar Tree Crafters Square Wood Pallets, all you'll need to complete this project are fabric scraps and some basic crafting supplies. The best part? You get to decide the look of your raven. You could go eerie and Edgar Allan Poe–inspired or upbeat and whimsical — whatever matches your Halloween style. Once complete, your DIY raven will add some personality to your yard, porch, or front door. It's also one of those Halloween table decor ideas you can easily do yourself. Since the project is so affordable, why not make a few extras as thoughtful, handmade gifts for family and friends who also love a touch of fall fun?
How to make your own fall raven decor from mini pallets
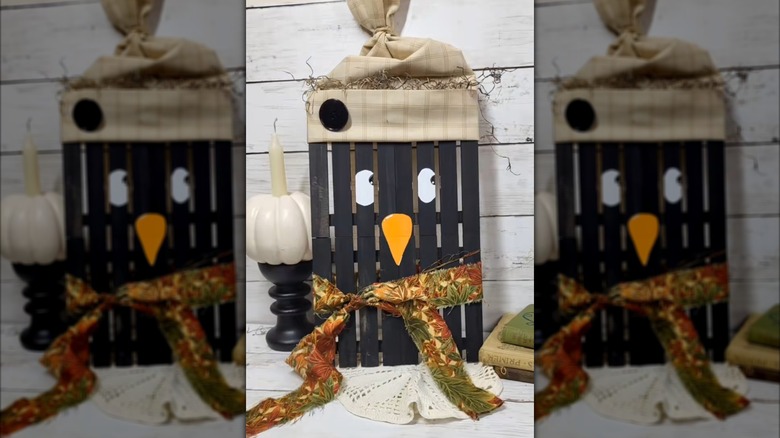
Ready to make this garden feature for a hauntingly beautiful outdoor space this fall? Start by lining four pallets in a neat rectangle, their sides touching. Where the sides meet, run a line of strong wood glue, like Gorilla Ultimate Waterproof Wood Glue, from one pallet over the seam and onto the next one. For a quick-setting hold to keep the wood in place while the wood glue cures, apply a bead of hot glue just above each adhesive line. Cut small squares from popsicle sticks, and press one over each glued seam to connect the pallets. Once the glue sets, mist the top surface lightly with water. Paint the pallets with black acrylic paint, and allow it to dry for at least 30 minutes.
@thediystruggle Grab these from Dollar Tree for an UNBELIEVABLY ADORABLE FALL DIY #cutecrafts #cutecrafts #craftideas #simplecrafts #dollartree #diyideas #dollartreecrafts #dollartreediy #thediystruggle
To make a scarf, wrap a narrow fabric strip around the bottom two pallets, and tie a bow at the front. For a rimmed hat, fold up the bottom of a large rectangular fabric scrap, place it across the top two pallets, wrap it to the back, and secure with staples or hot glue. Fill the hat with stuffing, such as LOKUNN Polyester Fiber Fill, and tie the top with twine. Add a pom-pom or bow if you like. Paint your raven's face with two big white eyes with black pupils and a large orange beak just below them onto the wood.
You don't have to stop there! With a few extra pallets, fabric scraps, and various paint colors, you can create a chilling menagerie of playful goblins, ghosts, or scarecrows. Paint these figures onto the mini wood pallets, and add embellishments like straw bows or faux flowers to make perfectly spooktacular decor to fill your yard or your home!