DIY Cute Wood Block Pumpkin Decor With Dollar Tree Supplies
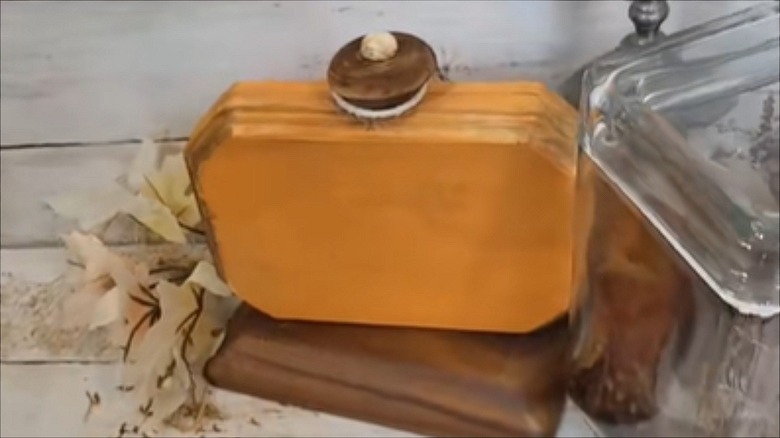
Halloween is nigh, and it's time to take stock of your fall decor. Do you have at least one pumpkin accent adding charm to an indoor or outdoor autumn vignette? Really, one is not enough, and you've got until at least Thanksgiving to bask in the orange glory. Instead of picking up a ready-made piece you could find in anyone's home, take on a super-simple project to make a rustic wooden pumpkin to steep your space in seasonal spirit from early September to the end of November. Not only is this wooden pumpkin craft simple, it's a budget-friendly Dollar Tree DIY that can give any room some fall feels. Two wooden plaques glued back to back, topped with a wooden "stem" and orange paint becomes an adorable tabletop decoration. A thin layer of paint lets the grain show through, and the wooden stem can show off as-is or sport a coil of wired twine from the floral aisle.
Grab that green DT basket and grab a couple of Crafter's Square wooden plaques with beveled edges, wood glue, and a bottle of orange paint. To make the pumpkin's stem, the 'Tree regularly has several wooden options in their crafting aisle, like Crafter's Square Wood Craft Cubes or a short cutting of a wooden dowel. You could also save your $1.25 and trim a piece of a found branch, or even make a stem from a wine bottle cork. TikToker TheDIYStruggle illustrates how to pull this faux gourd together.
Make a Dollar Tree rustic pumpkin in just a few steps
Head to the store for the makings of this easy and affordable Dollar Tree DIY that will add a rustic touch to your home this fall. If your local outlet doesn't have the wooden plaques, you can swap them out for another wooden item without too much alteration to the project. Their Special Moments Wood Clip Frames are on the smaller side of a substitution. However, given the hinged stand on the back, you can get away with purchasing just one frame rather than two plaques. (The two combined plaques give the pumpkin a thicker base so that it stands freely.) Also, this product is thinner and will look best with a similarly thin stem, like a small trimming from a branch.
Start by covering the backs of the two plaques with a generous amount of wood glue. Fit the two plaques together so that the edges match perfectly. Along one long side of the combined plaques, glue your stem piece vertically at the midpoint. Let the glue dry and cure before manipulating the piece too much. If you're impatient for the glue to dry, here are some tips to speed up the process.
Brush a thin layer of orange paint over the plaques' exposed surfaces, making sure to allow the grain to show through. If you're using the wood clip frame, remove the bow and clip before painting. If the spot beneath the clip and bow isn't smooth enough to look good without another accessory, like an oversized bow made with themed ribbon or a grouping of leaf-shaped Crafter's Square Wooden Shapes.