The Unexpected Way To Use A Dollar Tree Punch Bowl In Your Living Room

We may receive a commission on purchases made from links.
If someone told you that you could make a chic side table using Dollar Tree items, like punch bowls, you probably wouldn't believe them, right? But thanks to the internet, and how it connects us with creative people who know how to turn basic Dollar Tree items into high-end home decor, we're learning that these budget-friendly finds have way more uses than their original purpose. And yes, that includes building a functional side table with just a handful of Dollar Tree supplies, mostly clear acrylic punch bowls. We can thank TikToker Chontelle Phillips (@chontellemakes) for sharing exactly how to do this.
To create a stylish DIY side table, you'll need six 8-inch Clear Plastic Fluted Serving Bowls from Dollar Tree, one Plastic Oval Crystal-Cut Platter (or a similar clear platter from the store), hot glue, E6000 adhesive, and a small round LED puck light (optional if you want a light-up effect). Since selections vary by store, you can also use Carter's Corner Light Blue Plastic Bowls or any other clear plastic bowl that's a similar size, just avoid using anything that's too small to avoid having your table look miniature.
How to DIY a modern side table with Dollar Tree punch bowls
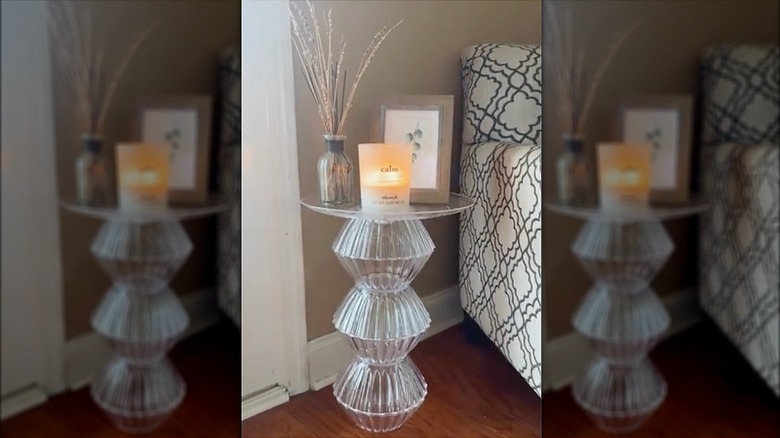
To DIY a decorative side table with Dollar Tree finds, start by placing one of your bowls right side up on the floor and run a line of hot glue around the rim. Then, place a second bowl face down on top of it. If you're using the fluted bowls like the creator did, make sure the pleated designs line up for a smooth, seamless look. Once the two bowls are joined, go over any loose spots with a bit of E6000 glue around the rim.
Next, take another bowl and glue it right side up onto the bottom of the bowl that's now facing downward, so their bases touch. Run hot glue around the rim and attach another bowl face down on top, creating your second tier. Repeat the same steps again to build a third tier. But before adding the final bowl, place your puck light inside the top bowl facing downward. Close the top two bowls with a small amount of glue, as the creator suggests, so you can easily remove the top bowl to replace the batteries. You can also scrap the puck light altogether if you plan to spray paint the table.
For the finishing touch, glue the clear plastic serving tray right side up on top. And remember, since the table is made from lightweight plastic bowls, it's not super sturdy. Consider gluing another plastic serving plate (right side up) to the bottom bowl and adding anti-skid pads, like Slipstick GorillaPads. Once it's assembled, finish it off with a coat of spray paint, if desired, and put it on display!