Bring Back Vintage Halloween Decor With This Charming Dollar Tree DIY
Nothing captures the whimsy and magic of Halloween quite like vintage-style décor. Simple yet distinct decorations from around the 1920s and 1930s feel like the embodiment of cozy, nostalgic, and spooky fall. If you want to tap into this style but don't want to fork over a bucketload of cash for authentic vintage pieces, there are plenty of craft projects that replicate that same old-school aesthetic. Looking for Halloween table décor ideas you can easily do yourself? If you're willing to put in a little time and energy, we have the perfect DIY for you to try. All you need to do is apply papier-mâché to Dollar Tree stacking pumpkins and paint on some old-fashioned faces.
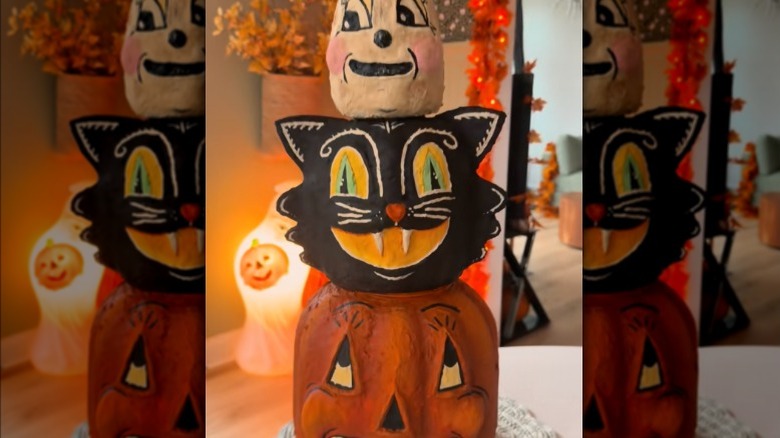
This stacked set of quirky characters draws inspiration from vintage Halloween candy pails in the shape of pumpkins, ghosts, black cats, and other spooky iconography. You'll need a three-piece set of Dollar Tree Stacking Pumpkins, cardboard, hot glue, toilet paper, pre-mixed drywall compound, Elmer's Glue-All, white flour, wood glue, and paint. Before you get to applying the papier-mâché, plan out your design for each of the three stacking pumpkins. Scour online visual resources — we love Pinterest or Google Images — using search terms like "vintage Halloween images" or "vintage Halloween candy pails" for ideas to base your design on. Download or print off the photos to use as a reference later. Now, let's get into the nitty-gritty on how to turn Dollar Tree's popular stacking pumpkins into a spooky display.
How to create vintage-look papier-mâché stacking pumpkins
Once you decide on a design style for each pumpkin, decide whether or not you need to attach cardboard onto the top or sides of any of the pumpkins — to create cat ears and whiskers, for example. Attach any additions using hot glue. Once your pumpkins are prepped, create your papier-mâché clay by combining 1¼ cups damp toilet paper, 1 cup premixed drywall compound, and ¾ cup Elmer's Glue-All. Add in half a cup of flour and mix everything together. Continue to add up to half a cup more flour until you get your desired consistency. It should be thick but malleable. Once your mixture is ready, apply a thin layer of the clay to each pumpkin and leave them to dry completely. You can place them in front of a fan to speed up the process.
@madnatorr2 ✨ DIY Vintage Stackable Pumpkins ✨ I turned Dollar Tree pumpkins into vintage-inspired decor using paper mache clay && I'm obsessed with how they turned out! Here's how I did it... First, I mixed up a batch of homemade paper mache clay and smoothed it all over the pumpkins to give them that vintage, old-world texture. I made another batch of paper mache clay using DAP joint compound + wood glue. This gave me a more moldable clay which I used to make the face like cheeks and ridges around the mouth and eyes. I let that dry overnight using a fan. Then I painted and distressed them until they looked like they came straight from a flea market find. 🎃✨ If you want to try this yourself, here's the paper mache clay recipe I used (or just use toilet paper or tissue paper and glue😬) : Paper Mache Clay Recipe: • 1 1/4 cups damp toilet paper • 1 cup premixed USG drywall joint compound (in a plastic tub) • 3/4 cup Elmer's Glue-All or any PVA glue • 1/2 to 1 cup white flour (adjust as needed) Mix everything until smooth and spreadable, then apply it onto your project! #halloweendecor #spookyseason #fallaesthetic
Once the first papier-mâché layer is dry, add another thin layer to cover any exposed parts of the pumpkin or cardboard. Allow it to dry again. Now mix more drywall compound and some wood glue into the remainder of your papier-mâché clay. You can pop the mixture into a nut milk bag and squeeze out any excess moisture, creating an ultra-thick sculpting clay. Use this to add 3D texture to your designs, sculpting jack-o'-lantern brows, cat's fangs, or the puffy cheeks of a Casper-like ghost. After all the features are dry, you can lightly sand away undesired lumps and imperfections. Now, you're free to paint your stunning, space-saving, and affordable vintage Halloween decoration. Check back on your reference photos regularly to make sure you get the aesthetic and colors right.