Make Affordable Decor That Has Designer Vibes With A Dollar Tree Glass Jar DIY
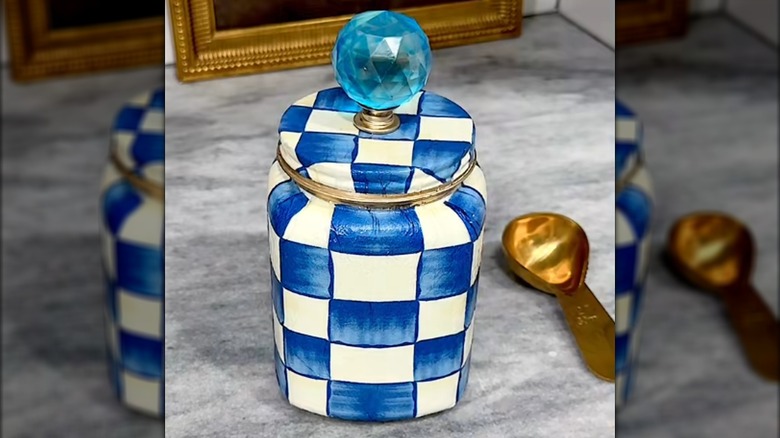
Thrifty readers, you've probably fallen in love with a designer's distinctive style, despite limited funds. But when investing in one of their pieces would cut too deeply into your paycheck, it's refreshing — and satisfying — to know there are simple projects that leave you with convincing dupes for pennies. Mackenzie-Childs' creations are craveably cute, but when even a spoon rest will set you back $60, you know the cost of a patterned ceramic jar will make a huge dent in your grocery fund.
Save the bucks for milk and frozen meals by making your own reproduction of their blue-and-white checkered jar. Even if you've never completed a craft in your life, this project requires little skill or patience. Turn a Dollar Tree find into a chic Mackenzie-Childs-look jar by decoupaging napkins to a Dollar Tree jar. These jars are blank slates for a mere $1.50 each, but this project will turn out just as cute with a repurposed glass jar and lid.
To make a cheerfully checkered canister with a bejeweled lid, start with a Dollar Tree Glass Jar with Metal Lid, a pack of Mackenzie-Childs Paper Guest Napkins in blue and white royal check, and a screw-on knob like one of these Xiaoyztan Clear Crystal Glass Knobs. Prefer other colors over blue? The brand also sells checkered napkins in black, gray, and pastels. Also grab scissors, heavy-duty glue, bottles of white and blue acrylic paint, a paint brush, Mod Podge, and a gold paint pen. If this is your first venture into the world of Mod Podge and paper, read these mistakes you need to avoid to guarantee a flawless decoupage before starting.
Make a Mackenzie-Childs checkered jar dupe
Before diving into this adorable Dollar Tree DIY, give the jar and lid a good cleaning. Coat the exterior of the jar and the lid with white paint, and let it dry. To attach the knob to the lid, you can make a small hole in its center to screw the knob directly to the lid, or you can try a heavy-duty glue like E-6000 or Gorilla Glue to hold it in place. If you're going the screw-on route, drill a hole in the center of the lid before continuing to the next step.
You'll only need one ply of the napkin, so separate the patterned layer. Trim the napkin into a rectangle that reaches around the jar with a small amount of overlap. As for height, the napkin should touch the threads on the jar's mouth and have a 1-inch margin at the base to glue in place. Paint a layer of Mod Podge over the surfaces. Slowly apply the napkin to the Mod Podge, smoothing out bubbles and creases as you go. A bit of creasing will happen around the edges of the jar and the lid, so hide any folds within one of the checks.
Give the napkin-coated surfaces a coat of Mod Podge. While this dries, treat the crystal portion of the knob to a layer of blue paint, and wait until all the components are dry before moving on. Attach the knob by screwing it into the hole or with glue. Edge the rim of the lid with your gold paint pen, and your faux-designer jar is ready to use.