Transform A Cracked Concrete Patio Into A Beautiful Tiled Oasis With This Budget-Friendly DIY
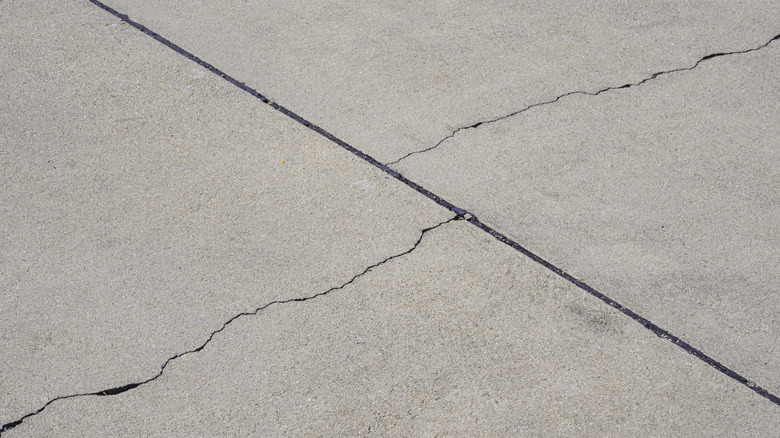
A cracked concrete patio isn't necessarily cause for alarm, but it can be rather unsightly. Luckily, it's fairly easy to give it a stunning tile makeover with a budget-friendly DIY technique called Crazy Pave. The project involves repairing the cracks and then covering the concrete in shattered tiles and grout. You can use any tile color and size that you like and create a design unique to your personal style. For instance, choose large, light colored pieces for the main tile and pick dark-colored, smaller pieces to fill the space between them — or vice versa.
Before you can actually get started with this DIY tile patio, you will need to take some essential steps to fix the cracks in the concrete. This involves power washing the patio and filling the cracks with a concrete filler. Use a power washer to completely clean the patio surface and the cracks. Then, wait for it to dry before applying the crack filler. It's important to take your time to avoid the impatient mistake that's causing concrete filler not to work. Likewise, follow the instructions for the specific crack filler for the best results, and don't forget to wear appropriate safety equipment. Things like rubber gloves and eye protection are essential, but you can also use knee pads and a construction mask for added protection.
How to safely DIY a Crazy Pave tile patio
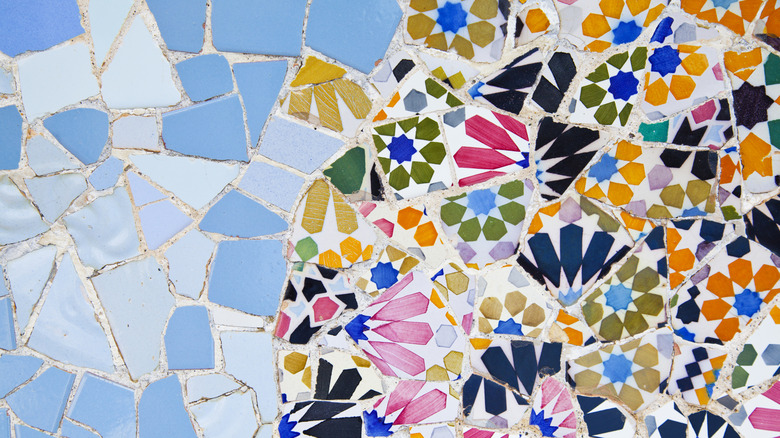
With the cracks all patched up, give the repaired concrete a final sweep and rinse it thoroughly. While that's drying, place the tiles on a hard surface and gently tap them with a hammer until they break. Where you tap and how hard you strike can impact the size and shape of the pieces. Depending on the tile (such as natural stone), you may also need to pre-seal the concrete before applying the mortar.
Mix the mortar according to the product label and let it stand for at least 5 to 10 minutes before applying. When it is ready, apply the first layer of thin-set to a small area, placing one tile at a time. You don't want to step on the newly laid tile for at least 24 hours, so be sure to leave yourself an exit at the end. Remember to check each tile for dirt or dust before placing — and have fun! This is where you get to be creative with how you lay the tile. As long as you have the correct amount of thin-set, you should be good to place them however you want.
Finally, to grout your own tile, mix the grout and let it sit for about 10 minutes before use. Spread the grout using a sweeping motion over small sections. About 4 feet by 4 feet is large enough. Make sure it completely covers all the cracks, and clean the tiles in between each section. Once that's all done, seal the entire surface for maximum protection.
Setting a realistic budget for your tile patio DIY

To plan your DIY Crazy Pave budget, think about what kind of equipment you will need; it goes beyond the power washer. You can rent a power washer from a hardware store for $35 to $80, depending on the model and length of the rental. However, you will also need protective equipment, buckets for mortar and grout, and a mixer, drill, and hammer. Most DIYers already have a drill and hammer on hand that will work for this project, so you probably won't need to budget for that.
5-gallon buckets cost roughly $12 for a set of three at Home Depot, while a drill attachment mortar mixer is usually around $15. You can usually find rubber gloves for under $5 and safety glasses for under $10. Finally, a flooring trowel for spreading the mortar and grout is usually under $10, bringing the total budget for equipment to somewhere between $87 and $132.
Now, getting into supplies, you will need to purchase the concrete filler, mortar, grout, tiles, and sealer. Depending on the type of filler you choose and the amount needed, you can expect to pay anywhere from $6 to $40. Tiles are where you will most likely spend most of the budget, but you can get as creative or thrifty as you want. Buying the tiles new will usually cost somewhere between $1 and $35 per square foot, though specialty tiles can be even more expensive. Mortar retails between $5 and $20 for a bag that covers roughly 10 square feet. On the other hand, grout costs about $20 for a 25-pound bag that covers between 120 and 500 square feet, depending on the thickness and spacing of the tiles, and sealer ranges from $10 to $40. Ultimately, the final budget will be heavily dependent on your specific project needs.