These DIYers Turned Their Coat Closet Into An Aquarium Display—and The Result Is Incredible
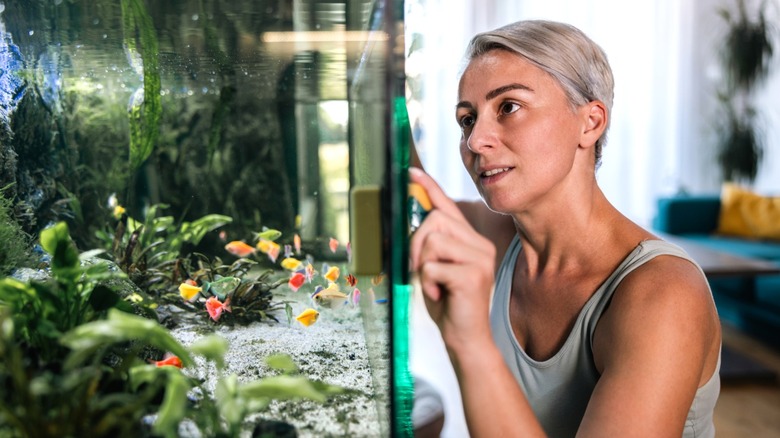
Well, fish lovers, the ultimate hack to give your aquatic friends the prominence they deserve is finally here — and all it takes is a free side closet. The creative minds behind TikTok account @yourlifeiswhatyoumakeit had a grand vision for their newest saltwater fish tank's setup. Rather than putting it on a plain old stand out in the open like every other home aquarium, this daring couple upgraded the look with a DIY closet arrangement. The fish tank sits illuminated on a shelf in the closet, while a cutout in a custom-made door creates a sleek window looking into the action. It has all the style of a built-in aquarium, but the smart use of an existing cavity means it won't involve a complicated construction or major overhaul to the space. Sitting behind a closed door, the tank and all its components remain easy to access and maintain.
Of course, this project may not seem so straightforward going by these DIYers' approach. Cutting out multiple walls, building a reinforced shelf, and crafting a custom door is pretty ambitious and can likely seem a little overwhelming (not to mention pricey). Take a step back to the basics, though, and your closet may still be just the right place to put your fish tank. Rather than build a shelf, you could buy a stand to ease the project, and scaling down the door design will make it more manageable to build. You can even go super simple and cut a hole in your current hollow-core or solid closet door with a circular saw to make a viewer for your fish tank. But for a more built-in look, it's not too much for a confident DIYer to make a basic door with some dimensional lumber.
Building a basic aquarium display into your coat closet
If you want the door for your aquarium to look integrated, remove the existing closet door and trim. Measure and cut three 1-by-4 pieces of wood to replace the trim, putting them around the door frame's sides and top and ensuring they're secure in the studs. Then, build your door. Following the DIY from @yourlifeiswhatyoumakeit, split the door into a two-piece Dutch door. With one door on top and another on the bottom, you'll have separate access to the fish tank and the storage section underneath.
@yourlifeiswhatyoumakeit We love putting holes in our drywall! And maybe removing a few studs too! 😜 #aquarium #saltwateraquarium #saltwater #homeproject #homediy
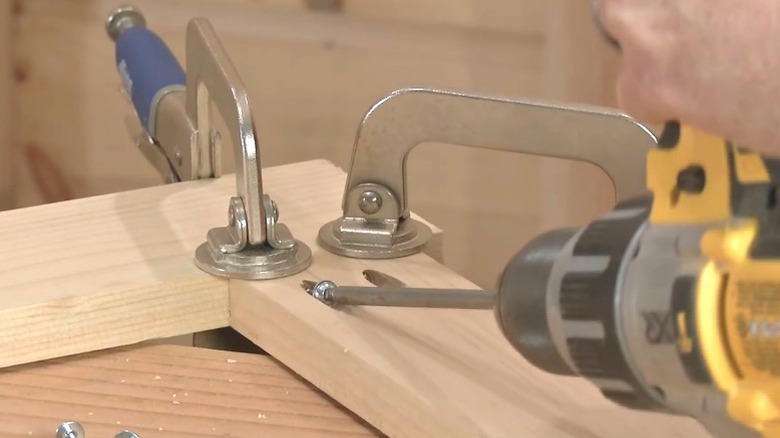
Build the individual top and bottom door sections by measuring, cutting, and combining 1-by-4 or 1-by-6 pieces into simple shaker rectangles. Start by measuring and planning the door sections so that, when closed, the edges will be flush with the outside edges of the door frame trim. With the boards cut to the proper length, set a Kreg jig to ¾ inch to create perfect pocket holes in the rails. Screw the rails to the stiles to make a rectangle.
The designers in this video took a clever approach to finish the lower door, making false drawer fronts with boards. Attach extra rails running across the frame between the bottom door panel's stiles, spacing them equally from top to bottom so they look like a stack of drawer holes. Then, cut equal-sized rectangular boards to cover the openings (resembling closed drawer fronts). Stick them in place with wood glue and brad nails. For the top door where the fish tank viewer will go, measure and cut rails and upright spanners to fit into the frame and form a perfectly measured frame around the tank. Lastly, follow the designer's lead on attaching the door sections with piano hinges, securing them to the trim for smooth operation.
Cover these key details in your closet aquarium display

Some style considerations to make this DIY look even more incredible include staining or painting the door and making a crosshead for an extra flourish. More important, though, are the practical aspects. Putting a fish tank in an enclosed space like a coat closet means you'll have to pay special attention to accessibility, environmental conditions, and your electrical setup. Before you even get started on the project, you have to ensure your tank will have at least 6 inches of space around all sides and even more above it for you to access the tank. To power all the equipment without snaking ugly power cords through the house, you may also need to install an electrical outlet in the finished wall of the closet.
Humidity is the other key concern here. Fish tanks can lose a few gallons of water weekly to evaporation, depending on the circumstances. In an enclosed closet, that moisture might settle into the walls and ceiling and potentially encourage mold growth. A tight-fitting tank lid could control evaporation to an extent, but you should also encourage air circulation to keep moisture levels down. The big viewing window in the door certainly helps, but you can consider additional venting in the walls or the door. Having a hygrometer in the closet will let you monitor humidity levels to see what changes you might need to make. Otherwise, you'll want to paint and prep the closet for any extra moisture. Use a fungicidal primer and paint on the walls and ceiling, preferably in a glossy or semi-glossy finish. It takes some extra work to prep the space like this, but you'll be so glad you put in the effort every time you pass by your custom aquarium closet.