What Most People Get Wrong When Setting Wood Fence Posts
We may receive a commission on purchases made from links.
When you need a fence on your property, it's hard to go wrong with wood. It delivers a classic look and delivers privacy for your family. However, there can be unexpected downsides to a classic wood fence. If you aren't careful during a DIY installation, for example, you might not acheive the expected durability and lifespan from your posts.
A common installation error can cause the wood post to rot near ground level. This is the area where the post is exposed to soil, moisture, and air, allowing microorganisms to grow and slowly destroy the wood. Failing to protect this vulnerable section of the post is a mistake I've seen occur many times. Having inherited a few wood fences when moving to different homes — and having made my own mistakes building my first wood fence for pets and kids at a house without a fence — I've investigated a few different options for protecting this part of the post.
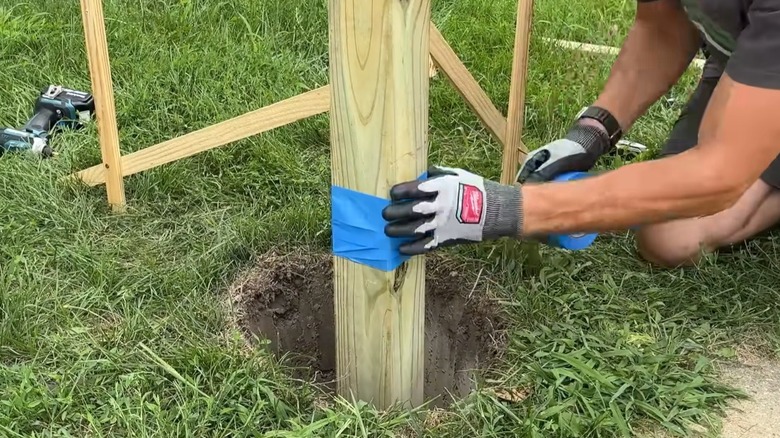
I've found that sticking with pressure-treated wood is not a guaranteed solution for preventing post rot. While it resists moisture better than untreated wood when making contact with the ground because of its chemical treatments, it's not completely resistant to rot. One of the best tips I've found to help keep fence posts from rotting is to apply a protective layer where the post enters the ground. My favorite option is to apply a flexible, waterproof coating along the segment of the post that's at and below ground level. Everyday Home Repairs on YouTube improves on this idea by using painter's tape to create clean lines.
How to apply waterproof coating to your fence posts
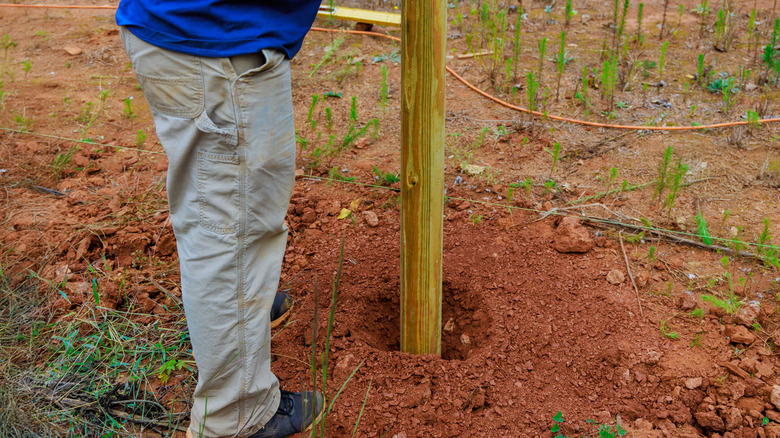
As I've learned through installing hundreds of wood fence posts — and inheriting fences that weren't built correctly — following the proper installation procedure is vital to avoiding premature rot. Before worrying about sealing the portion of the post at ground level, which is most likely to rot, you need to make the hole deep enough. The hole's depth should be about one-third of the post's total height. You'll then have two-thirds of the post above ground level.
Place the post in the hole and draw a line around the post about 4 inches above ground level. I'd suggest applying the sealant from this line down to the bottom of the post to prevent it from rotting prematurely. I've often used Flex Seal Liquid Rubber ($18) for this step. I chose it partly because I happened to have some on hand, but also because it works very well at preventing moisture from seeping in. Some people even use Flex Seal to beautify an entire outdoor fence while preventing wood rot. However, other options to seal your posts include bitumen or roofing tar.
Before applying the sealant, I'd suggest borrowing the idea from Everyday Home Repairs on YouTube to apply painter's tape along the line drawn on the post. This ensures a clean line for the sealant that will look good after you remove the tape and finish installing the post. After applying the Flex Seal, I always allow at least 24 hours for it to cure to ensure maximum waterproofing.
Another option for protecting wood fence posts from rot
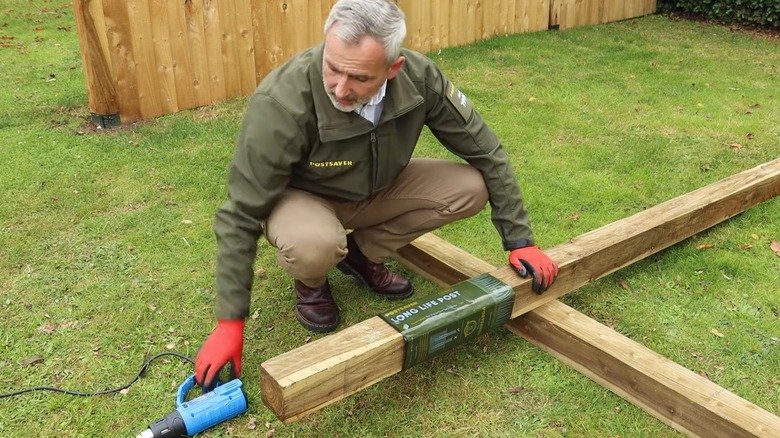
If you don't want to wait for the Flex Seal to dry, or prefer a less messy option for protecting your fence posts from rot, you could try a protective post sleeve, such as the Postsaver Pro-Sleeve (about $8 per piece), which wraps around the post at the area most prone to rot and offers a 20-year guarantee of protection. I've never used this type of wrap, partly because it's far more expensive than applying sealant products. Considering an 8-foot, 4-by-4-inch pressure-treated wood post costs about $11, the sleeve is pretty pricey. However, most customer reviews say it works well and is extremely easy to install. It also provides a relatively clean edge for the visible area at the top of the installation, similar to using painter's tape with the Flex Seal application.
To apply the post sleeve, you'd wrap the thin material around the post with the upper edge 2 inches above ground level. The remaining 14 inches of length on the wrap will be below ground level, providing maximum protection in this vulnerable area. Use a hot-air gun or a gas blowtorch to secure the wrap to the pressure-treated wood of the post. The sleeve consists of bitumen and a heat-shrink film that seals the wood when you apply heat. You can then install the post in the hole using concrete, just as you normally would.