Turn Leftover Scrap Wood Into A Rustic Bird Feeder With This Simple DIY

We may receive a commission on purchases made from links.
Lively, colorful birds are the perfect addition if you want to make your backyard feel like a secret garden oasis. But there's no need to invest in a brand new bird feeder to attract them. Instead, utilize two clay saucers and a scrap wood piece you already have to DIY an upcycled bird feeder.
The best type of scrap wood to use will be a single wood board, but it can be also a leftover fence plank or a remnant trim piece. When selecting which wood piece to use, keep in mind that it will need to be at least six inches long and about ¾ inch thick. The thickness can vary, but if it's too thin, it won't support the clay saucers of birdseed. However, a thicker board will be more difficult to cut.
You'll also need a small electric saw, two clay saucers, a drill and large circular drill bit (or hole saw). For a quick project like this, a hand-held, electric saw will work. It's a great option for small projects and beginners because it's easy to control and more affordable than large saws. For example, this Enventor Mini Circular Saw will work well and it has a laser attached to guide your cuts. The large drill bit will need to be about an inch big. This will be used to drill two large holes into the wood, which will support the dishes of birdseed. Make sure that your drill is compatible with a bit that large and that you are using a drill bit designed for wood.
Cut nooks into your wood board

For sizing, cut your wood slat to the desired length, anywhere from 6 inches to 2 feet long. Measure and mark your wood with a pencil before cutting. Once the wood length is cut, draw a line lengthwise down the center of the board. Make two pencil marks right in the middle about 4 inches from the top and 4 inches from the bottom. These are the spots where you will drill your 1-inch holes. An easy tip is to drill a pilot hole using a smaller drill bit before you create the larger holes.
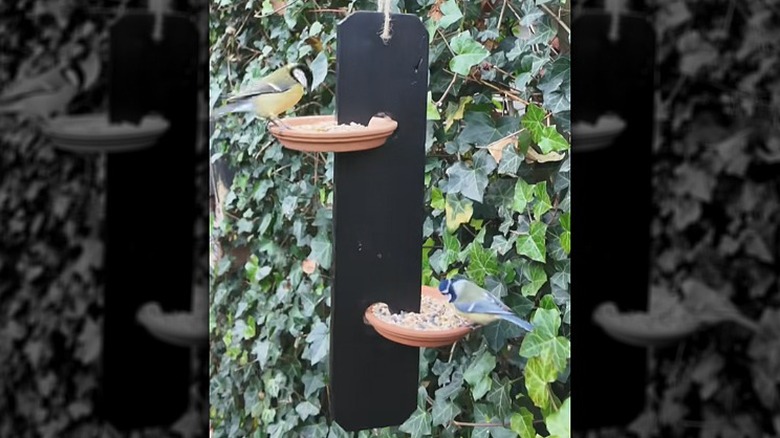
@unfollowthepath DIY bird feeder 🐦 #BirdFeeder #GardenDIY #DIYBirdFeeder #Gardening
Once you have your holes drilled, there needs to be an opening to them from one side of the plank. Take your hand held saw and cut a straight line from the side of the plank toward the top of one hole. The opening should be about 1/2 inch thick, so you'll need to do another cut slightly further down. Then flip the board over to repeat these steps on the second hole. The notches should be open on opposite sides of the board so that the feeder stays balanced when both saucers are inserted. Finally, attach a hook or drill a small hole at the top where a string can run through to hang the feeder. This can be done using a small drill bit and drilling a hole about 2 inches down from the top of the board.
Finish the bird feeder and insert plates
It's a good idea to sand the rough edges after you're finished cutting the wood. Since the birdfeeder will be outdoors, applying stain or paint will be necessary to avoid wood rot. This is the part where you can infuse some creativity or style. A stain can make the birdfeeder blend in with nature, while pop of color will make your DIY project a stand out.
At this point, your birdfeeder is ready to be hung. Use some twine and string it through the hook or small hole at the top of the wood slat and hang it in a spot where you can watch birds come to visit. Next, put the dishes of birdseed into place. When selecting the dishes, remember that they will need to fit into the openings and holes you created. This Yukfona 2-Pack of Ceramic Plant Saucers should be about the right size, and they're big enough to hold a small bird and seeds. If you're an avid birdwatcher, you'll want to fill the dishes with bird seeds that will attract a diverse variety of bird species. Make sure there's also a water source such as a birdbath nearby so they have everything they need to keep coming back.