Hide The Eyesore Of Bulky Outdoor Utility Boxes With A Beautiful DIY Solution

We may receive a commission on purchases made from links.
The two most common eyesores outside your home are probably outdoor garbage bins and those ugly utility boxes belonging to power and cable companies. Fortunately there are a number of budget-friendly ways to hide those bins, but what about the utility boxes? Over on YouTube, Jesse and Company shows us a beautiful DIY solution that can be adapted to just about any size.
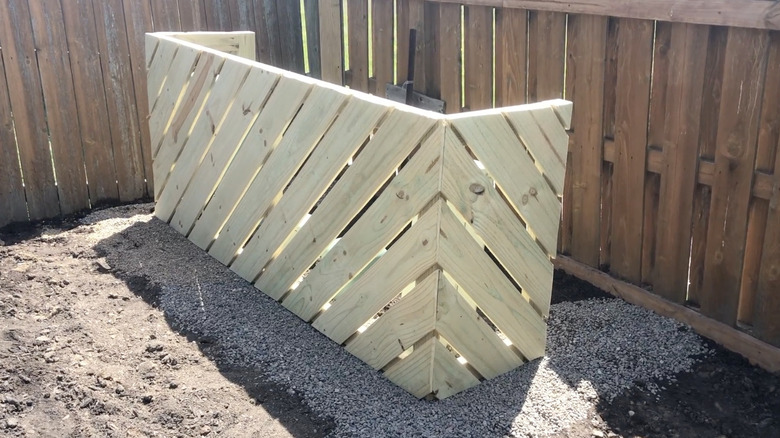
These covers are easy to make and use unexpensive store-bought lumber, so they're affordable too. What's more, they can be stained or painted to blend in with their surroundings, and they are relatively easy to move if service or repair technicians need access. They can also be used to hide those bulky outdoor AC units, but make sure to check the manufacturer's advice about the amount of space needed for proper air flow (usually 12 to 24 inches).
Jesse and Company has a fairly extensive tool kit, which includes a nail gun, a sander, a pocket hole jig, a cordless drill/driver, a sawzall, a circular saw, and a miter saw. Either of those last two are tools worth investing in to start woodworking at home, but if you measure and cut carefully, you don't need both. In fact, if you're on a tight budget, you could DIY these outdoor utility box covers mostly with hand tools.
Making the frames for the outdoor utility box cover
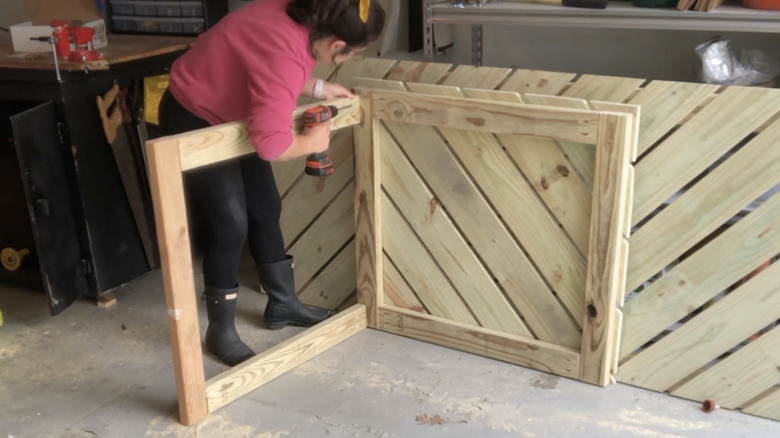
For her project, Jesse uses two-by-four lumber for the frame and fence pickets for the cover pieces. It's a good idea to use pressure-treated lumber, which is resistant to rot and insects. First you need to work out the height, width, and depth that will cover your utility box. Then cut the frame pieces to the required sizes. There's an old woodworker's expression that says, "Measure twice, cut once." Doing so will save a lot of frustration and wasted lumber. A miter saw is the best tool for this, although a circular saw, or even a hand saw, could be used.
In the video, the frames are assembled using a high-quality Kreg pocket hole jig. However, for most DIYers, simple flat metal joining plates and ordinary wood screws will be easier and cheaper. If you get some that are approximately 2 inches by 4 inches, they will be big enough to give plenty of grip and strength. Those with four holes (two on each end) are okay, but those with six (three on each end), like the ones from Mountain Ark, are better. You can find them on Amazon, although your local hardware store will probably have something similar.
Fit one side of the plate to the narrow end of a board first. Line it up at 90 degrees to the other board, then screw them together. Work on a flat surface so the frame stays level.
Adding the fence pickets and finishing the cover
A 45-degree angle is cut across one end of the fence pickets, then they're given a light sanding with 120-grit sandpaper. If you don't have an electric sander, you can do it by hand with sandpaper wrapped around a scrap block. The pickets are nailed to the frame using another piece of picket as a spacer. If you don't have a nail gun, a hammer and nails will do the job just fine.
There's a lot of back and forth in the video measuring, clamping, and trimming with a picket used as a saw guide. Jesse is working on the floor a lot of the time, which can soon get uncomfortable. As an alternative, you could either do a little math to work out the length of each picket first, or line them all up on the frame and mark the correct lengths with a pencil. That way you could cut them all at the same time, then nail them in place. Once all the pickets are attached, the sides can be screwed to the front with metal L brackets.
All that's left is to stain or paint the covers to suit your yard decor. Then, add some gravel or pebbles around the base to finish off this beautiful DIY solution for hiding utility boxes. If you're looking for creative ways to increase your home's curb appeal, you'll definitely want to build one or two of these.