The Frozen Bird Feeder DIY That's Perfect For Winter

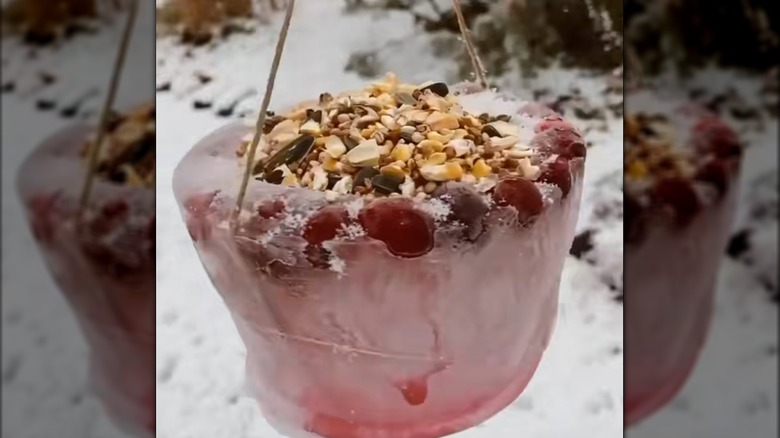
Not every bird flies south for the winter. Quite a few stick around during the snowy season, and cold temperatures increase their calorie needs compared to the rest of the year. Bird feeders can be costly, and the budget-friendly DIY feeders made with upcycled materials sometimes lack polish and charm (despite their planet-friendliness). You can make an attractive bird feeder that leaves minimal waste behind by creating a hanging ice bowl filled with seed. Once the feeder melts, toss the twine into your compost pile for a nearly zero-waste creation.
Put this together easily by reusing a couple of empty tin cans or small flexible plastic containers, biodegradable twine, bird seed, and berries. Also, grab some tape and a few rocks or something else to weigh the inner can down while the water freezes. The two tin cans or plastic containers will act as a mold for the feeder's ice "bowl," so one container needs to be small enough to fit inside the other with about an inch of margin between the two containers' sides.
If you're going the metal container route, opt for cans that don't have pull tabs — like ones on soup or chili — since they have an extra lip around the mouth that will make the ice difficult to remove. Plastic containers might be a better choice for your mold, since their flexible sides should make removing the frozen form easier.
How to form a frozen birdfeeder
Start by snipping up two pieces of twine that are long enough to knot into loops that you'll arrange in an X around the inner can. The goal is to create a secure hanger that will continue to hold as the ice melts. You can also skip this step to make a feeder that sits on a flat surface instead of hanging. This option is ideal for a heavier feeder made from something like a coffee can.
Since cooking spray can make shoveling so much easier by preventing sticking, a generous spritz to the interior of the larger container and the exterior of the smaller one may simplify sliding them away from the ice. Once you've treated the cans, rest the twine loops inside the larger container, arranging the X at the bottom of the can. Let the slack hang over the sides.
Set the smaller container atop the X, and add water to the space between the two cans. The inner container should float slightly so a solid base of ice can form beneath it. Fill it with rocks or another weighty item to keep it submerged up to just below its mouth, and place a few pieces of tape across the containers' mouths to hold the inner one in place. Add a few berries to the water between the containers, and set the containers in the freezer or outside if it's cold enough. Once the ice is solid, remove the tape and containers, fill the hollow center with seed, and hang it for your feathered guests to enjoy.