Keep Shoes Organized And Off The Floor With This DIY Storage Solution

If you have kids or even young adults, you understand perfectly the daily nightmare of the morning rush as you try to leave the house. One person is missing a shoe while another complains both their shoes are missing altogether. Then there's the occasional tripping over shoes or stepping on dirt or water with your clean socks. It all boils down to the haphazard arrangement of footwear on the floor, whether in the entryway or in a corner of the mudroom. And that's a clear sign you might benefit from this fun, done-in-a-weekend, DIY shoe storage solution.
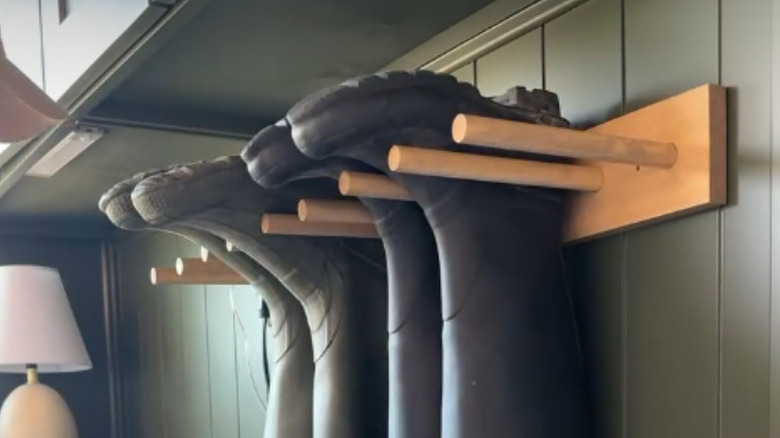
With this simple DIY that involves attaching dowels to a wood plank, it's easy to keep your footwear organized and, most importantly, off the floor. And as a bonus, this unique setup is visually pleasing, hence one of the mudroom ideas that will help you transform your space. Talk about killing two birds with one stone. In case you're a newbie DIYer, don't worry because this project is pretty straightforward. The materials you'll need include: 1-inch by 4-inch wooden board, a 1-inch dowel, wood glue, and a few screws. In terms of equipment, get a drill with a 1-inch drill bit, measuring tape, sandpaper, and a cutting saw. All these can be easily sourced from your nearest hardware store.
How to make the DIY shoe storage rack
Begin by determining the length of wooden board you'll need depending on the number of shoes you want to hang up and the length of space on your wall. Use the saw to cut the board to the right size. Next, measure and mark where you will place the dowels. Allow 4 inches between each dowel for adult-sized boots and slightly less for children's shoes. Using the 1-inch drill bit, drill shallow holes into the board without going all the way through. Then, mark the center of each blind hole on the back side of the board. These markings will come in handy later.
@birdsong.design Simple and inexpensive DIY for you this weekend. A great way to get those shoes organized and off the floor! Save this and let me know if you try it. 😜 Follow along for more diys and home design tips! 💛 #diy #home #homeimprovement #homedesign #fyp
Afterward, sand down the blind holes to ensure there are no rough edges. Measure and cut your dowels to 6-inch pieces. Anything longer and people are likely to be bumping into them. At this point you can stain the board and dowels for durability or enhance aesthetics by picking a color that complements the existing decor, then leave them to dry.
Next, apply wood glue into the dowel holes and fix your dowels. For extra help ensuring wobbly dowels dry upright, place a triangle ruler next to each dowel, one at a time, to keep it straight as it dries. Alternatively, try sandwiching the dowels between two planks of wood to keep them straight. Leave them to dry. Now, remember the marks you made on the back of the board while drilling the dowel holes? Drill screws through these spots to secure each dowel. A final coat of paint here will help protect the finish from dirty shoes. Your rack is now practically ready for mounting on the wall.
Installing the DIY shoe storage rack
There are two ways you can go about this: Mount this shoe rack on a wall or make it a free-standing rack. The most popular choice is mounting, and in that case, you can either position it against the wall in your mudroom, along the entryway, or even in your garage if that's where you have ample space. Simply mark two pilot holes on the wall, then drill screws through the rack and wall into studs to hold the rack firmly and securely. Use a leveler as you drill the second screw to ensure the rack is perfectly straight.
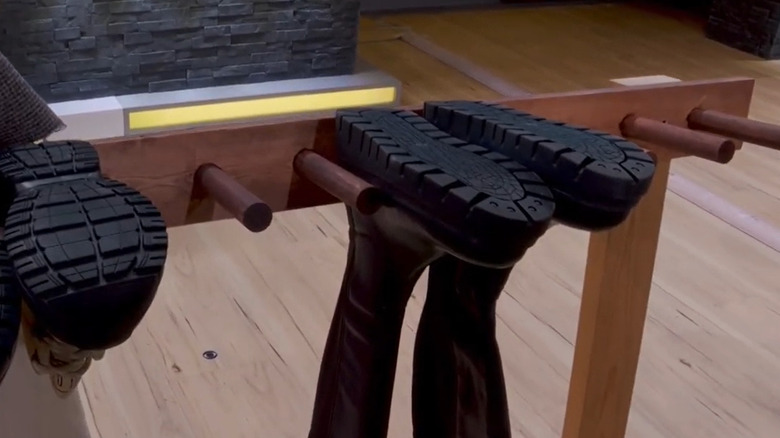
To turn this DIY shoe storage rack into a free-standing shoe storage solution, you'll need two long wooden planks to serve as legs and two short pieces of wood to attach at the bottom of the legs for balance. Screw each leg to the base wood first, then attach each leg to the opposite ends of the rack. With that you have a mobile shoe rack you can place wherever you need it, or even put away whenever it's not in use. And that's how you get shoes off the floor and organized on a tight budget.