The Affordable DIY That Gives Dollar Tree's Taper Candles A High-End Upgrade

Taper candles add a classic ambiance to your home decor. Often, their holders are ornate and made of brass, copper, or wrought iron. You're likely to see them lighting a room in a Victorian-era period piece, like HBO's "The Gilded Age." But it's not just the candelabras holding the candles that demonstrate detailed decorations. The candles themselves can also have interesting designs. For instance, some are molded in a twisted shape, while others feature floral images. Instead of purchasing a fancy candle, you can make them yourself by stamping them with ink. All you need are a few materials from Dollar Tree.
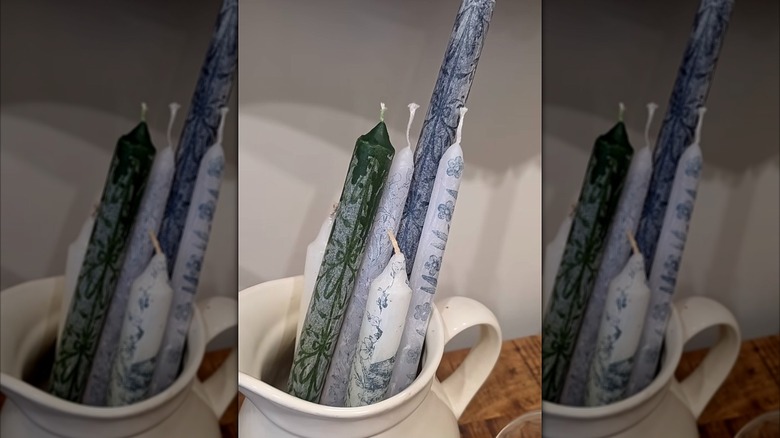
For this project you'll need some white tissue paper, silicone stamps, an ink pad, scissors, a heat gun, a bottle of Mod Podge, and, of course, your candle sticks. This project should only take a few minutes to complete, depending on how many candle sticks you need. There are plenty of variations on this simple process. Try making different candles to match the seasons. You can stamp your candles with flowers in the summer and snowflakes in the winter. You can also experiment with different ink or wax colors. If DIY candle projects interest you, try making your own large scented candles. Try these beautiful home decoration tips, like putting candles on the mantle or grouping them in threes.
The process of stamping your candles with ink patterns
Now that you have assembled your materials, it's time for the interesting part, which is stamping your candles. Start by pressing your stamps against the ink pad, and then press them against the wax paper. Make sure not to drag the stamp when you press it, because this will leave smudges, which won't make for a good design. The stamp's ink pattern should be clear. Then redo the stamp several times below and above the original stamp. You should create two lines of stamps.
The next step is to cut along the rows of stamps, making sure to leave about an inch of blank, and wrapping white paper around them. You might not get it right the first time, but trial and error is the key. You should then coat your candle sticks in a thin layer of Mod Podge. Too much glue will be goopy and won't allow your paper to stick correctly. Once you've wrapped your stamped papers around your candle, walk away from the project for a while and wait for the glue to dry.
After a few hours, turn on your heat gun and run it over the stick. This should cause the paper to cling tightly to the wax. Once you're finished with the project, you will have decorated candles. Just make sure not to light them, because the paper could catch on fire. There are plenty other ways to maximize the mood of your candles with decorative touches, including holding it in a saucer full or sand or marbles.