Don't Toss Old Food Storage Containers: Turn Them Into A Bird Waterer

One way to keep your kitchen decluttered is by getting rid of the countless old food storage containers you no longer use. But don't throw out the plastic containers yet; there are genius ways to reuse them in your garden. From making watering cans and creating little herb gardens, to reusing them as perfect DIY seed starters. One of our favorite options is turning a container into a bird waterer.
If you enjoy having birds visit your backyard, a blooming garden is a great natural magnet for them, thanks to the nectar from the flowers, but adding a water source can make it even more appealing. In fact, this is one of the easiest ways to attract birds to your garden since they rely on it for survival and feather care. A water station can be especially important during hot summer days and colder winter months.
Begin by gathering your materials: a medium-sized round bowl-shaped plastic food container, a large lid that is wider than the container, and some sturdy twine. For tools, you'll need a drill and a utility knife.
Transforming your old food storage container into a bird waterer
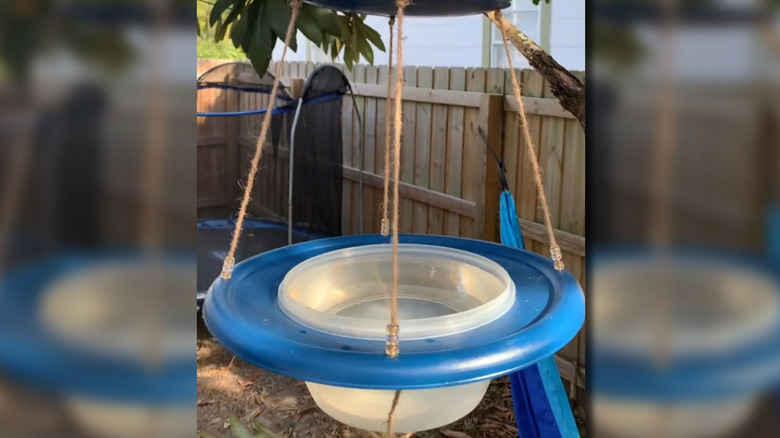
Start by cleaning the container thoroughly. Then, place the lid on top of the bowl and mark out the bowl's rim circumference. Next, cut out the area you have marked using the knife. The piece you've cut out should look like a small flat saucer, and the outer part should now have a hole in the middle. Insert the food container into the hole; it should fit snugly and be held in place by its rim collar or protruding edge.
Now, using the drill and a tiny drill bit, drill four evenly spaced holes around the edge of the lid. Do the same with the circular cutout. Next, cut four pieces of twine that are long enough to make a hanging bird waterer. About 4 feet will do. Slip the twines through the holes in the circular cutout. Position the circular cutout about one-third of the way down all four pieces of twine, then tie small knots in each to secure the saucer in place. Now pass the lower ends of the twines through the holes in the lid with a hole. Again, secure everything in place with knots.
Afterward, gather the rope ends hanging beneath the large lid with the container insert and tie them together. Gather the ends above the saucer cutout and tie them together in a secure knot, leaving a loop for hanging the bird waterer. This saucer cutout will serve as a top surface level where birds can perch. It's also simply a decorative addition. The lower lid surrounding the food container offers the birds a place to land before getting in the water for a bath or just standing there as they drink from the container. The removable food container also makes cleaning much easier.
Where to hang your bird waterer
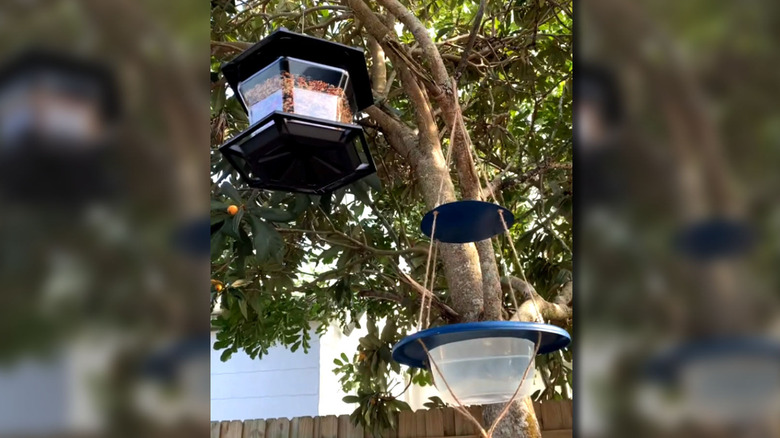
Where you'll hang your DIY bird waterer is a critical decision that can determine whether your feathered friends will actually choose to land there or not. Birds look for locations that feel safe, easy to access, and consistent, so placement choice makes a big difference in how often your waterer gets used. One great option is to hang it on a tree branch. The tree's shade will help keep the water cool on hot days and slow down evaporation. But remember, you still need to refill the water regularly.
Also, try to keep the waterer at least 3 feet off the ground, away from cats and other predators. Then, remember to have your bird feeder close by so the birds can both feed and drink from the same area. Keeping food and water within sight of each other creates a reliable stop that birds are more likely to return to throughout the day. Once your DIY waterer is hanging securely, fill it partway with water, then sit back, relax, and wait for the feathered visitors to swing by. If you're feeling more adventurous, there are several smart tips to keep your birdbath beautiful.