Transform An Ordinary Dollar Tree Frame Into Chic Illuminated Wall Art

Hanging wall art in your home is a simple and effective way to bring unique character and personality to your humble abode. Wall art makes use of space on walls that would otherwise look bare and empty. One easy way to add personality to your home is by using family photos to decorate some of those areas, but It takes a bit of creativity to figure out what else to adorn your free wall space with. It can also be difficult to turn your dream wall decor into a reality – especially if you take matters into your own hands. If you have not found a specific artist or art style you're particularly drawn to, you can always DIY wall art that reflects your personal tastes and decorative motifs. For a unique, self-lighting art piece, try this DIY art project that transforms an ordinary Dollar Tree frame into chic illuminated wall art.
To make your one-of-a-kind art installation, head to your local Dollar Tree to pick up a few craft items. This DIY from TikTok requires a simple black plastic photo frame, like this Special Moments Black Plastic Photo Frame, an accent background of your choosing for the frame, LED string lights, faux flowers, and, for a fun 3D twist, dessert shot glasses. Since art is a form of expression, feel free to swap out some of the listed items for others to make the piece something that really matches your personal style. To assemble and secure everything together, you'll also need hot glue or an alternative adhesive.
How to create your chic illuminated wall art
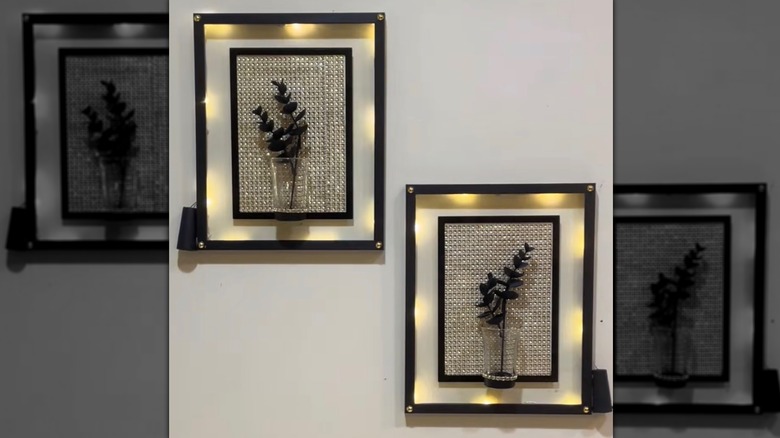
After gathering your materials, start by cutting your chosen accent background material to fit the frame. A few options from Dollar Tree you can use for the back of your art piece include these Floral Garden Adhesive Diamond Wraps, a sheet of Metallic Foil Tissue Paper, or even just a plain, solid-colored piece of paper. Measure your chosen material to fit the dimensions of the frame and place it where you would usually place a photo. To add light, take your LED string lights and hot glue them around the border of the frame. Once the lights are properly aligned and secured, attach the battery pack and switch for the LED lights onto the outer edge of the photo frame or behind it.
Now that you have light, flip the frame over to add the finishing touches to your chic illuminated wall art. Glue a dessert shot glass in the center of the frame, embellishing it with lace, ribbon, or extra pieces of your diamond wrap. Once secured, add sprigs of faux flowers of your choosing to the shot glass for a 3D, illuminated floral art piece. For a whimsical cottagecore frame, swap the dessert shot glass for a Mini Glass Shaker Jar and use a floral-based background for the piece. For decor that's more holiday-centric, create festive illuminated wall art that can also serve as decorations for Christmas, Halloween, Valentine's Day, and more. Just swap out the crafting materials for seasonal ones.