The Stunning Way To Turn An Old Pair Of Jeans Into A Versatile Storage Solution

We may receive a commission on purchases made from links.
Riiiiiiip! To your horror, you feel the seat of your jeans split. Quick, hop in the car and no one will notice! That's the best-case scenario if your jeans rip while you're wearing them, of course. No matter how your jeans end up getting worn out, don't toss them in the trash — you can turn them into a variety of craft projects. Snipping and stitching jean scraps into cute storage boxes gets some extra life out of a tired-out pair, for example. Flexible sides make it easy to fit the storage container into a variety of spaces. The best part of all — besides the low- to no-cost — is that blue-jean containers are machine-washable. Use them for nearly any purpose, knowing that you can toss dirty ones right into the dark load.
The next time you get a tear, or when you've finally leached the life out of your jeans, fire up your sewing machine to make adorable, uncomplicated storage containers. Along with a pair of jeans, you'll need scissors, straight pins, an L-square ruler, thread to match your denim, a sewing machine, thin woven fabric and thread in a matching color for the liner, a fabric marker, pins, an iron, and iron-on interfacing. If you don't have a sewing machine, create a no-sew version by substituting all sewing instructions with a flexible, machine-washable, and dryable fabric adhesive, like Gorilla Fabric Glue. It won't have quite the polished look as a sewn container, but it will still be attractive and useful.
Prepare and assemble the denim and liner pieces
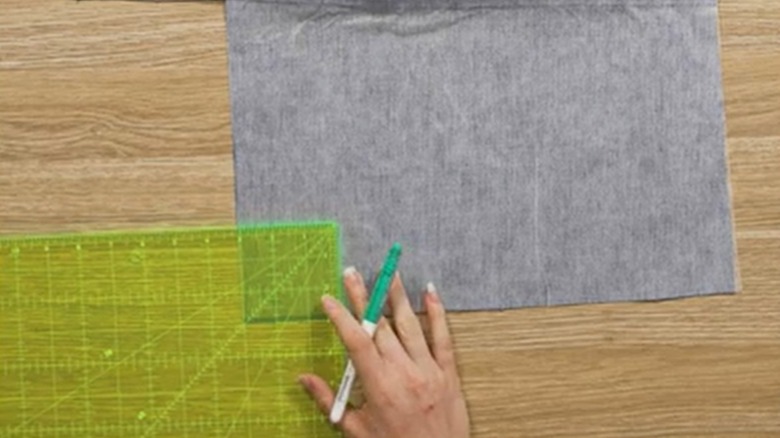
Scope out two spots on the jeans that measure 10 inches by 15 inches. You can avoid cutting pieces with seams by taking a piece from each leg. You can also cut along the inner seam (the one with topstitching) or remove the stitching with a seam ripper. Cut two pieces of liner fabric of the same size; for this material, you can repurpose old clothing, like a long skirt or another piece consisting of a lot of fabric. Finally, cut four 10-inch by 15-inch pieces of interfacing. Fire up the iron, and fuse the interfacing to the back side of each fabric piece, following the product instructions.
To make a flat base for the container, you'll be making box corners. To do that, you'll need to cut two corners along the same long edge out of each piece. Measure and mark a 3-inch by 3-inch square at both corners on one long edge of one of your denim pieces. If your denim pieces include part of a seam, cut the box corners closest to the seam; that will give it a better chance of being hidden on the underside of the container. Cut away the marked corners, and repeat this process with the other denim piece and both liner pieces.
Now, you're going to sew each denim piece to a liner. Lay a denim and lining fabric piece, right sides together, with all edges matching. Pin the longest edge, and stitch or glue along this seam. Repeat this with the other piece of denim and lining. Unless you're using fabric glue, iron the seam flat to one side.
Final touches on your fabric container
Now, you'll combine the pieces together into one container. Unfold the two combined pieces of denim and lining. Lay them together, right sides facing each other, liner to liner and denim to denim. Pin all of the edges except the cut corner areas. Also, leave a 3-inch opening along the edge of the lining between two cut corners; we'll call this the "turning hole" to flip the fabric the right way. Stitch or glue along these edges, but don't stitch the cut corners. If you're using glue, give it at least 24 hours to cure.
To make the box corners, pinch and separate the layers of fabric at the corner cutout spots on the denim pieces. Holding the corners with no seams, line the edges up, pin them, and sew or glue this edge closed. Repeat with the other three corners. Turn the fabric pieces inside out through the turning hole. Tuck the raw edges inside the hole, and sew or glue it closed.
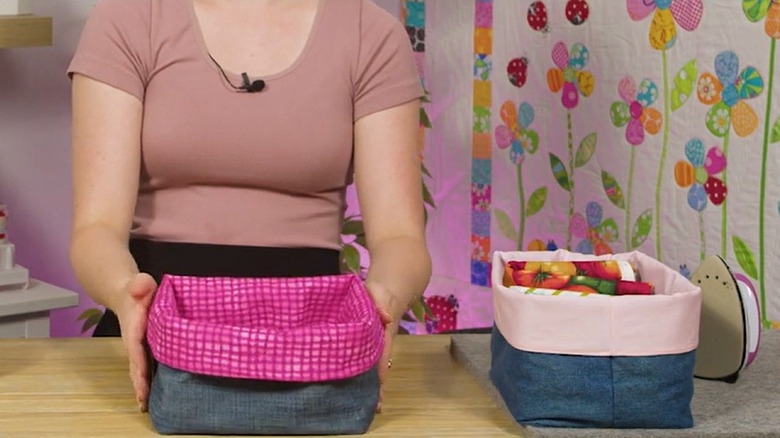
Press the liner into the denim shape, working it into the corners and smoothing it into place. Run a hot iron over the seam between the liner and denim to make a crisp fold. If you've seamed with glue, wait for it to cure fully before ironing. Place a piece of protective fabric over the area, and iron with low heat. For the machine-sewn version, run a line of topstitching around the upper edge of the container, and fold over the edges so the liner shows. You can also sew on decorative trim or add embroidered designs if desired. Snip off stray threads, and your handy cloth storage container is ready to corral items on a bathroom counter, toy storage bin, or kitchen pantry.