Fill Your Home With Sweet Lanterns Thanks To This IKEA Picture Frame Hack

We may receive a commission on purchases made from links.
Lighting is one way to set a romantic atmosphere, but a part of what keeps that mood alive is with intention. Elevate the intimate vibe in your space by combining lighting and intention, and craft a DIY candle lantern for your home. Candle lanterns may be old-school, but they make undeniably romantic decor. You can pull off this project with some IKEA DALSKÄRR picture frames, along with some twine and cork. The result? A beautiful lantern that can fit right into your living room or any interior adorned with coastal or rustic aesthetics. It can even be used as a cute outdoor lantern to give your porch a glow up.
Historically, these candle lanterns served as one of the primary sources of light in one's home. Before the 18th century, these were constructed with tin or copper punched with holes to let light through, while modern pieces are made of glass panels encased in a metal or wooden frame. These casings shielded the flames from wind and protected whoever was holding it from heat or wax dripping. Over time, though, these lanterns evolved from an essential light source to more decorative fixtures that contribute to a cozy atmosphere. It is also one of the many easy DIY projects many people create for their home or as gifts for their loved ones.
Turn your IKEA picture frame into a candle lantern
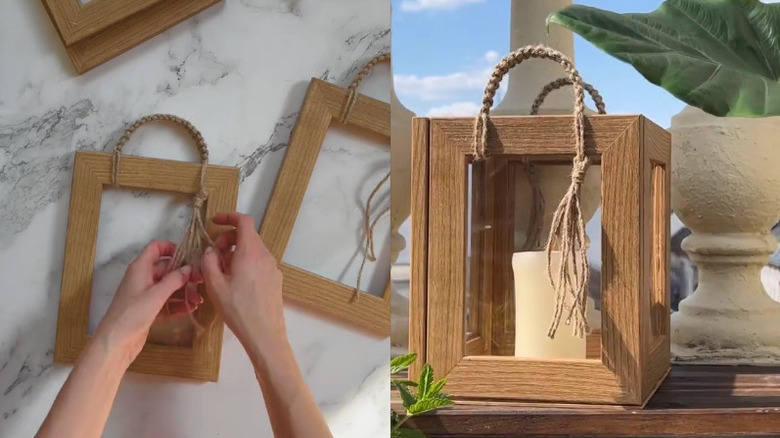
You will need four of the IKEA DALSKÄRR picture frames for this DIY project. Start by removing the paper mat and the clear panels from each frame. Next, use some twine to create a handle. Start by tying the twine onto the top section of the frame, and create a thick, sturdy braid, such as a four-strand braid pattern, so you'll have a handle that's suitable for bearing weight if you choose to hang the lantern.
Once you've tied handles onto the frames, assemble them into a cube-like shape. Use hot glue along the edges and press them together, while making sure that the structure is even and stable. For the base, cut a piece of cork or wood to fit the bottom opening, and then adhere it using hot glue. Let your DIY lantern dry before use. Sprinkle an additional layer of personality by decorating your lantern with trinkets or seasonal decor. And if you don't want to stress over the potential safety hazard of burning real candles, pick up some LED pillar candles like the flameless, battery powered option from Hanzim to use instead.