Don't Forget To Maintain This Important Part Of Your Driveway

We may receive a commission on purchases made from links.
When it comes to driveway maintenance tasks, many homeowners have the basics down: clean regularly, repair cracks when they show up, and reseal it every few years. But there's one part of the driveway that's often overlooked: the small gap between the garage floor and the driveway itself (a.k.a., the expansion joint). Designed to let your driveway expand in the heat and contract in the cold without damaging your garage — or home, if it's nearby — the expansion joint is actually key to protecting the longevity of your driveway.
We get it — on the surface, this might feel like one of those non-urgent tasks that isn't worth the hassle, but it's just as important as the other items on your to-do list. While this little space is key to giving your driveway the space it needs, it can also allow water or ice to slip underneath the concrete slabs, causing major damage to your driveway or even your foundation, especially in areas that experience freezing temperatures.
The good news is that maintaining the expansion joint is fairly budget-friendly. And, with the only materials needed being a few tubes of polyurethane caulk, a backer rod or expansion foam, and a bag of sand, it's a lot more affordable than repairing major cracks in your driveway or replacing it altogether. Experienced DIYers may be able to tackle it in a few hours (not including curing time), while beginners might want to set a weekend day aside.
Start by properly cleaning and prepping the expansion joint

If you've ever tried to apply caulk to an even slightly dirty surface, you know how important it is to properly clean and prep first. Sealing the expansion joint between your garage and driveway is no different. Using a slim putty knife or old screwdriver that you don't mind dinging up, scrape up any dirt or debris that have nestled into the joint. This includes any old cement or leftover joint boards. Then vacuum the gap and surrounding area with a shop vacuum. Scrub the edge of the gap with a small wire brush, then vacuum again.
Next, decide on the method to fill the gap. Backer rod and expanding foam are popular options. Expanding foam, like Loctite Tite Foam Big Gaps Spray Foam Sealant, is effective and budget-friendly, but it can be difficult to cut to create an even surface for the caulk. Backer rod, on the other hand, is easy to install (simply tuck it into the gap), inexpensive (typically between $5 and $10, depending on width and length), and can help your exterior caulk last longer. If you want to use a backer rod but the gap is too wide, twist the rod together before installation to add width.
If you decide to use a backer rod, measure the width of the gap. Ideally, it should be a touch bigger than the gap to ensure a tight fit. While you're there, notice how deep the gap is. If it's below an inch or varies in depth, use general purpose sand to even the depth out to about 1 inch, smoothing it down.
Fill & seal the expansion joint to protect your driveway
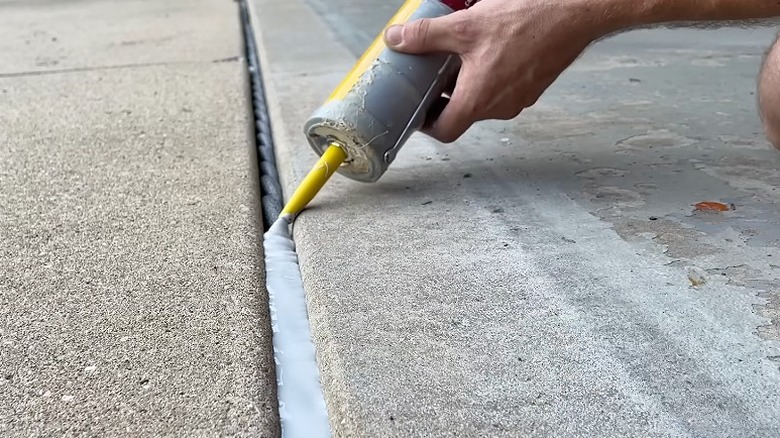
Let's fill the gap! If using expansion foam, follow the manufacturer directions, then cut off the excess, smoothing down the dried foam as much as possible. If you're using a backer rod, press it down into the gap with your screwdriver until it's tucked along the bottom of the joint. There should be about a ½ inch gap between the top of the rod and the edge of the joint.
Then apply self-leveling polyurethane caulk that can be used on concrete, like SIKA Self-Leveling Sealant. Does it have to be self-leveling? No, but it will save you a lot of time and work. Plus, it's kind of fun to watch it even itself out — just us? If you braided your backer rod together, you may need to apply two coats to get a smooth look — wait for a full day for the first layer to cure, then reapply if needed. If you don't like the look of the caulk line, scatter sand on the top before it dries to create a concrete-type effect. Let it cure according to the manufacturer's directions.
While this seal will last a while, it will need replacing eventually. The exact amount of time your seal will last will vary depending on your local weather and caulk, but regularly checking on it will help you protect and maintain your driveway for the long term. A good rule of thumb is to assess the seal at least once a year, maybe while you spring clean your home or in the fall before winter weather rolls in.