Turn An Old Aluminum Can Into The Cutest DIY Tabletop Lamp

When empty cans are pretty, it's hard to throw them into the recycling! The next time you find yourself with a can that's too attractive to toss, keep enjoying its lovely graphic design by turning it into a mini lamp. By borrowing some ideas from punched tin crafts, you can dot your can with artistically-placed holes that let LED lights shine through. Do this with a can, a can opener, an awl or compass tool, sandpaper, and battery-operated LED candle or string lights.
Repurpose empty cans with a pretty, printed-on design rather than the shrink-wrapped plastic labels sometimes on beer cans. Cans from sparkling water or craft beer often have pleasant graphics. Even classic designs like Coca-Cola or Budweiser could be cute with holes outlining the script.
However, if your can supply is leaving you uninspired, you can sand off the graphics to start with a clean slate. Likewise, you can remove plastic labels. If you're sanding off the logos, wait to drink the contents until you're finished sanding so that the can sides won't indent as you work — and don't forget to rinse the residue off the can before drinking! You'll then be left with a blank "canvas" to draw a design in permanent marker and perforate. Set up shop in your kitchen, since you'll be freezing water inside the can to make punching the holes easier, and working over the sink will catch any drips.
Plan, punch, and light your can
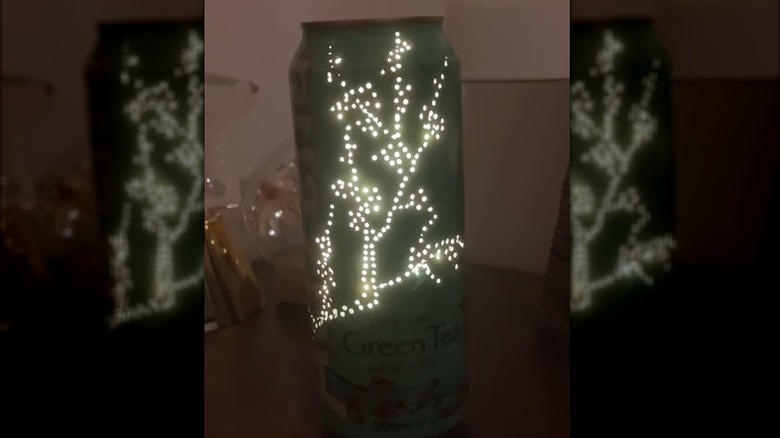
Plot out the holes on the side of your can in permanent marker to help ensure that you're spacing them out evenly. As for designs, you can make closely-set holes along brand names, graphics, or in curved lines winding among the can's details. For label-less cans, you can draw shapes on the sides and break the outlines into a series of holes. Since punched tin is a centuries-old art form in Mexico and New Mexico — It even had its moment in American colonial times — you can search for inspiring traditional patterns online to copy.
Fill your can with water, and stand it on a flat surface in your freezer. When the contents are solid, remove the can from the freezer, and poke holes in each marker dot until your design is complete. When you're finished, you might have stray lines of permanent marker on the can. If so, leftover ink doesn't stand a chance against WD-40.
Use the can opener to remove the entire lid of the can, and dump any remaining water or ice into the sink. You can save the pull tab to use as part of this unique decor piece, too! The cut edges around the mouth of the can may be sharp, so use the sandpaper to smooth them out of the danger zone. Place a lit LED tea light inside the can to check out the glow of your design. A string of remote-operated fairy lights may distribute the light better around the can's interior. You can also string a piece of wire through holes at the can's mouth to hang it, creating a charming lantern that's perfect for illuminating your space.