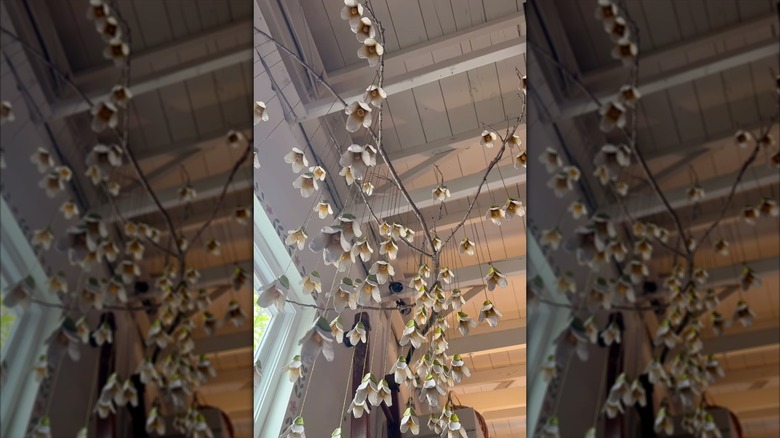
Save Your Egg Cartons To Create A Hanging Canopy Right Inside Your House
Spring is a time many people find themselves with a mountain of extra egg cartons lying around, whether they're left over from dyeing eggs or making special holiday desserts. If your local municipality doesn't accept them for recycling, or you're just looking for a craft project, there are many cool ways to transform egg cartons into stylish home decor. One DIY which turns paper cartons into delicate floral decor is especially perfect for the season. You can save extra egg cartons and make a hanging canopy for your home with some embroidery thread, paint, and other embellishments. By cutting out the protruding posts that support the eggs (or the cell where the eggs were held), and passing the thread through the top parts of your newly crafted "flowers," you can quickly make a set of these decorations, which can be strung from a reclaimed branch or any other tall structure. And unlike cut flowers from the garden or a flower shop, these will last!
Besides the paper egg cartons you've saved up, the basic supplies for this DIY are scissors, acrylic paint and paintbrushes, crepe paper, an embroidery needle and thread, and a hot glue gun. Although some egg cartons are made of styrofoam, this DIY and variations on the project use paper cartons, which give the flowers a natural, slightly textured look. Also, since the idea is to create a cascade of flowers, and one technique benefits from having extra pieces that can look like stem parts, you'll definitely need more than one carton. The more you have ready to craft with, the better. If you have any left over, you can put them to use by making a beautiful spring wreath you'd never known was a DIY.
Paint, glue, and hang egg carton pieces for a springtime floral decoration
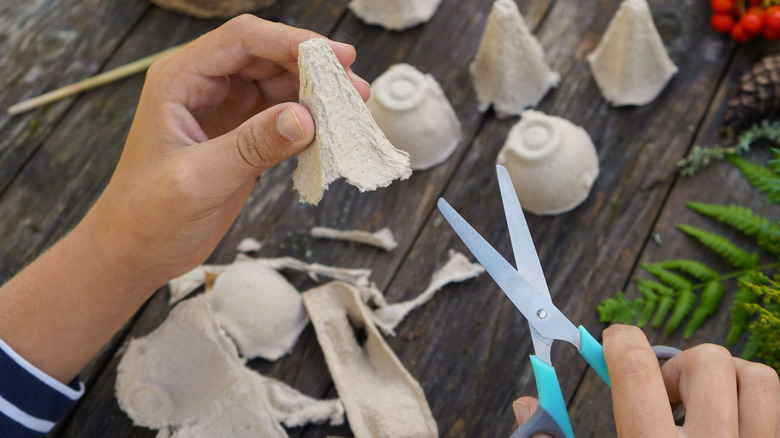
Start this project that will refresh your home for spring by cutting out either the support posts in the middle of the carton or the little cups, or cells, that once held the eggs so you have enough flower shapes to string up. Using the support posts (the protruding parts in the middle of the carton) is elegant and easy, since their shape naturally resembles small, bell-shaped flowers. The cells also make for good flowers, but need more shaping. If you're using the cells, cut a triangular shape into the middle of each side, trim into what's left to form rounded or pointed "petals," and pull the slides of the cell out to give the illusion of an opening flower. In addition to the flowers, cut off just the tops of some of the support posts. These will be the top of your flowers, which you can paint green so they resemble calyxes.
Once you've cut enough paper flower parts, the next step is painting them. Acrylic paint is the most recommended type, and painting the flowers white will give them versatility against different backdrops. If you prefer a brighter color, paint the flowers white first, then add the desired color on top. The paper absorbs the first coat, so a base helps the paint stand out more. This stage is where you can incorporate crepe paper (in yellow, or white, which you can paint on) to represent the inside of a flower. Roll up the crepe paper and glue it to the center for this realistic touch. When the paint has dried, thread a needle and pull it through through the top part you painted green, then glue this to the flower part, and repeat the process for your new favorite hanging display.