Turn An Old Plastic Soda Bottle Into A Stunning Planter That Looks So Chic
We may receive a commission on purchases made from links.
Plant parents shouldn't just grab any random container that can hold soil to pot a new indoor plant. The right plant pot should maintain proper drainage, optimize space, and provide enough room for roots to thrive. Offering visual interest is a welcome bonus as well. So, now that you're looking for the perfect planter for your indoor plants, one option to consider is a DIY planter made using an old plastic soda bottle. This clever way to repurpose plastic in the garden may not produce something that looks like the fancy or expensive store-bought planters, but you'll be amazed at how stunning it'll turn out.
The goal here is to create a pedestal planter with a goblet-style base and two handles. Using a colored plastic bottle, such as green or blue, can add to the overall look and make it a subtle focal point in your space. For example, you can use any leftover soda, water, or juice bottle with a tinted finish. The other supplies you'll need are a marker, at least four zip ties, scissors, and potting mix. To cut the plastic bottle and punch drainage holes, you may want to use an electric cutting tool to make your work easier and faster, like this ANBES Soldering Kit on Amazon. Otherwise, a regular craft knife will do.
How to turn an old plastic soda bottle to a pedestal planter
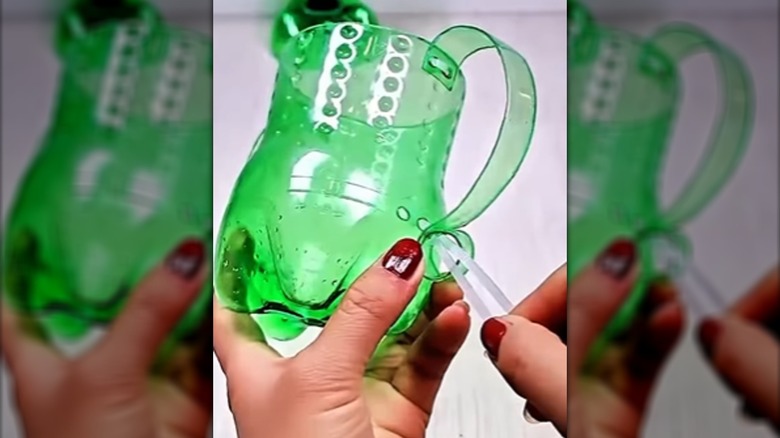
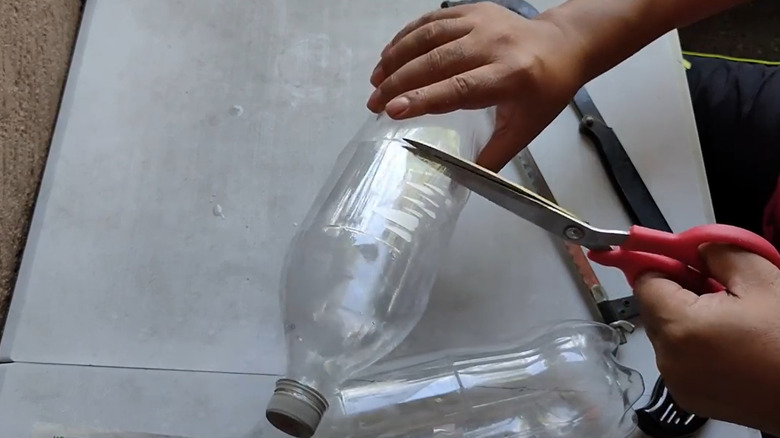
Begin by removing any labels, then cut the bottle in half across the middle (the bottom half will become the plant pot). To do so, simply use your soldering kit or craft knife to make a clean cut at about the midpoint area. Next, create handles by cutting two wide rings from the upper section of the bottle, then cutting each ring into strips. Attach the strips to the bottom half of the bottle, on opposite sides. First, make holes at each end of the strips and on the sides of the bottle where the handles will attach. Secure the strips in place using the zip ties, then trim the excess zip tie sections to size. You now have two little decorative handles for your planter.
Next, make the pot's drainage holes by poking small holes into its base using the electric soldering pen. Finally, you're going to make the pedestal base for your planter. Remember the upper half of the bottle we cut at the beginning? Grab that, trim away the straight-sided section so you remain with only the cone-shaped top part, and unscrew the bottle cap. This will serve as the pedestal base. Cut out a hole at the bottom of the plant pot and push the cone-shaped base through via the neck. Screw the bottle cap back in place, and that's it! You have successfully upcycled an empty plastic bottle into a chic pedestal planter for your houseplants.
How to pot and customize your DIY pedestal planter
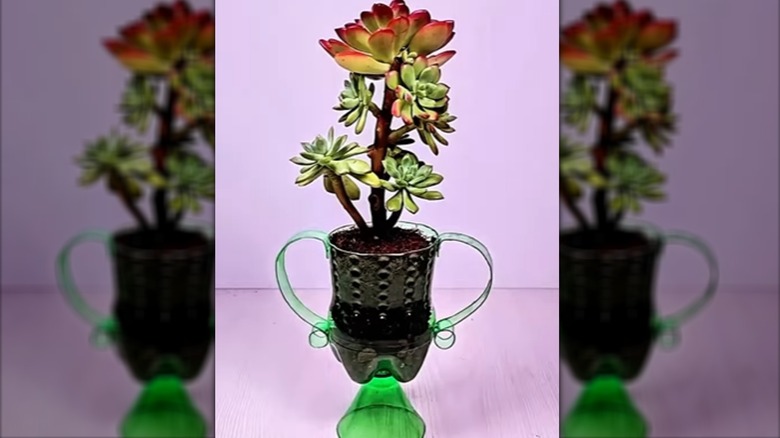
With your DIY planter ready for potting, add a layer of fresh potting mix to the bottom and pack it down. Then take out your plant from its original growing pot and remove most of the old potting mix from its roots. Now, place the plant in the new planter and add potting mix to fill up the sides and keep the plant upright. Finally, water your plant and position it at the spot you want it in your room. You'll want to place it on top of a plate or small circular tray to catch any excess water that'll be draining from the holes after watering.
When it comes to customization, there are several ways to take your planter from boring to beautiful. Painting is one of the easiest options. Use spray paint with a glossy finish if you want a more glamorous look. But if you prefer a rustic vibe, use matte, textured paint that'll give your planter a distressed look. For a fun, playful customization, consider attaching mini pom poms all over your planter like this pack of Caydo Assorted Pom Poms on Amazon. Use a hot glue gun to glue them in place. You can go with one color or use various colors for the pom poms to suit your preference. Whatever you choose, keep your room's overall decor in mind so the planter blends in seamlessly without clashing.