Turn A Protein Powder Canister From Trash To Treasure With A Unique DIY
We may receive a commission on purchases made from links.
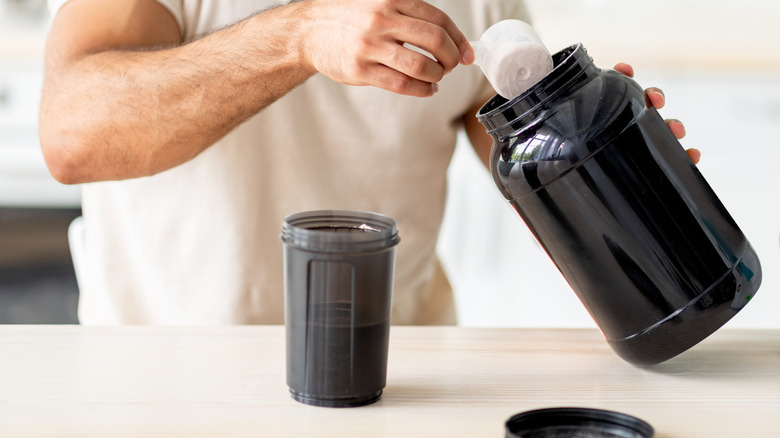
You have one to hold batteries, another to store plastic bags, and several more in your garage for things like loose hardware. Protein powder containers are perfect for upcycling. They're big, have handy lids, and have thick, strong plastic walls. However, there are only so many ways you can use a huge screw-top plastic container in household storage. You probably never considered making one into a lamp. With their rotund dimensions, these durable containers make great lamp bases. The containers are designed to stay upright in the pantry and the expansive exteriors invite decoration — or not, if you prefer. Outfit your decorated protein powder container with a lampshade and a battery-powered light, and you have an affordable cordless lamp for any room in the house.
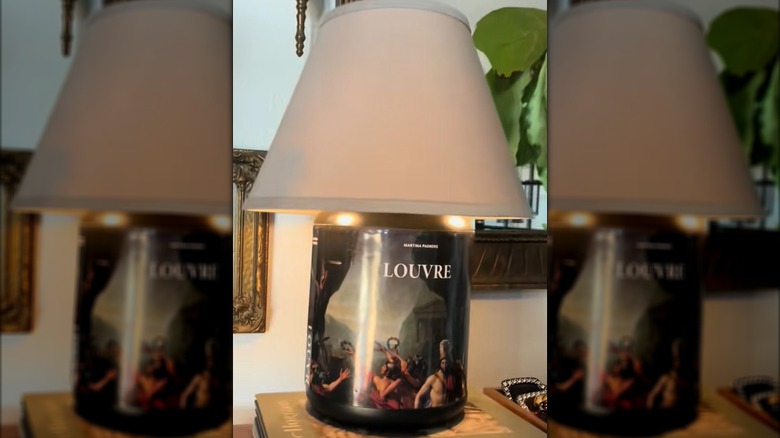
For her lampe à la française, crafty TikToker @redeux_style decorated a protein powder container with the jacket from a coffee table book about the Louvre. You might already have a similarly attractive book jacket that's just the right size. If you're coming up empty, consider other decorative options, such as printouts of public domain art, old book pages, or fine floral fabric. You'll also need a clean, ideally black protein powder canister with a lid, a BLS Remote Control LED Puck Light, and a fixed gimbal, UNO, or base-fitting lampshade. The lampshade should sit low enough over the container that it hides the lid. Supplies-wise, gather together Mod Podge, a paintbrush, strong craft glue (like E6000), a measuring tape or ruler, a marker, and something to weigh down the canister, such as sand or rocks.
Piece together your artsy battery-operated protein powder canister lamp
Your paper image might be large enough to cover the protein powder canister's label, saving you a potentially annoying task. If not, or if you prefer to start with a bare surface, use this foolproof way to remove sticky labels from nearly any surface: a steam cleaner. Then, measure and mark where your decorative paper will go so it's perfectly centered on the container. Paint the back of the paper with Mod Podge. Starting at one corner, slowly and carefully apply the glue-covered paper to the canister. Smooth out any wrinkles or air bubbles by lifting and repositioning the paper and pressing them out with your fingers. Paint an additional coat or two of Mod Podge over decorative paper, and leave your lamp base to dry — a few hours to overnight — before moving on to the next steps.
Adding something to the plastic canister to weigh it down will ensure the lamp won't tip over. You could skip this step, but we highly recommend doing it. Place a handful of clean rocks inside the protein powder canister or pour a couple of inches of gravel or sand into it, then screw on the lid. Center the lampshade's gimbal over the lid and mark its location. Apply some E6000 or other strong adhesive to the mark and firmly press the lampshade gimbal into position. Give the glue between 24 and 72 hours to dry and cure before handling the lamp. Once you're confident of the glue's bond, set your DIY lamp in your living room, bedroom, or kid's room. You could even use it to illuminate outdoor spaces without the hassle of hardwiring lights. Place an LED puck light on top of the gimbal, and use the remote to turn it on.
A protein powder canister plug-in lamp is almost as easy to make
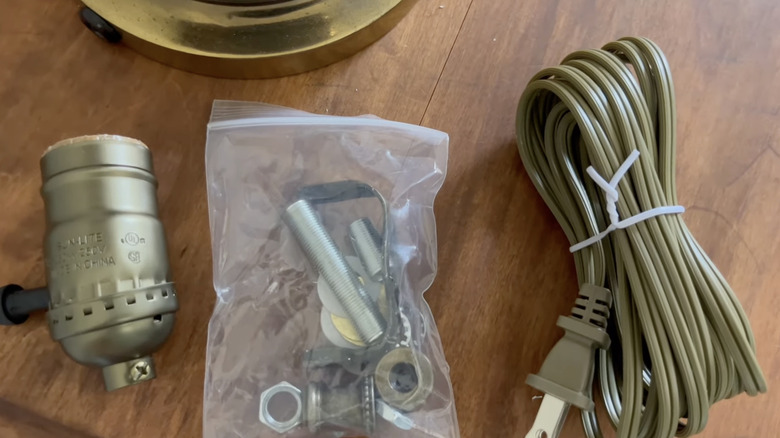
Portability not a major selling point for you? By making some tweaks to the steps and supplies needed for this project, you can upgrade your battery-operated protein powder canister lamp to a plug-in fixture. You'll need an electric drill or a soldering iron and an inexpensive lamp kit. Most lamp kits come with removable harps that allow you to attach lampshades with various fittings. Plus, they are surprisingly easy to use. This attractive, adaptable Creative Hobbies Premium Antique Brass Lamp Kit costs about $15.
Either drill or melt a hole for the cord along the bottom side of the container right near the base. Then follow all of the same preparation steps as you would for the battery-operated lamp, making sure not to cover the hole with the decorative paper. While the Mod Podge dries on the paper surface, drill or melt a hole in the center of the lid that's large enough to fit the lamp collar — that part that sits between the cord and the lamp socket. Add a little glue to the collar for a better hold. Peruse the lamp kit manufacturer's instructions carefully, and follow the steps to fit the socket and other parts to the lid. Screw in a cool-burning LED bulb, just to be safe, and top your lamp with a shade. Plug in your budget-friendly DIY lamp that makes any space look luxe and enjoy a protein shake by protein powder-powered lamplight.