Turn Pieces Of Wood Into A Wall-Mounted Solution To Store Blankets

Wall-mounted blanket storage has become popular, not least because you don't need to fold your blankets. It also saves valuable closet space and adds color to a room. Although there is affordable blanket storage you can find on Amazon, you can turn a few pieces of wood and some wood screws into something equally attractive and useful, and save money, too.
The materials you need are some 2x2 lumber, 2½ inch wood screws, 120-grit sandpaper, and perhaps some wall anchors (more on this later). You'll need some kind of saw. While there are several options, a miter saw makes things quick and easy and is one of the top tools worth investing in to start woodworking at home. You'll also need a cordless drill/driver and a drill bit that's slightly smaller than the diameter of your screws. This is for drilling pilot holes. They make it easier to drive the screws, prevent the wood from splitting, and help with accuracy.
You can build your wall-mounted blanket rack any size you like, but the following is a good average. Cut your 2x2 into two pieces 36 inches long, two pieces 12 inches long, and four pieces 8 inches long. You could miter the ends (cut them at a 45-degree angle), which some woodworkers prefer because it hides the end grain, but it's an extra step that isn't necessary. Sand all the surfaces smooth. You could use a sander or just wrap sandpaper around a scrap block.
Assembling the wall-mounted blanket storage and mounting it
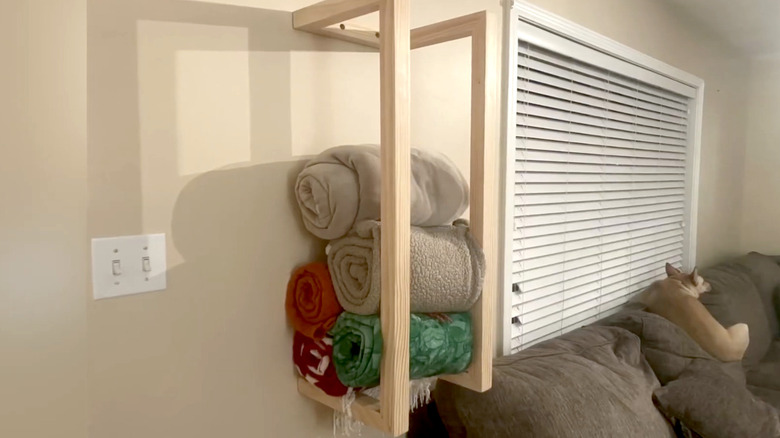
Make two 'U' shapes from one 12-inch piece and two 8-inch pieces sat on top. Standard 2x2 lumber is actually 1½ inches square, so take the 12-inch piece and make pencil marks on one side ¾-inch in from each end, and halfway across. Carefully drill pilot holes right through, and drive screws partway in. Now draw a diagonal cross on both ends of each 8-inch piece, and drill pilot holes about ½-inch deep. Line up one end of each with the 12-inch piece and drive the screws home. Next, mark and drill both 36-inch pieces the same as you did for the 12-inch piece, and screw through into the top of each 'U' to finish the assembly. Some people don't bother with the pilot holes. It is faster, but you might split the wood.
You have probably thought about where your blanket rack will go, but there's one more decision to make. If there is a convenient wall stud, then driving 3 to 4-inch-long screws through the center of each horizontal bar and into the stud should provide enough grip to hold it. If you're just relying on the drywall, you'll need two holes, top and bottom, and wall anchors.
Turning pieces of wood into a wall-mounted blanket rack is one of the woodworking projects even beginners can do. You can stain, varnish, or paint the finished item to match your decor, and of course, it would be equally useful in the bathroom for towel storage.