Jute Baskets Don't Have To Be Expensive: How To DIY One On A Budget

We may receive a commission on purchases made from links.
Jute baskets will never go out of style. The homey fibers complement nearly any decor style, from boho to Mediterranean to industrial and beyond. Although baskets are a common thrift store find, and plenty of discount purveyors sell suspiciously cheap ones, a sturdy brand-new jute basket can be costly. If you're up for a DIY, however, your nearest Dollar Tree might just have the fixings for a homemade jute basket that's pretty, tough, and light on the wallet. Plus, the steps are ultra simple and could be the perfect meditative craft to calm a frazzled mind.
At Dollar Tree, seek out a large, wide-mouthed bowl like this Caterer's Corner Large Plastic Bowl ($2.00). Any color will do, since it will be covered by coiled jute. You'll also need several packs of Floral Garden Decorative Nautical Rope ($1.75 per pack). On TikTok, content creator @homegoodiys used six packs of rope for a shallower container, so it might be wise to grab as many as 10 packs — you can always find other uses for it, either for crafting or in the garden. Instead of settling for Dollar Tree hot glue, it could be worth spending a bit more on Gorilla Hot Glue (around $10), an adhesive that's highly-rated for crafting. As for other supplies, set aside a pair of scissors, a measuring tape, and a permanent marker. Lastly, you'll need little more than an hour to fashion this easy Dollar Tree DIY and add a rustic touch to any room.
Steps for coiling a custom Dollar Tree jute basket
First, you'll have to coil and glue jute to the center of the inside of the bowl. Start by dabbing a bit of hot glue onto the end of the end of the jute and cover the ends of the fiber to keep the rope from fraying (without leaving an unsightly glob at the end). Take a measurement from the bowl's mouth to its center and mark the spot with a permanent marker. Add a bit of glue there, press the rope's end into it, and tightly coil the rope around the center, gluing it every inch or so. As you reach the end of a rope section, add glue to the cut ends of both the rope you're finishing and the new rope to reduce fraying and hide the joint.
@homegoodiys 🍂DIY Dollar Tree Basket🍂 #budgetfriendlydiy #dollartreediy #dollartreecrafts #dollartreecommunity #homegoodiys #dollartreehacks #diyhomedecorideas #diyhome
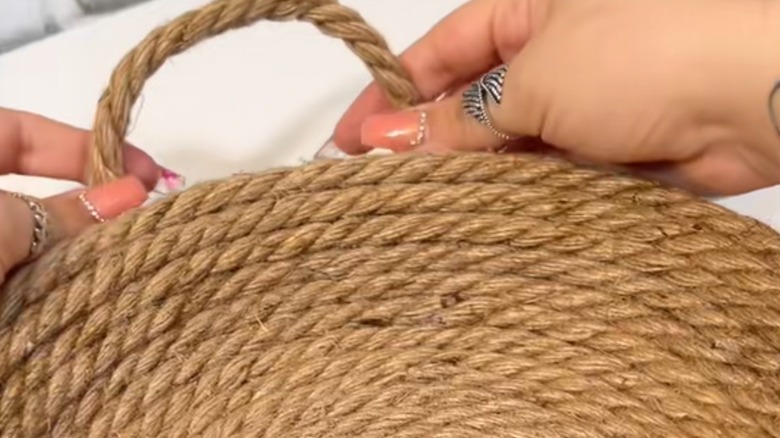
Once you've covered the bowl's interior with rope, pause and cut two 10- to 12-inch pieces of jute for the handles. Loosen and fray about 2 inches on both ends of each piece of rope, and attach those ends to the sides of the bowl, 3 to 4 inches apart, on both sides of the bowl. Use a generous amount of glue. You'll be covering these unsightly areas with coiled rope, so don't worry about aesthetics yet.
Keep coiling the rope around the bowl's mouth, working your way to its exterior. Work around the handles and continue until you've covered the entire exterior. Now your basket is ready to be styled in any part of your home.