Use Simple Tissue Paper To DIY Flower Lanterns That Look So Elegant
We may receive a commission on purchases made from links.
Lanterns have a way of making spaces look and feel more atmospheric. Among all the different types of lanterns available, paper lanterns with floral designs feel especially romantic. If you want to have these warm, whimsical lights in your home, you can make it happen with a simple DIY. All you need is some tissue paper, pressed flowers, and a glass jar that you will need not sacrifice for this project, as it will serve as the lantern's mold.
In a nutshell, this project will involve some easy paper mache techniques to help create the lantern's lightweight structure. Apart from tissue paper, you can also work with colored wrapping tissue or Japanese paper — or repurpose leftover tissue paper to make this project a little more eco-friendly. Other than that, you will need cling wrap, PVA glue, a brush to spread the adhesive, a pair of scissors, and some string to turn the lantern into hanging decor. You can work with yarn, twine, or even chain links to achieve a rustic yet sturdy handle.
For the light source, you can work with LED tea lights like Luminessence LED Tealight Candles from Dollar Tree, or get a pack of Fairdeer battery operated fairy lights from Amazon for under $4. For the design, you can choose whatever flora and fauna is already available in your home: Make pressed flowers, repurpose a dying plant instead of throwing it out, or let out your inner Van Gogh or Monet and paint the flowers yourself.
How to turn tissue into an elegant floral lantern
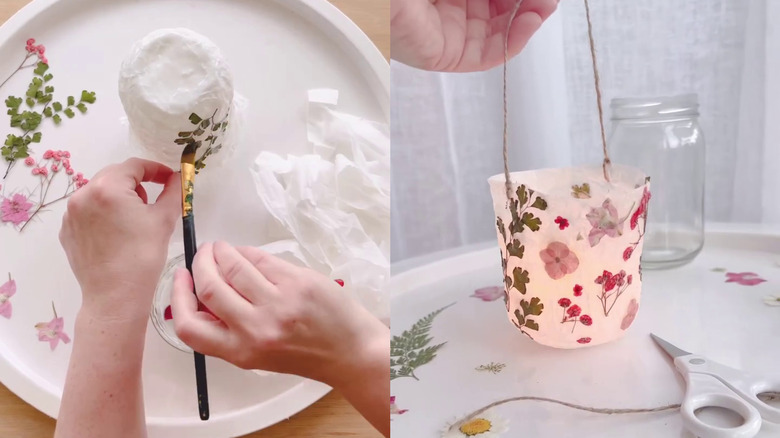
Make sure your glass jar is clean and dry, then wrap an even layer of cling film around it. Avoid wrapping too tightly as doing so will make it difficult to remove the tissue lantern from the jar once you are done. Next, brush glue around the surface, then adhere the tissue paper one layer at a time. Since we want the lantern structure to hold well, apply four to five layers of tissue for thickness and durability, brushing each layer with glue. Once the tissue lantern has dried and taken shape, adhere the floral decor around the surface.
If you're working with dried plants or pressed flowers, simply brush glue before and after adhering it to the tissue lantern. If you want to paint your flora and fauna, and have the colors stand out and last, it is best to work with acrylic paint. Once you're satisfied with your tissue lantern design, let the whole thing dry thoroughly before removing it gently from the glass jar. Afterwards, gently bring the two opposing edges of the lantern towards the middle and poke a hole through it using your scissors, then tie your handle using your string of choice. Finally, insert the LED tea light or fairy lights inside the lantern before you brighten up your living room or any part of your home with it.