Save Old Jar Lids To Craft One-Of-A-Kind Kitchen Decor

We may receive a commission on purchases made from links.
Pretty designer food labels notwithstanding, when you look at the lid on that giant pickle jar in the fridge, artwork for the kitchen probably isn't the first thing that comes to mind. That's why earth.paint.queen's repurposed jar-lid tutorial on Instagram is as cute as it is clever. With the application of a smidgen of paint and some miniature pieces of art, her jar lids morphed into three pieces of kitchen decor that matched the canisters on her countertop: It was certainly an innovative way to bring wall art into the kitchen.
If you'd like to follow in this crafter's footsteps, you'll need some medium to large non-Mason-style jar lids. These are the "canvases" you'll paint the art on. Next, add acrylic paint, primer, some sandpaper, and a set of brushes to your work table. You'll be doing detailed work for this. Since even the largest lids are still quite small from a painting perspective, go with small- to medium-sized filbert brushes with short bristles. These give you the best control when you're painting on small surfaces.
A glue gun, GUSSKER D-Ring Picture Hangers, some pencils, vine charcoal, newsprint paper, architect's tape, scissors, kitchen-related images from magazines or Pinterest (for illustration inspiration), and hair spray or fixative make up the rest of the tool supply list. Lastly, dig the baking soda, some oil-cutting dish soap, and some scrubber sponges out from under the kitchen sink. You'll need them to clean the lids.
Preparing the repurposed jar lids

You may be dealing with some leftover scents on your soon-to-be art canvas. To get rid of any smell, fill the lids first with baking soda, then with vinegar. Your baking soda cleaning hack might boil over a bit, so to avoid the mess, lay a thick towel or large piece of scrap cardboard down on the surface you're working on before you start. The mixture will bubble for a few minutes. Leave the lids as is on the counter for up to 24 hours before dumping the solution out. If you still have pesky pickle smells, add a few drops of lemon essential oils to the lid and rub it around with a cotton ball. Then, wash everything with soapy water.
Next, sand the surface lightly. Follow with some primer, and then acrylic or chalk paint. These paint types are better if you're going to draw the art onto the lid: It's easier to get pencil marks to stick to them.
You have a couple of options for paint colors. If you have some essential kitchen decor pieces, like a canister set, then select paint hues based on those sets to create matching decor. The other option you have is to choose colors that contrast with the dominant hues in the kitchen. The opposing color schemes attract the eye. After you've made your selection, finish by covering the jar lid with a coat or two of primer, paint, and then let it dry.
Finishing up the kitchen decor pieces
Even the largest jar lids are actually quite small when you look at them as a potential canvas for an art image. To ensure that your decor piece doesn't look cluttered, create a small spot illustration on a piece of paper. For example, an image of a tomato against a plain white background would work well. Make sure that the art you've drawn is small enough to fit on the lid.
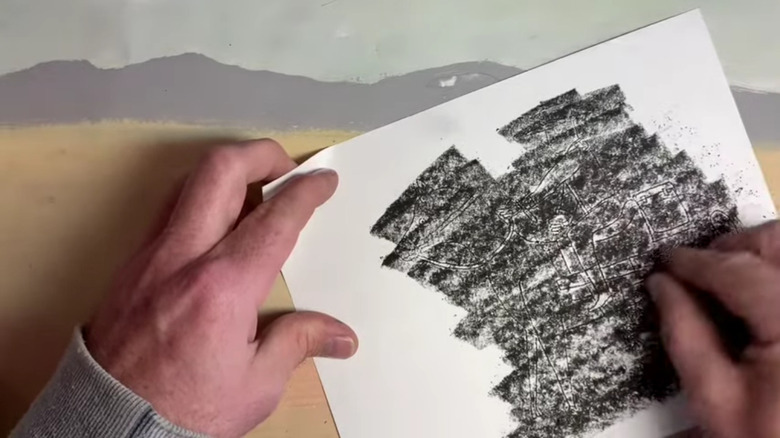
Next, use the charcoal transfer method to trace the illustration onto the lid. To do this, rub vine charcoal on the back of an illustration you've already drawn on your paper. Turn the drawing over, place the charcoal side on top of the lid, and then trace over the lines of your drawing. Press hard with the pencil. The pressure from the writing instrument, plus the charcoal, functions like carbon paper to transfer the image onto the lid. (You can actually use something like Selizo Black Carbon Transfer Tracing Paper instead of the charcoal transfer method to save time.)
Repeat the process if you have two or three illustrations you need to draw onto subsequent lids. Spray the finished images with hair spray or art fixative to prevent the line art from smearing, then color the line illustrations in with paint. Add the D-Ring to the back of your lid art and hang it all up in your kitchen for the finished look.