How To Build A Kitchen Storage Shelf From Scrap Wood Pallets

There must be some kind of unwritten law that says however much kitchen storage you have, your gadgets, staples, or ingredients will outgrow it. Finding space for extra cabinets can be a challenge, but most of us could probably fit another shelf somewhere. Making one or more from scrap wood pallets takes minimal skill and is budget-friendly. You can also stain or paint the finished item to match your existing decor.
There are numerous places to find free pallets if you don't already have them, and a host of DIY projects that use them. Be sure to check the stamps or brands on them. Don't use any that are marked MB (they've been treated with a pesticide called methyl bromide, which is poisonous), or CP (pallets used to carry chemicals). They might be harmless, but there's no way to know, so it's better to be safe than sorry.
While you could build your kitchen storage shelves using a handsaw, a hammer, and some nails, a circular saw and a cordless drill will make things quicker and easier. Both top the list of must-have power tools because of their versatility, and you'll find plenty of jobs for them around the home and yard after this project, so they are well worth the relatively modest investment.
Designing your kitchen storage shelf
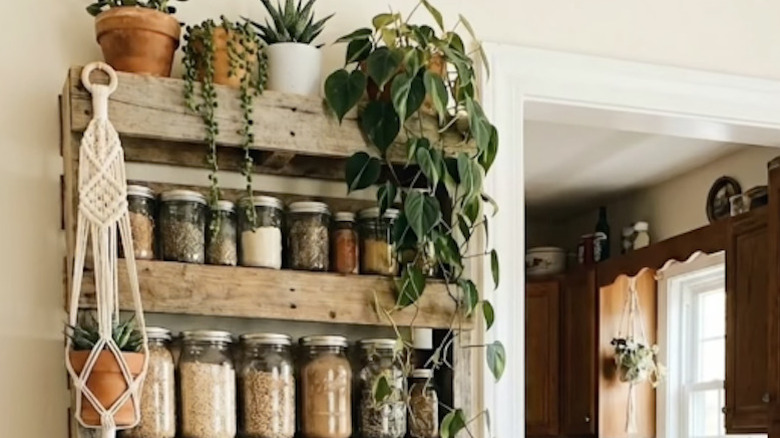
A pallet shelf is one many woodworking projects even beginners can do, and the pallet should provide all the wood you need. If you want to take it apart, you can use a pry bar (working slowly so you don't split the wood) or cut it into pieces with the saw. Before you do, it's worth considering the design of your kitchen storage shelf. If you stand a pallet on end, with the boards running horizontally, it already looks a bit like shelving. You could minimize the work by leaving some boards in place. Those you remove could be screwed underneath them, and in a few minutes you have a basic shelf with pockets to hold jars, for example.
Standard US pallets are 48 inches long by 40 inches wide. The stringers (the rails at the sides and middle) are usually 2x4, the bottom boards are 1x6, and the top ones are 1x4 (or similar). This gives you several different sizes of wood to work with. With a little ingenuity there's very little to limit what you can achieve, and you may find inspiration online. You might want to sketch out some ideas, or simply pull a pallet apart and lay the pieces out until the appearance appeals to you. Let's look at some of your options.
Assembling a wood pallet kitchen storage shelf
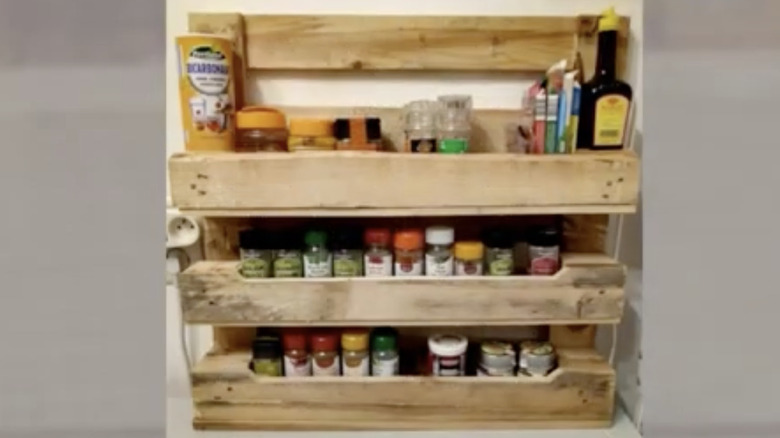
If 40 inches is too wide, the simplest approach is to cut the pallet almost in half (leaving the central stringer intact). The boards from the discarded portion can be used to create pockets, as described above. If you want open shelves, remove the front boards then reattach them by screwing through the back and stringers into the shelf edges. You could use nails, but it might split the wood. Pre-drilling and using screws avoids this and creates stronger joints.
Although the full 48-inch height will provide lots of potential storage space, cutting it down will make it more manageable while remaining useful. It depends on how many, and what type of shelves you need. If you were to fit a vertical board halfway across the back, you could have horizontal shelves on one side, and add hanging space on the other using screw-in cup hooks. If you want the shelves full width, add the cup hooks to the front edge of the bottom shelf instead.
Pallet wood is often a little rough. Use 120 grit sandpaper on a random orbital sander or wrapped around a piece of scrap to remove any splinters, particularly along edges, or anywhere you have sawed. Finishing your kitchen shelf with paint or varnish will make it easy to keep clean. If it's small, and you can find a conveniently placed stud, you can screw directly into it for hanging. If it's larger, you'll need to use wall anchors.