

Use Old Toilet Paper Tubes To Create A Budget-Friendly Way To Organize Jewelry
We may receive a commission on purchases made from links.
How many times have you set a ring down on the bathroom sink, only to never see it again? If you're tired of losing your jewelry, but don't want to invest in a new jewelry organizer, did you know you can make one using old toilet paper tubes? Its one of those common household items you can repurpose into unique DIY home decor. Plus, this eco-friendly craft is also super affordable — primarily using stuff you were going to toss in the recycling bin anyway.
For this project, you'll need a small box, roughly the size of a box of baking soda, and enough toilet paper rolls to fit snugly inside the box (about four). Also, grab a piece of attractive fabric. It needs to be large enough to cover the box and hang a couple of inches over each side. You'll want a pair of scissors, foam mounting tape, adhesive craft foam, and something to act as the "feet" of your jewelry box; wooden beans, large acrylic gems, or even bottle caps can work for this. Finally, you'll need wooden craft dowels (bamboo skewers work in a pinch), glue, and paint. The result is a chic and minimalist little jewelry box that has rolls for your rings and a little bar on which to dangle your necklaces and bracelets.
Creating Your Jewelry Organizer
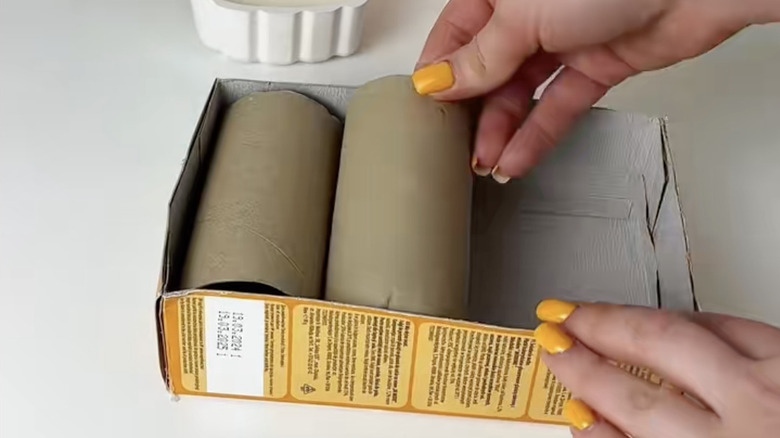
To make this jewelry organizer, place the toilet paper rolls inside your box, ensuring the rolls fit snugly, and the entire box is filled. Then, drape your fabric over the box and tuck it into the crevices between and surrounding the rolls to anchor it. (The dull edge of your scissors or a butter knife can make this process easier.) Slide a piece of foam mounting tape along the inside of each edge and fold it over the box's rim. Surround the outside of the box with more foam tape.
Cut your craft foam to the size of the box and fold it over the edges, adhering it to the tape, and cut off any excess. Then, glue whatever you're using for the organizer's "feet" — like beads — onto the bottom of the box. Finally, paint your wooden dowels and allow them to dry. Cut them at an angle and glue them in an upside-down goalpost shape to the sides of your box, forming a necklace hanger.
Variations, Embellishments And Other Uses
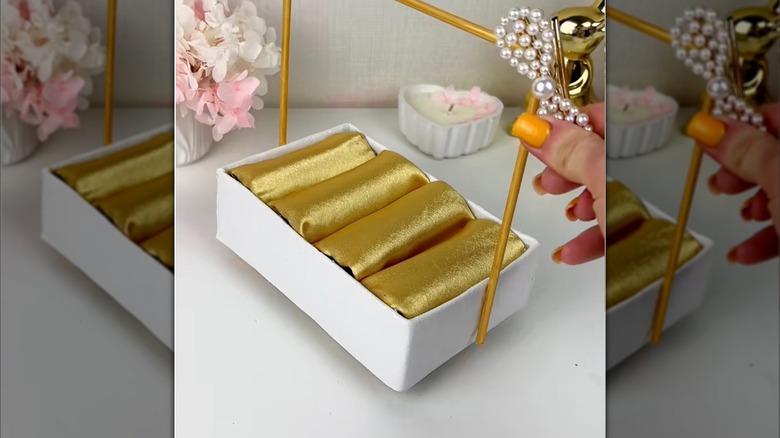
Of course, there are plenty of ways to use a DIY like this, other than just for jewelry. The same basic craft can be turned into the perfect place to charge your devices (minus the necklace hanger), or it can hold hair accessories and pins. To make it look a little more luxe, upgrade the foam wrapping on the outside of the box to velvet, linen, or another indulgent-feeling fabric instead. Or, invest in fancier hardware–like drawer pulls for the feet.
You can add a subtle trim to your jewelry box, using nail heads, ribbon, or beads. If you do nothing else, simply make sure your toilet paper rolls are evenly spaced and the fabric covering them is pulled tight. This will make your organizer look polished and chic, even without additional embellishments. Or, if you're feeling more indulgent, opt out of DIY'ing altogether and treat yourself to one of the best jewelry organizers for your space instead.