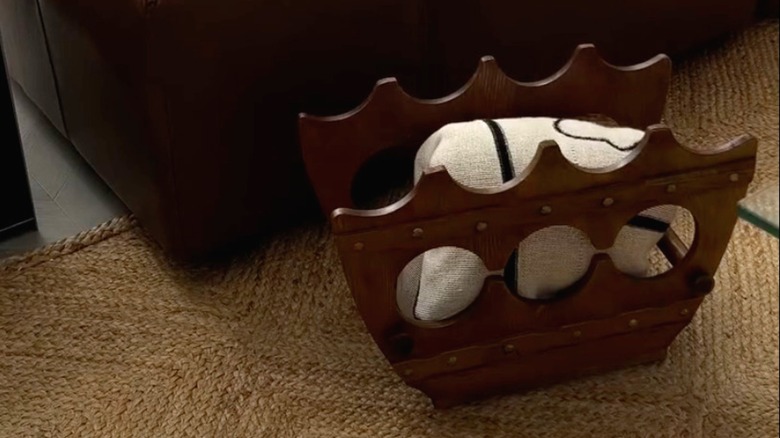
Upcycle An Old Wine Rack To Create Blanket Storage With A Clever DIY

Few things make a space as cozy as blankets. They add color, texture, and comfort to any space, and there are plenty of cozy throw blankets that will look good in every room in your home. However, it's easy to go overboard, especially when so many people love to give blankets as gifts. If blankets are taking over your space, it may be time to try out another tried-and-true storage method that looks stylish and soft while keeping your blankets accessible: a blanket box. You don't need to open a new tab or run to the store to start searching for blanket boxes, though. Instead, you can take the opportunity to make your own DIY box in order to stick to a budget, give new life to unused items, and let your creativity flow freely by transforming a wooden wine rack into a lovely blanket holder, as demonstrated by Instagram account ryobinz.
Wooden wine racks are a surprisingly great starting point for a blanket box. They are often made of beautiful, high-quality woods like redwood, mahogany, or pine, and the openings made for the bottles create a unique geometric design without you having to do all of the carving work yourself. The availability of wine racks is another benefit. While you may not easily find an affordable blanket box you love, online marketplaces and in-person thrift stores often carry different types of wine racks perfect for a project like this. The project requires some tools and additional materials beyond the wine rack, but it can be as simple or complex as you like.
How to make a DIY blanket box using a wine rack
For this project, you'll need your wooden wine rack, a hand saw or power saw, wood glue, screws, a piece of plywood, and sandpaper in coarse, medium, and fine grits. For an older wine rack, wood filler and cleaning supplies are helpful. Finally, wood stain or paint will help finalize and customize the look.
With your supplies ready, start by cleaning the surface using a rag and degreaser before assessing the condition of your wine rack. Fill in any chips or scratches with wood filler, and tighten any loose screws. Discolored spots can be addressed with sanding and staining, but you'll want to wait until after making the necessary cuts. Wine racks come in a wide variety of shapes, so you'll need to consider your specific wine rack's shape and what you want your blanket box to look like.
The simplest way to complete the DIY is to make a horizontal cut halfway up the wine rack. This should produce a rough box shape with an open top and bottom. To complete the structure, measure and cut a piece of plywood for the base, then stain it and attach it to the cut wine rack using wood glue or screws. For a 10-bottle wine rack, cutting it in half should comfortably fit one or two blankets, and you may be able to fit a third on top. Plus, you can make a second box using the other half. For more or less storage capacity of a single box, though, consider cutting higher or lower.
Tips for perfecting your blanket box
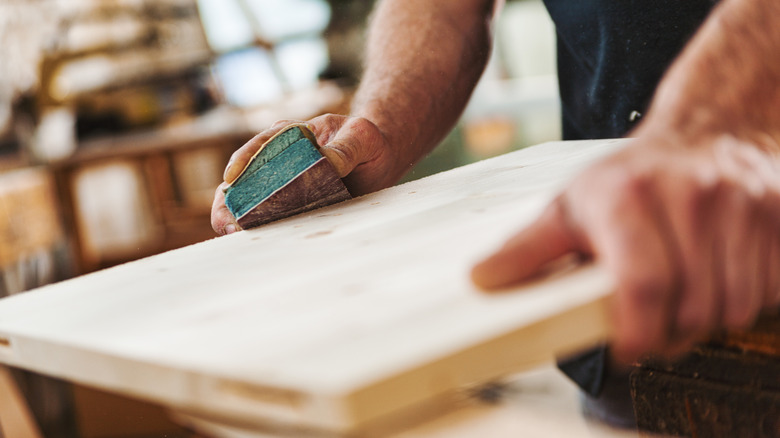
An important part of the transformation process is sanding. If you've ever had your favorite blanket snag on a wood surface, then you already know how necessary it is to create a smooth finish. When sanding, be sure to start with a coarse grit before moving to a finer one, and maybe even use an extra fine grit to make it perfectly smooth. Be sure to avoid the common mistakes you're making when sanding wood projects, and pay careful attention to the top edge and any nooks or crannies where blankets could get caught.
By repurposing a wine rack, you're already creating a unique blanket box, but you can further personalize it with your stain or paint choice. There are tons of wood stain and paint color combos that will look stunning in your home, so you can combine a subtle stain and a bold paint if you don't want to choose just one. Painting only the base or decorative designs will certainly enhance the look and help you style it in any room of your home, no matter the color scheme or style. Another enhancement could be cutting out four small pieces from the leftover wine rack half and making small feet to elevate the box. When the paint or stain is dry, pop in your blankets, a pillow, or a cozy sweater, and your space will be perfectly comfortable, stylish, and functional.