Ditch Bins & Baskets: Store Extra Blankets In A Common Garden Item That Makes Storage Pretty

We may receive a commission on purchases made from links.
Finding a clever way to store those extra blankets can have you searching far and wide for ideas that you like and can actually use. While you might have seen numerous ways to utilize bins or baskets, or you've seen how to upcycle an old wine rack, none of them have really appealed to your sense of style. Well, if you love filling your home with pretty things and are handy with a paintbrush, you might just like what Instagrammer mythreadbearlife has done with a common garden item, namely an old wooden wheelbarrow. While there are plenty of ways to repurpose an old wheelbarrow, this project might just be one of the prettiest you've ever seen.
Before she got started with the transformation, the wheelbarrow was looking considerably worse for wear with peeling brown paint and some old decals that were faded. But once you see what some paint, pretty floral transfers, and some nice fabric can do, you'll look at that wheelbarrow at the back of the shed or at your local thrift store in a different light. Besides the old wooden wheelbarrow, you're going to need a sander, some lovely FolkArt acrylic chalk paint in a white or cream color, a few sheets of Beinkmake vintage flower and bird rub-on transfers, and a paintbrush. You'll also need cardboard, wadding, a piece of matching floral fabric, and some double-sided tape for the base of the interior of the tray. If you can't find a vintage wooden wheelbarrow, you could always snag a metal one from the thrift store or Facebook Marketplace and use paint that's suitable for metal. Remember to use a primer first, so the paint will adhere well.
How to upcycle an old wooden wheelbarrow for pretty blanket storage
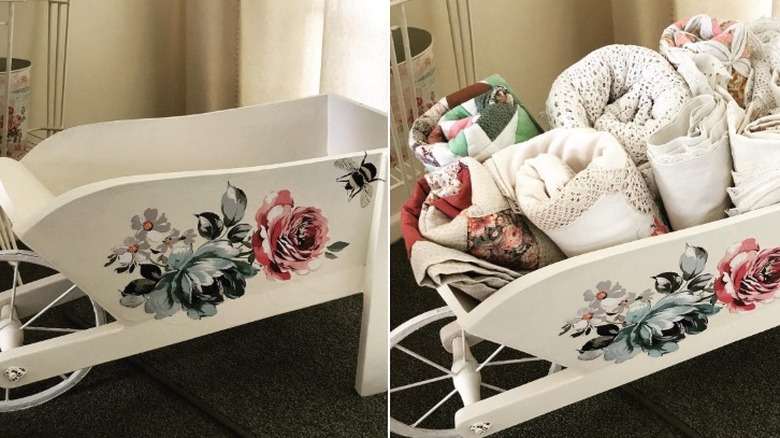
The first thing you'll want to do is give the wheelbarrow a really good clean, maybe hose it out, and then let it dry completely. Once dry, it's a good idea to go over the entire unit with a sander. This will remove any flaking paint and create a surface that the paint will stick to easily. To get a nice, lasting finish on the unit, you'll probably want to give it around three coats of paint. When this is dry, it's time to apply the rub-on transfers by following the instructions on the pack.
For the base of the wheelbarrow tray, cut a piece of cardboard to fit and then glue on some wadding. Cover the entire thing with a nice piece of fabric and attach it to the bottom of the tray with some double-sided tape. This provides a pretty base for your blankets to sit on.
Of course, there are many ways that you can make this project entirely your own by adding customizations. You don't just have to stick to white or cream for your wheelbarrow. Choose a color that matches the decor in the room where you're going to put your blanket storage unit. You might also like to swap out the floral transfers and add ones like these Thymeless Designs farmhouse decals. These are the same ones you can use to give your kitchen a DIY farmhouse makeover. Or, for something completely different, you might like these cute Globeland gnome and butterfly stickers. If you're artsy, you could paint on your own designs or just find some nice stencils to use instead.