

How To Use A Plastic Bottle To Keep Tomatoes Hydrated In The Heat
During the summer months, our garden plants need a little bit of extra TLC to make sure that they're given the nutrients and environment they need to flourish. One key element is, of course, water. A popular vegetable to plant and harvest in summer is tomatoes. They are relatively easy to manage, they grow quite quickly, and who doesn't love being able to pop to the veggie garden to grab a few ingredients for a delicious tomato dish recipe? Plants like tomatoes are, however, particularly thirsty, and even more so over the warmer months of year. While you can give them a good soaking, water draining quickly into the soil and away from the plant won't give them the slow drink they need. Having a slow irrigation system comes in handy here. This YouTuber has one such vegetable watering hack, using everyday supplies you can get right from your kitchen to allow water to slowly drain into the soil around your thirsty plants as it's needed.
If you consider yourself a handy gardener that takes a lot of pride in yielding a hearty crop in your own yard, the last thing you want to see when you visit your vegetable garden is to that your water-reliant plants have given up the ghost and moved on to a better place. For this garden watering trick all you'll need is a plastic bottle with a narrow neck and a sponge. You won't even need the lid. The best part is that this DIY home garden watering system will only take you a minute or two set up.
How to create a slow draining watering bottle with a sponge
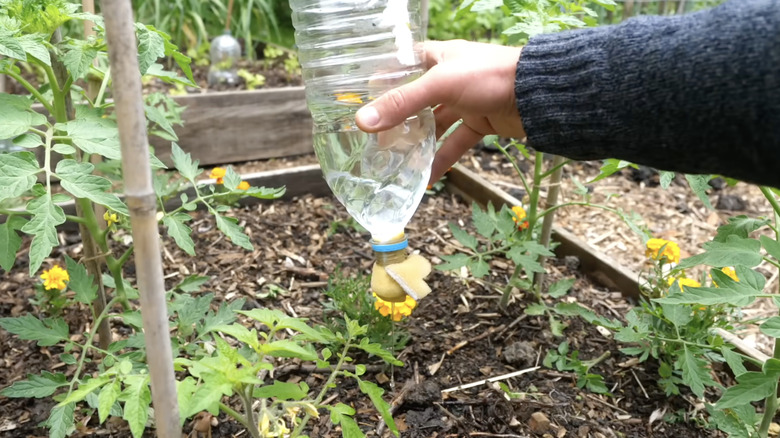
For the bottle, you can go with a few sizes depending on how much water you want, but we'd recommend a 1-liter or larger plastic option. To prevent the plastic wrapper from littering your garden later, use hot water to peel it off. Next, cut the back of the bottle off near to the base so it holds as much water as possible. Then, you'll just need a standard kitchen sponge that will give you the slow flow that you'll be looking for to set your tomato plants up for success.
With the sponge, you'll want to roll it over itself, with the scouring layer on the inside. Then, insert it into the neck of the bottle, leaving some of the sponge on the outside. You may have to play around with the positioning of the sponge slightly depending on the rate of drainage you want. Start with approximately half the sponge outside the neck, and adjust it from there. Dig a small hole close to the plant, about 4 inches deep and wide enough to take the bottle. Once you've placed the bottle into the hole and tucked it in with soil, all that's left to do is fill it up with water. Then, fill the bottle up and move from plant to plant. By the time you've done the last plant, if you see the water has already drained, you can fill them all up one more time for an extra soak.