

Ditch Traditional Garden Steps: Upgrade Yours Quickly With This Unique And Durable Material
Sometimes an easy makeover can be just as effective as a whole renovation. Which is great news if your garden steps are looking a bit dull and run down. If they're in need of an upgrade but you're not ready to rent an excavator or hire a construction crew, you can give them a quick facelift with a material that's as gorgeous as it is durable: corten steel. This DIY upgrade is the simplest way to give your garden a pro designer look.
Corten steel is what they call weathering steel. The natural elements will cause it to rust, but not in a bad way. It actually creates a protective outer layer by oxidizing and forms a patina. Corten steel will look like typical silver steel sheets when you first purchase it. But as it sits outdoors and weathers, it gradually turns shades of orange and brown. When laid against the back of a stair step, it offers a beautifully earthy tone. It's not just a pretty face though. Corten steel is a great choice for its strength and ability to hold up for the long haul. Corten steel steps are an outdoor feature that make every gardener's life easier because they're incredibly low-maintenance.
For this project, you'll need corten steel panels and a strong construction adhesive glue. You'll also need gold dust, which is just decomposed granite. It's not as fancy as it sounds, but the name does add a little whimsy. Then you'll need pea gravel and rock glue. As for tools, grab a flat head shovel or trowel, one 5-gallon bucket, and a garden sprayer.
How to use corten steel for a quick & durable garden steps upgrade
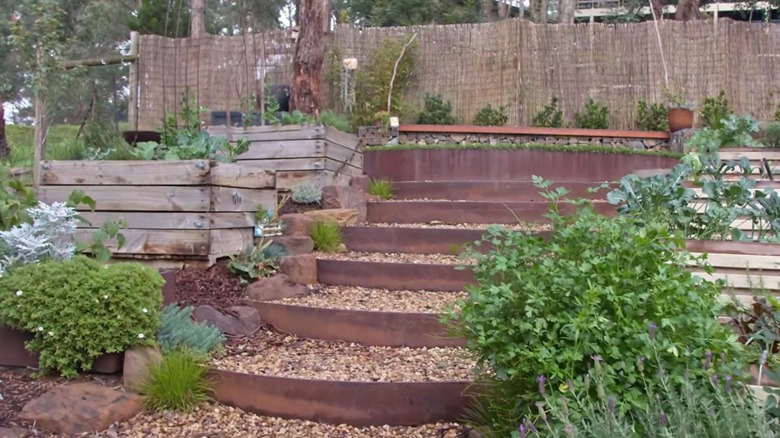
If you're ready to transform your boring old garden steps, let's grab the corten panels and adhesive. Working with one panel at a time, apply a generous amount of adhesive to the back of the panel and push it firmly against the riser part of the existing stair step. Repeat for all stair steps.
While we let the adhesive dry and the panels weather, begin pouring the decomposed granite in a layer across the top of each step. This is going to give the pea gravel something to adhere to. Use a flat-head shovel or trowel to smooth it across the top of the step so it's level. Then add your layer of pea gravel on top, using enough to completely cover the granite base. Just like the decomposed granite, pea gravel is great for drainage. Again, use your tool of choice to create an even layer across the entire step.
To secure the pea gravel in place, offering a solid surface for walking, we're going to use rock glue (sometimes referred to as mulch glue or gravel adhesive). You can DIY mulch glue or purchase it from your local garden center. Generally, this is purchased as a concentrated form of landscaping glue that needs to be diluted with water. Using a 5-gallon bucket, follow your product's mixing instructions to combine the glue and water. Then fill a garden sprayer with the diluted adhesive and spray it directly onto the pea gravel you've laid on the stairs. Use your trowel to push the pea gravel down, then add another layer of adhesive to finish.