

Gardener Transforms Simple Wood Planks Into A Unique Garden Bench

Every yard needs somewhere to sit and relax, whether that's on the patio with family and friends or in a secluded corner where you can enjoy a little peace and quiet. Over on TikTok, a channel called Jack's Garden demonstrates how to turn basic planks into a unique and attractive bench that would suit the latter. It's the kind of DIY project that could turn scrap wood into useful pieces, or it could be made relatively cheaply with store-bought lumber. Unfortunately, the video doesn't come with instructions, but the assembly is quite straightforward.
There's no complicated joinery, so even complete beginners should be able to build this bench. There aren't many tools required either. You'll need a drill driver, a speed square, and a saw. Just about any type would do, but a miter saw is particularly good for this job, and one of the top tools to invest in to start woodworking at home. You'll need some sandpaper, wood screws, and your choice of paint or varnish depending on how you want the finished bench to look.
Most of the bench can be made from 2x4 or similar-sized lumber. You can modify the design to suit whatever you have handy. It will change how thick the seat or legs look, but not the construction method. The tricky bit looks like it would be creating the curve, but you don't need to cut angled wedges. It's done with slightly different thicknesses of wooden spacers.
How to assemble the unique curved garden bench
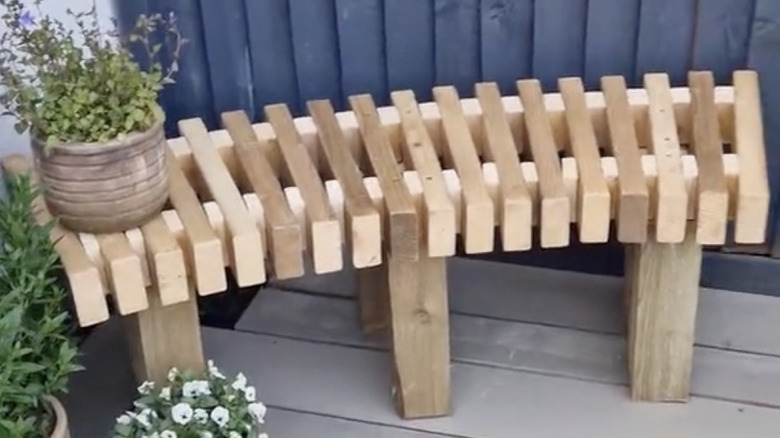
Decide how deep you want the seat and approximately how wide. You could do some math to work out how many pieces you need, or just cut the planks and lay them out until you get to where you like the appearance. The rear spacers are made from the same lumber as the seat slats. The front ones are narrower to form the curve. If you don't have an appropriately sized board, cut it down carefully on the miter saw. Make sure your hands are well clear of the blade.
@jacksgarden85 This effective curved bench is actually simple to make. #DIY #bench #garden
There are numerous ways to style a garden bench, and if you want to color or varnish yours, you need to do it before assembly. It will be very fiddly to try to do it afterwards. Wrap sandpaper around a scrap block and remove any splinters first. Then, it's just a matter of screwing through the spacer blocks into the first seat slat, screwing the next slat on top, screwing on more spacers, and so on. To keep the spacers the same distance from the front and back, just cut a simple guide piece.
It looks like the legs have been added simply by screwing down through the seat, although that wouldn't be particularly sturdy. Alternatively, you could use metal 'L' brackets screwed on either side to the top of each leg and to the underside of the seat where they won't be seen. You should find what you need at your local hardware store.