

Not A Crow Bar: There's A Better, Quicker Tool For Removing Baseboards
We may receive a commission on purchases made from links.
Baseboards play an important, utilitarian role in every room, protecting walls and hiding unsightly floor gaps. However, they also serve an aesthetic purpose, which means keeping them in tip-top shape is imperative. This requires cleaning your baseboards regularly, as well as giving them an occasional refresh with a new coat of paint. At some point, though, such cosmetic procedures will no longer be enough to hide growing scuff marks and signs of wear and tear. When that happens, removing them entirely will prove to be a better option.
While it may be tempting to reach for a crow bar, there are actually much more effective specialty products that help make the job quicker and easier. As YouTuber Everyday Home Repairs explains, you can avoid accidentally chipping away wall paint or damaging underlying drywall by simply using the right tools. A thin pry bar that fits between the baseboard and wall is an okay option, but there's an even better one: a trim puller. These are specifically designed to remove baseboards and feature a wider, flatter metal surface than traditional pry bars. This creates a larger contact area, thus reducing the potential for damage while also ensuring the baseboards come off in one piece. The Zenith Trim Puller by Danco is a top-rated option, with 4.8 out of 5 stars on Amazon and a $24.97 price tag. Here's how to use it to get the job done like a pro.
How to use a trim puller for smooth baseboard removal
Of all the handy DIY tips for replacing baseboards, using the right tools is one of the simplest and most effective. Start by scoring along the top and sides of the baseboard with a 25mm utility knife to help loosen it from the wall by cutting across paint and any possible caulking. Using a stud finder and masking tape, mark the location of all the studs, which will show you where the wall is strongest.
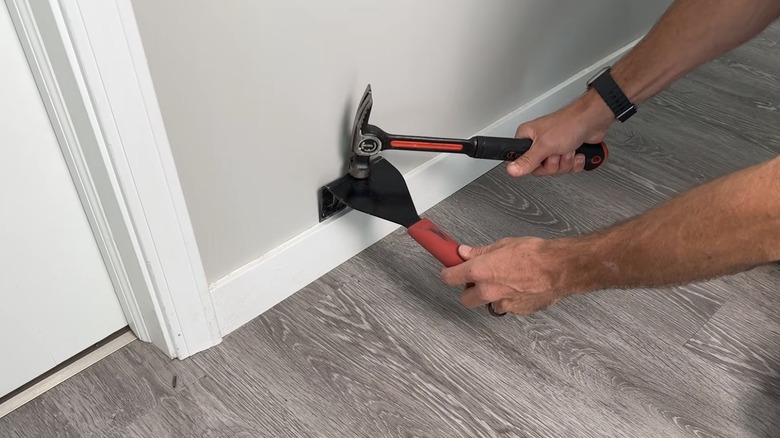
Align the trim puller against the wall where the first stud is and drive it down behind the baseboard by hitting it with a hammer. By starting at the location where the wall is most reinforced, you'll avoid accidentally damaging the drywall. Repeat this process under the next stud, then all along the length of the baseboard as many times as needed to loosen it. Use the utility knife to cut through any pesky sections of caulking, then, once the entire baseboard has been pulled away from the wall, pry the panel off and away with your hand.
Not only does using a specially designed trim puller save time and diminish the chances of damaging paint and drywall, but it can also help you save cash by keeping the baseboard intact. Being able to pull them off in one piece means being able to upcycle them — simply pull out all of the nails, sand, and repaint your baseboards to look brand new, then reattach them with a nail gun, once again following your stud markers.