

Turn Old Frying Pans Into The Cutest Wall Decor For Rustic Kitchens
We may receive a commission on purchases made from links.
Sometimes, you have to say goodbye to an old friend. And sometimes, that old friend is a trusty frying pan. Eventually, even the best pans get grimy, scratched, or lose their nonstick coating. You need to dispose of the old pots and pans correctly, so getting rid of them can be troublesome. It just so happens that the frying pan that once crisped your morning bacon is one of the many common household items you can repurpose into unique DIY home decor. Sending it to your local landfill simply isn't an option.
Crafty YouTuber Evrim Taşer Yılmaz shared a video tutorial that turns an old frying pan into rustic wall decor. As is, it's perfect for anyone wanting to decorate their home with a bohemian style. To get started on this DIY transformation, you'll need a clean, dry frying pan. If you don't have one already, head to your local thrift store or, in a pinch, get a new 8-inch IMUSA Black Nonstick Aluminum Fry Pan for about $13.
You'll also need some matte cream craft paint, a can of Minwax Fast-Drying Clear Satin Polyurethane Spray Finish, a roll of thin jute twine, a roll of thick jute rope, a ball of vanilla-colored yarn, and some flat or patterned burlap ribbon trim. The pan's handle is adorned with artificial flowers — this pack of 60 Ruidkun Small Silk Flowers in fall colors costs about $17 — while the pocket you'll create is filled with a spray of dried wheat stalks. For tools, get a kitchen sponge, some scissors, a hot glue gun, and a lighter.
Wrap the pan in jute twine and weave a pocket for the dried florals
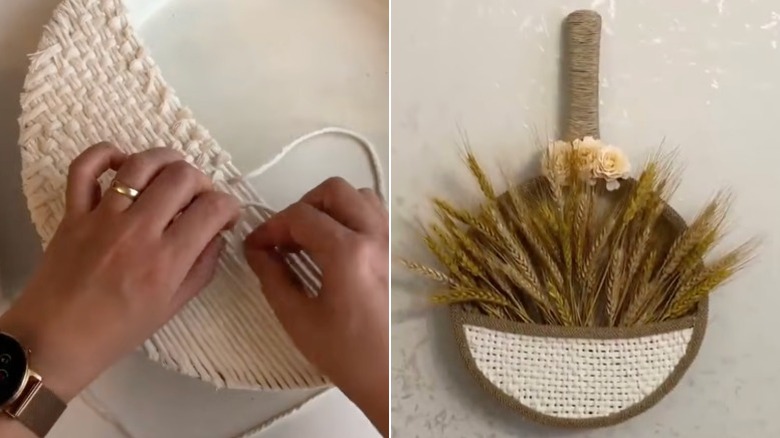
Dilute the paint with water and apply it to the inside of the pan with a sponge. Apply two coats, and when they've dried, spray the pan with varnish. Tightly wrap the handle in jute twine, securing the ends with a few dabs of hot glue. Glue the thick jute rope around the rim of the frying pan and then continue to coil it around the base of the pan until all the metal is hidden under the rope. Use a lighter to carefully singe the rope to remove all the fuzzy bits. You're ready to start the decorative phase.
Set the pan on your work surface with the handle pointing upwards and the interior of the pan facing you. Use your hot glue gun to attach pieces of yarn horizontally across the pan, starting at the halfway point and working down to the base. Each piece of yarn should be about ⅛-inch apart. Trim any loose ends. Weave more yarn vertically through two horizontal pieces of yarn at a time, creating a checkerboard pattern. Eventually, the woven yarn will form a pocket. Once the pocket is complete, finish the edges with the burlap ribbon trim. Attach the flowers to the handle, fill the pocket with dried stalks, and you're done!
While the construction of this project needs to remain the same, the decorative elements are highly customizable. You can easily switch up the colors and materials to fit a specific palette or vibe. For example, if you prefer colorful interior design, pair royal blue twine and sunshine yellow yarn with some black Uxcell Pom Trim and bubbly Dried Billy Balls for the pocket.