

Use Old Litter Containers As A Space-Saving Solution For Growing Strawberries
We may receive a commission on purchases made from links.
While you can grow a whole range of fruiting plants in your garden, they usually come in the form of a shrub, a tree, or a collection of thorny canes. Not so if you want to grow strawberries. These summer-fruiting plants grow in small clumps that can be propagated easily from runners or seeds, depending on the variety. However, to get a crop large enough to use in that delectable dessert you're planning to make for a future family gathering, you'll need quite a few plants.
Again, depending on the variety, one plant can produce up to 1 quart of fruit. This means you'll need about 25 plants to supply enough berries for the average household, and they'll take up a fair amount of space in the ground. YouTuber UpcycledStuff has come up with a clever solution. They converted old kitty litter containers into alternative planters for growing strawberries if you don't have space for a garden bed by simply drilling large holes in the sides.
For this easy DIY, you're going to need one or more empty, large kitty litter buckets, like the lidded, handled containers Purina Tidy Cats Clumping Cat Litter comes in. You also want to grab an electric drill with a 2½-inch hole saw attachment, some wire mesh or landscape fabric, scissors, a black marker, and a can of spray paint. You'll use the wire mesh or landscape fabric to line the inside of the containers so the soil won't fall out of the holes you'll drill into the side. Either option is fine. It's also entirely up to you what color spray paint you use, as long as it's non-toxic, suitable for plastic, and designed for exterior use. Lastly, don't forget to grab a bag of potting mix and some small strawberry plants.
Drill some holes and line the empty kitty litter bucket
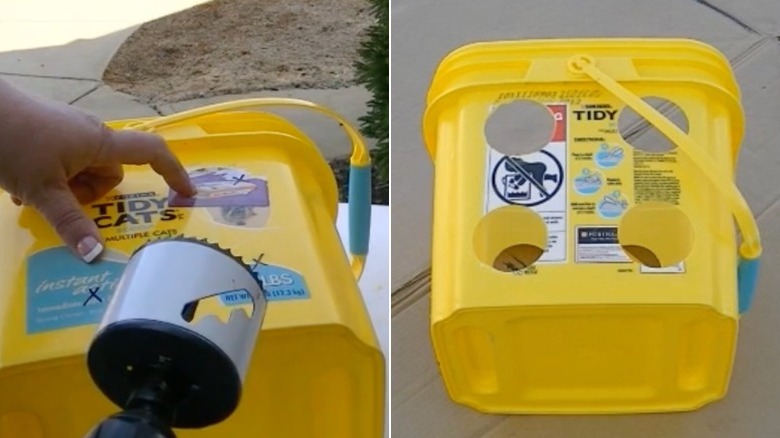
Remove the lids from the kitty litter container, then mark the location of the large planting holes with the black marker. Ideally, try to fit four holes on the two larger sides of the bucket and three on the two smaller sides. Next, grab your drill with a hole saw and create holes where you've marked. Go slowly — getting perfect holes may take a little practice. Once the teeth of the saw sink into the plastic, reverse the drill before pulling the saw out. This will help you achieve clean lines. Don't forget to make a few small holes in the base of the container for drainage. If you wish, sand the edges of all the holes with very fine-grit sandpaper to remove any jagged pieces of plastic.
The next step is to spray paint your buckets. Follow the instructions on the can of paint to pretreat the outsides of the containers so that the paint will adhere to the plastic properly. If the manufacturer advises you to sand glossy surfaces before painting, do so using 1000-grit sandpaper or steel wool. The aim is to remove shine from the plastic rather than heavily scour it. While the paint dries, cut the mesh or landscape fabric to fit inside the bucket, covering all the sides that have large holes. Of course, you'll need to make holes in this liner as well; otherwise, you won't be able to plant your strawberry seedlings. Draw an X in the center of each hole with a white marker — white ink is easier to see on the material. Then remove the landscape fabric or mesh and cut out the X with scissors or a utility knife.
Finish your upcycled planter and start growing strawberries
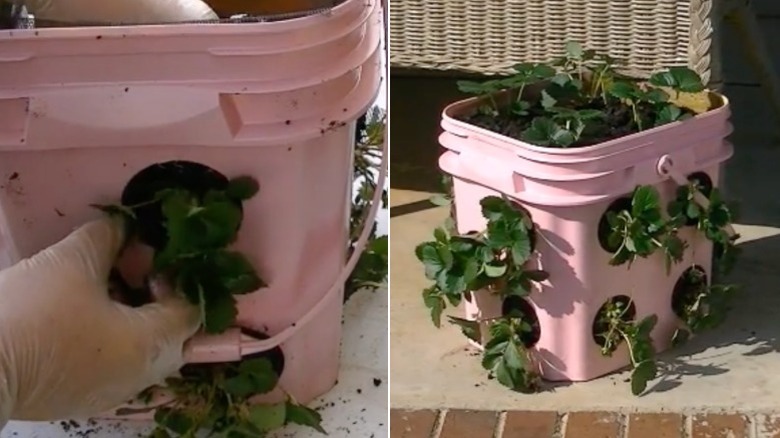
Re-line the kitty litter container with the cut landscape fabric or mesh, carefully lining up the Xs with the holes. If you wish, tape the edges of the fabric to the bucket to help keep it in place while you're adding soil. Then fill the planter with growing medium designed for strawberries, like Perfect Plants Organic Strawberry Potting Soil, and push a strawberry seedling into each hole. Alternatively, make the job a little easier by filling the bucket with potting mix to the lowest hole, pushing plants into those holes, then adding more soil around and above them until you reach the bottom of the next holes. Repeat the process until all the holes are filled, and then add more potting mix to the top of the bucket.
Plant any remaining strawberry seedlings in the soil at the top of the bucket, then give the entire arrangement a deep watering. Now all that's left to do is to find the perfect sunny spot in your backyard for your new planter full of strawberries and watch as the plants start to grow, flower, and, hopefully, produce fruit. Don't forget to follow the essential watering tip for thriving strawberry plants and give them 1 and 2 inches of water a week. Apply liquid fertilizer every three to four weeks, too. Growing strawberry plants in a kitty litter container means they're portable. If temperatures drop, simply pick the planter up and move it to a protected spot. You can even grow strawberries indoors. Here's how to do it: Set the bucket on a tray to catch water drips and place it in the sunniest spot in your home or under some grow lights.