

Gardener Transforms Fence Scrap Into A Beautiful Garden Bed With An Impressive DIY

We may receive a commission on purchases made from links.
If you have an area in your yard in need of sprucing up, adding a wooden raised garden bed that you can fill with flowering plants is an excellent idea. Plus, building the bed is likely easier than you think if you have some spare fence slats ready in the garage or garden shed. Perhaps they're left over from a recent fence build, or maybe they're the old ones you replaced. Either way, it doesn't take a lot of effort to turn the slats into a simple but beautiful raised garden bed, just like the one a clever Hometalk gardener shared in a tutorial on Facebook.
To complete this simple but impressive DIY project, you'll need one pressure-treated, 8-foot-long four-by-four fence post and six fence slats that are 6 feet long. Don't worry if you don't happen to have any fence slats lying around or can't procure some from a neighbor. You should be able to purchase all the wood you need to make this garden bed from your local hardware or timber supply store. A pressure-treated fence post of the required dimensions should set you back just over $18 at Lowe's, while 6-foot flat-top fence pickets are only $2.98 each (also at Lowe's). You'll also need 32 1½-inch-long deck screws, a saw, and an electric drill. If you don't already have a post-hole digger, you might like to get yourself a Tcbwfy Auger Drill Bit. It's a simple drill attachment that efficiently prepares your garden beds by making holes in the ground.
Making your impressive garden bed from fence slats
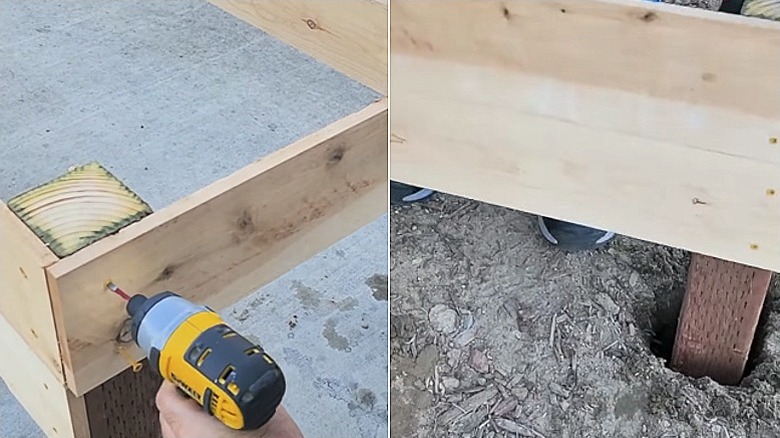
To get started on this DIY garden bed, cut the fence post into four 2-foot-long pieces. You can either use a drop saw or a circular saw for this, depending on which tool you have on hand. You'll insert the bottom half of these posts into the ground, which is why it's important to use pressure-treated lumber for this project. Pressure-treated wood is less likely to decay or get damaged by termites. Next, you want to make the long sides of the bed. Attach each end of the first fence slat to two of the fence posts using the deck screws (two on each side), then attach a second slat below the first. Repeat the process with two more fence slats and posts.
Cut the remaining two fence slats into 30-inch-long pieces and attach them to the shorter sides of the garden bed, making a wooden frame that's open at the bottom. It should be relatively lightweight and easy to move around. You now have to choose between leaving the wooden boards raw and applying paint or stain, depending on the aesthetic you're after. A distressed stain would give the garden bed a rustic look. Alternatively, you could choose a paint color that matches the exterior of your house or nearby landscaping. If you don't have any spare paint on hand, grab a can of Krylon ColorMaxx Spray Paint, which is available in an enormous range of shades. Of course, if you're planning to grow edible plants, make sure the painted wood is safe for garden beds by choosing non-toxic paint.
Getting your new wooden raised garden bed ready for planting
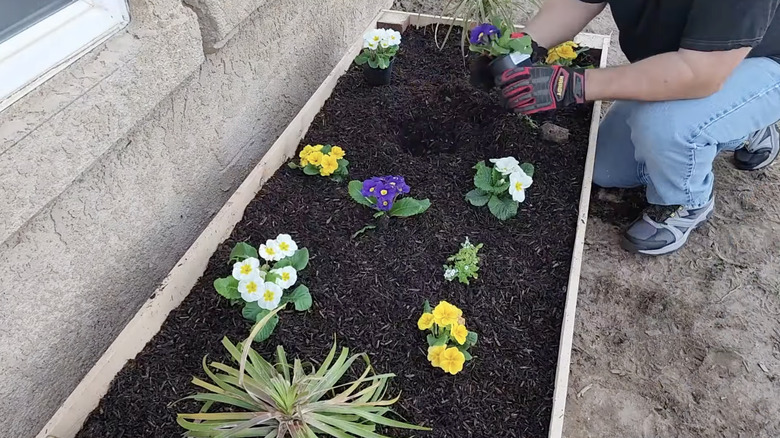
If you decided to finish the timber used in this creative way to repurpose old fence posts around your yard, wait for the paint or stain to dry. Then you can move on to digging the holes for the four posts of your garden bed to slot into. Carry your garden bed to its permanent site and use it as a guide for the location of the post holes. The pressure-treated wood posts should extend for about 12 inches below the fence-slat siding, so you'll need to dig holes that are 12 inches deep to accommodate them. Once the holes are deep enough, simply insert the posts into the holes so that the raised garden bed sits comfortably on the ground without any gaps.
Line the bottom of your new garden bed with some sturdy cardboard or several layers of newspaper to prevent weed growth. For the base layer, which serves mainly as filler, you could just use some soil from your garden or three to four bags of topsoil bought from your local garden center. Next, add some nutrient-rich potting mix or some compost from your backyard compost pile. If you go with the latter option, top off the compost with a little potting mix, which provides a better medium for planting. Your wooden raised garden bed is complete and ready for some colorful flowering plants that are sure to make your backyard look prettier.