

Some DIY Skills Are All You Need To Make The Cutest Fall Wreath In A Pumpkin Shape

You might repurpose parchment paper to make pumpkin decor for fall, or stay traditional by decorating with real pumpkins in a variety of colors. Other projects, like this cute wreath, use simple burlap you might find in your crafting drawer. Thankfully, when it comes to fall, it is hard to have too many pumpkins. By adding embellishments to a simple metal frame, you can bring a little life to your front door or kitchen cabinets. This DIY idea is demonstrated in detail by Hollie Hobbies on YouTube, who uses a wood-burning tool to precisely cut rolls of burlap mesh to create a full pumpkin-shaped wreath.
A pumpkin-shaped metal wreath form, like this Floral Garden Pumpkin Wreath Form, is essential to the success of this DIY. But to turn this drab frame into a cute wreath, you will also need burlap. Instead of basic brown burlap, grab a collection of Chuangdi Rolls of Burlap Mesh, with colors that include orange, green, and yellow. This product is similar to the one used by the creator, which has a width of 10 inches that is used to craft precise burlap "petals." This material also is suitable for either indoor or outdoor display, making this a fun cabinet wreath idea to decorate your kitchen or a cute DIY wreath for your front door.
Remember to select your favorite ribbon and autumn decorative picks to add a little pop to your finished wreath. Also, grab small zip ties and a wood-burning tool, which helps keep the cuts precise and the edges neat. The original creator also uses a bow maker tool to form decorative bows out of ribbon, but you can create yours by hand if you would prefer.
How to turn a bunch of burlap into a rustic wreath for fall
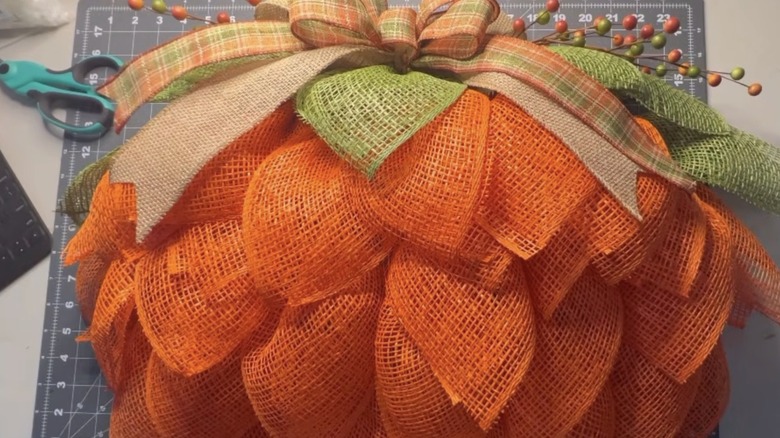
If pumpkin guts aren't your thing, then you will love that this DIY pumpkin craft involves no carving. But you will need to bring a few beginner-friendly DIY skills to the table. First, measure out squares that are 10 inches by 10 inches and cut the rolls of orange burlap mesh with your wood burning tool. Fold these squares in half to form triangles, then pinch the one corner of the triangle to crimp it into a petal shape. These petals are then attached securely to the wreath form using zip ties. The goal is to carefully layer petals on top of the one below to create a bold 3D effect. To make leaves at the top of the pumpkin shape, cut out green burlap and tie near the top at a slight angle. A little bow made out of festive ribbon and some artfully placed fall-themed picks will finish the picture. Attach a few chenille stems to create a basic hanger.
Do not fret if you have never used or owned a wood-burning tool. You can still craft an adorable pumpkin wreath using burlap with a few variations. Instead of 10-inch burlap mesh, take a few rolls of colored burlap ribbon (about 2 ½ inches wide). You will not tie this ribbon onto the wreath form. Instead, cut about 30 inches of burlap, glue the one end to the top, and wrap it around two metal spokes on the frame. Continue across the entire wreath form, then glue on some final decorations, such as faux leaves or ribbon. Whether you create a pumpkin with full burlap "petals" or one with a woven pattern, you will have a fun piece for the fall season.