

Remove Your Old Bathroom Shelf: The Dollar Tree DIY That's Cuter
We may receive a commission on purchases made from links.
For the home designer (or redesigner, as the case may be), shelves for the bathroom can come from the most unlikely of places and be made of unexpected materials. Exhibit A: sourcing supplies from Dollar Tree. While you can, indeed, often find items like mini shelves among the store's wares, smart DIYers like you will pass those by and head straight to the craft section. There, items like wooden trays, craft sticks, and S-hooks are available in abundance. These items are the things that a Dollar Tree bathroom shelf for the counter is quite literally made of, along with some MacGyver-level crafting skills. This DIY organizer is way cuter than most bathroom shelves you can buy. And considering that you'll only spend around $10 and some change on this project, it's likely a better bargain than a ready-made shelf, too.
This small bathroom shelf idea that will maximize your space is the brainchild of YouTuber She So CraftDee. She got most of the basic materials for this project at Dollar Tree. The materials list starts with three wooden trays, similar to these Crafters Square Wood Trays. Add some Crafters Square Jumbo Craft Sticks to your list as well. Once you have those, head over to the garden section and grab two 12-inch Garden Collection Metal Garden Hooks. You won't leave the wooden trays in their natural color for long. Instead, you'll stain them in a hue of your choice. Since this is a small shelf, it represents a good opportunity to use up the last of any stain that's been hanging out in your garage forever. For tools, you'll need a few rags for the stain, a pair of scissors, and a pencil. Finally, grab some adhesive, such as hot glue, for this project.
Constructing your new bathroom shelf from Dollar Tree items
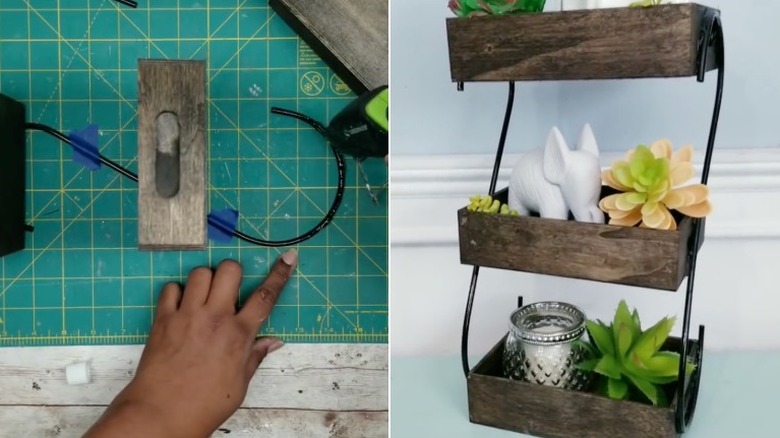
The wooden trays you'll use for this DIY project have a hole on each end — these holes act as handles for the trays. You'll use some trimmed craft sticks to cover these holes; you'll likely need to trim them to fit. Luckily, craft sticks are thin and you should be able to cut them easily with scissors. Once you've shortened the sticks, glue them over the holes on the inside of the trays. Depending on which style of Dollar Tree tray you bought for this DIY, you may need two sticks to cover each hole.
Next, coat the trays with wood stain. At this stage, you can add a cute and useful touch to the shelves with some Duozea Letter Stencils. Use the letters to paint a label on the front of each shelf that indicates its function. For example, one shelf could be labeled with the word "soap." Another could have "makeup" written across its front. You get the idea. Adding stenciled words or pictures gives the shelves a vintage, country, or farmhouse decor vibe and personalizes them for your bathroom.
Once the stain dries, glue an S-hook to each side of the trays-turned-shelves. The S-hooks form the uprights of this multi-tiered bathroom shelf. You may need to use a lot of glue to keep them in place. However, if you're concerned about the S-hooks detaching from the shelves, you could reinforce the glue with some cable clips, like these Abnii Cable Nail Clips. These U-shaped clips fit over electrical cables and are fastened with a small nail. The clips should fit neatly over the S-hooks, helping hold the shelves together. And with that, this nifty item you can use to organize your bathroom is done!