

Woman Transforms Wire And Rope Into A Handmade Storage Basket
We may receive a commission on purchases made from links.
When you're decorating or sprucing up your home, storage baskets probably aren't the first things that come to mind. But when it's time to get organized, they can help cut down on visual clutter and make the most of your space. Instead of buying expensive storage baskets, why not try one of the budget-friendly methods to keep your home organized by making your very own handmade storage baskets? The woman behind the Craft Box YouTube channel did exactly that using wire and rope. The result is a unique basket you can customize to your liking.
This DIY starts with a cardboard base and wire spokes that form the frame for the basket's sides. You'll then weave rope around the wires, make the handles, and add a few decorative touches. So besides the wire and rope, you'll also need cardboard, burlap, and jute twine. For the embellishments (optional), you can get beads and lace ribbon. For tools, grab scissors, wire cutters, a hot glue gun, and a crochet hook.
Before we start building, you may want to prepare some of these supplies. First, cut the steel wire into several short pieces. Alexandra made hers about 4 to 5 inches long, but you can adjust the length depending on how tall you want your basket to be. Next, cut two cardboard circles approximately 8 inches in diameter, or adjust the size depending on how wide you want your basket. Finally, cut two burlap circles slightly larger than the cardboard pieces so you have enough extra fabric to wrap around their edges. Now you're ready to craft your DIY storage basket.
Building your DIY storage basket using wire, rope, and cardboard
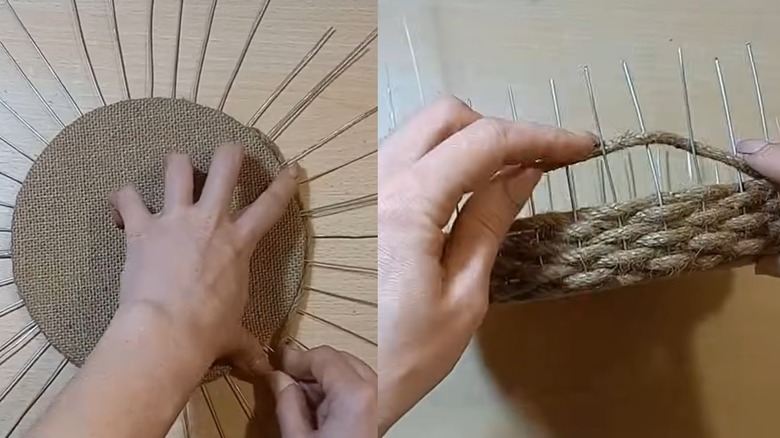
The first step is making the base using cardboard. Cover one side of each cardboard circle with burlap, folding the excess fabric around the edges and securing it with hot glue. You'll then place one of the cardboard circles on a flat surface (wrapped side facing down), then glue the wire pieces flat along the edge such that they point outward like spokes. Space the wires approximately ½ inch apart around the edge of the cardboard. Now place the second cardboard circle on top, with its burlap-covered side facing up and the wires sandwiched between the two pieces. Glue the circles together.
At this point, the DIYer inserted four long wires in between the two cardboards which would later make handles for the basket. These wires should be about two to three times as long as the shorter spoke. Position two longer wires about four spokes apart on one side of the circle, then place the other two in the same arrangement on the opposite side. Secure them between the cardboard layers with glue. Now you can start weaving with the rope. Glue one end of the rope to the cardboard's edge, then weave it around the spokes, going over one wire, under the next, and continuing around the circle. Repeat this and make about three rows to complete the base of the basket.
Next, build the basket's sides by bending the shorter wire spokes upward to form the frame. Keep the wires upright for straight sides, and for a fancy rounded basket, you can curve the wires outward. Continue weaving the rope in and out until the wall is complete. Once you reach the end of the wire spokes, cut the rope and glue the free end securely to avoid unraveling. Then take jute twine and crochet a simple rope which you'll glue all round the rim for a neat finish and to completely cover up the wire ends to avoid any accidental scratches.
Making the handle and other final touches
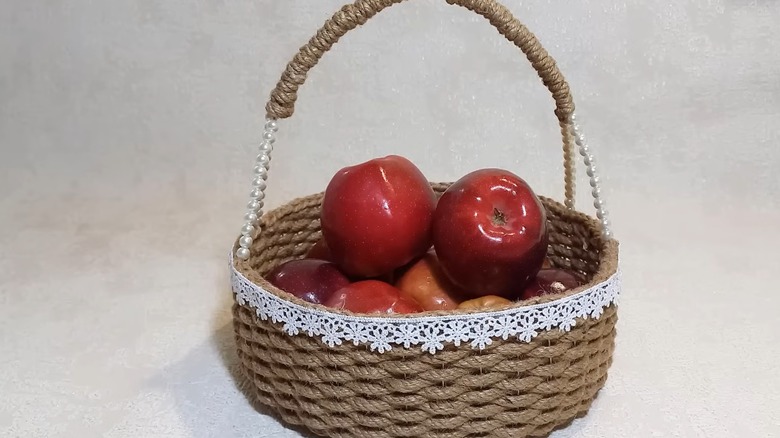
Your DIY storage basket is just about ready. The last bit is fashioning the handles using the long wires still protruding on the basket rim. Thread a few beads until about halfway up each of the four long wires. Now bend the wires toward each other and twist them together at the meeting point to form a curved handle. Finally, wrap rope around the twisted section of each handle, stopping where the beads begin. With that, you have a pretty handle for your basket.
If you're wondering how else to style this basket, attach a lace trim ribbon along the outer edge of the rim. Alexandra used white lace to match the white beads, but you can switch up the colors of both to complement the rest of your room's decor. Jute rope and twine give this basket a beautiful rustic look, but you can swap them for cotton rope like NOANTA Natural Macrame Yarn if you prefer something sleeker. You can even experiment with different colors of the macrame yarn if you like.
Besides decorative customization, consider a variation that increases durability. The cardboard base, for instance, isn't ideal as it will easily break down if the basket gets wet. You can instead use something plastic, like upcycling a plastic lid you no longer use in your kitchen. And, as much as hot glue works for this project, you could also try E6000 for a more durable bond.